
NeoLumn8 Rear Dynamic LED Strip – Step-by-Step Installation Guide

Welcome to a an elite group of cool people that have chosen to add “bling” with class to your car! Remember what your partner tells you… read the instructions first! I strongly encourage you to read through everything as there are good tips those of us who have already installed this. The very first thing to note – don’t pull on wires, pull on the connectors. If you stumbled across this page, go here to find out more about NeoLumn8.
Required Tools:
- Xacto knife | Small Philips screwdriver | Cutters | Pry tool | Silicone | Beverage or chocolate!
Quick Start Overview:
- Remove left trunk cowling
- Test strip with harness
- Run wire through grommet
- Mount strip & controller
- Verify operation

Installation Workflow (suggest watching the video below) :
- Remove the left-side trunk cowling.
- It’s designed to install in the left trunk area with connector confirmed to work on the left tail light. The LED strip wire also runs on the left side. Note – if you will regularly change sequences, consider mounting like this.
- Test the NeoLumn8 first
- Open the controller and connect the 3-pin LED strip connector (it only fits one way).
- Unplug the left tail light harness and connect the NeoLumn8 harness inline.
- With a helper start the car (make sure the lights are on). Confirm NeoLumn8 shows the startup sequence and the green LED blinks on the controller board.
- Press the brakes and ensure NeoLumn8 shows the brake sweep.
- If the controller does not show any activity, the car light sensor may be disabling the running lights. Running lights are the main power source for NeoLumn8. Cover the mirror on the outside of the windshield trick the light sensor to allow the running lights to come on. Or turn the lights on and verify they are on.
- Once confirmed, power everything off, unplug the 3-pin strip connector from the controller and begin installation.
- Mount the NeoLumn8
- Clean all mounting areas (rubbing alcohol works well). Pay particular attention to under the trunk lid as this area can get dirty and have oils build up over time.
- Mount the LED strip by removing the 3M tape. Try to center it, but note that the strip can be shifted in the mounts to adjust later.
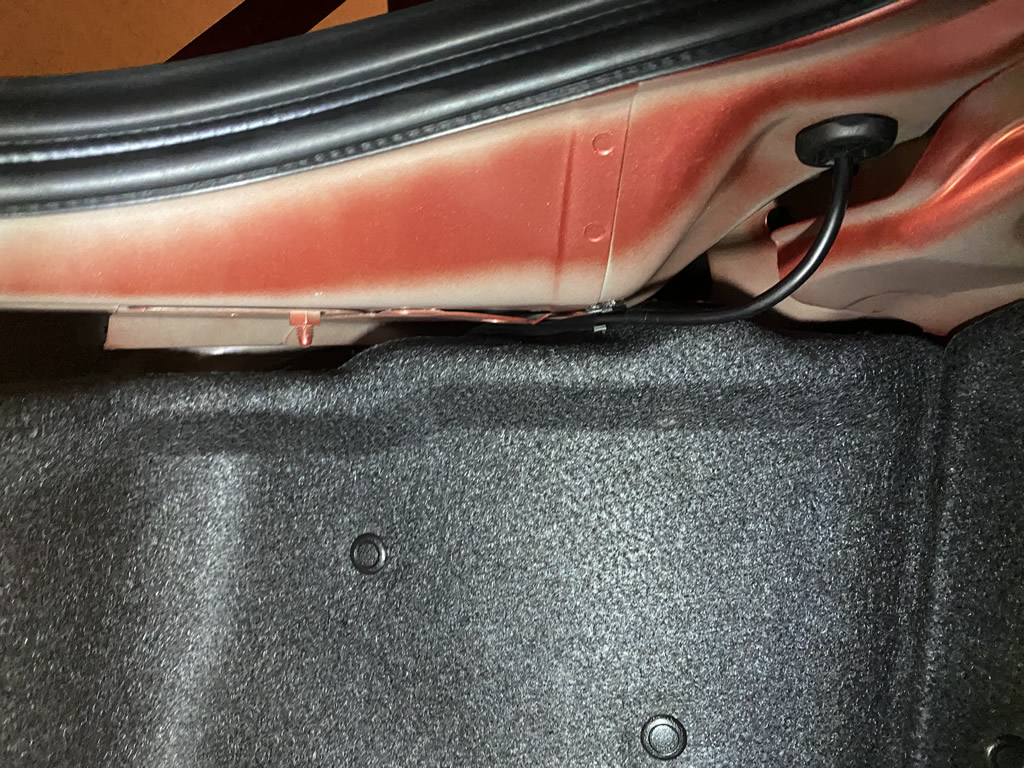
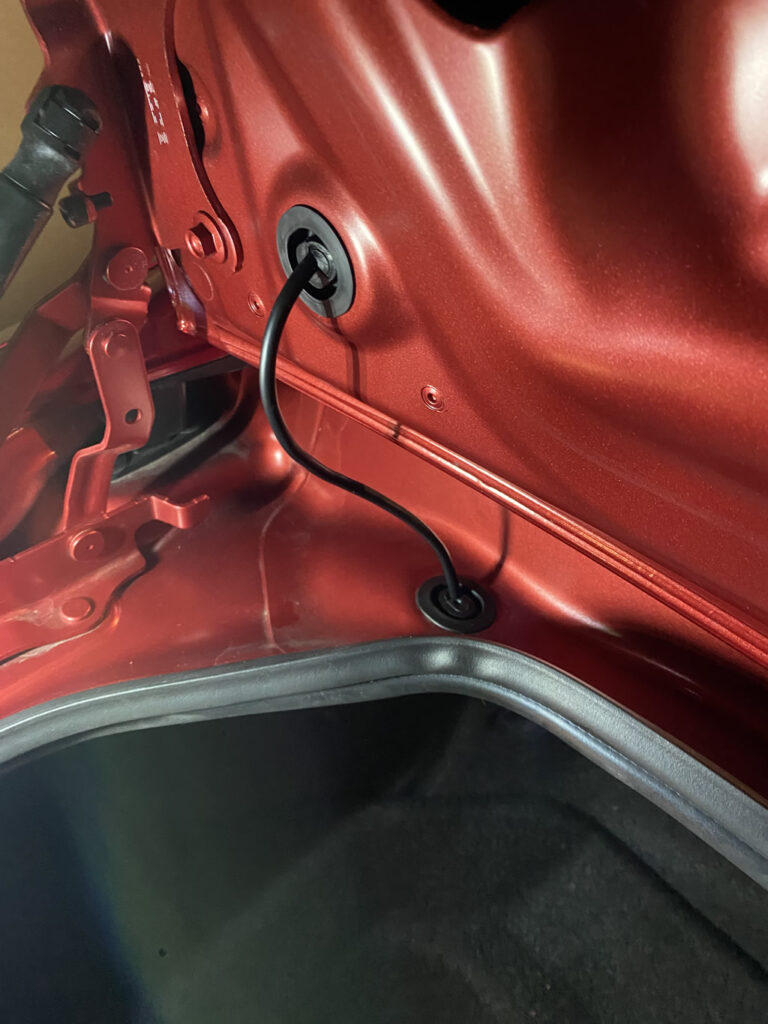
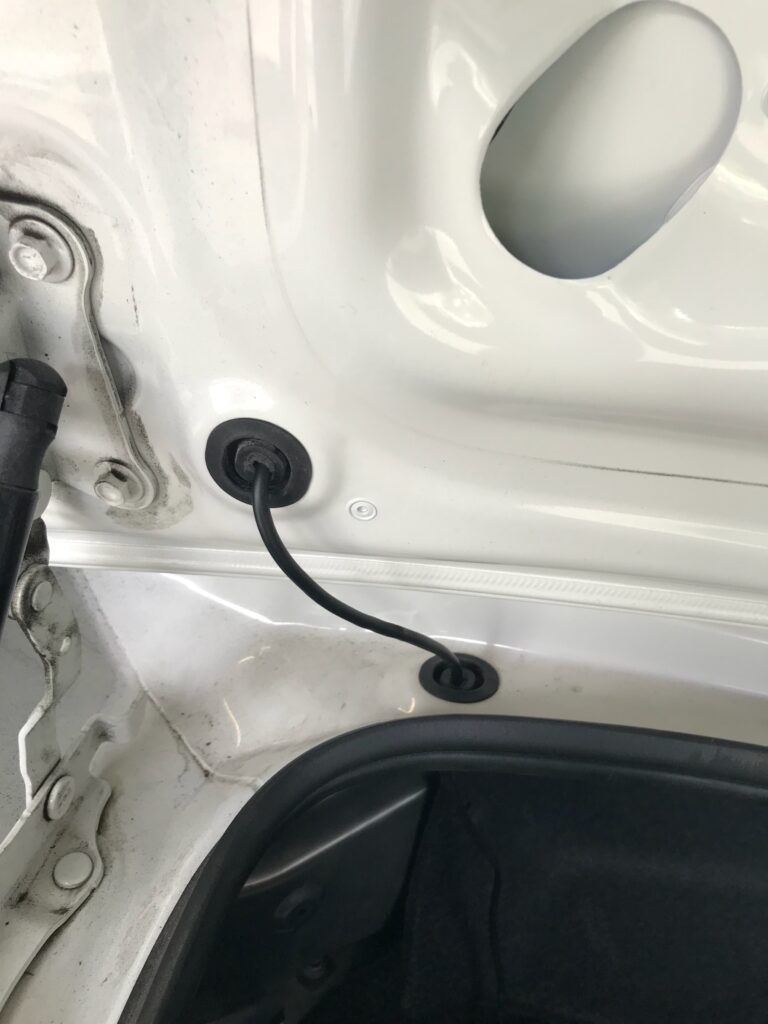
- Run the black LED strip wire through the left grommet into the trunk. Be careful of the connector.
- Seal the grommet with silicone.
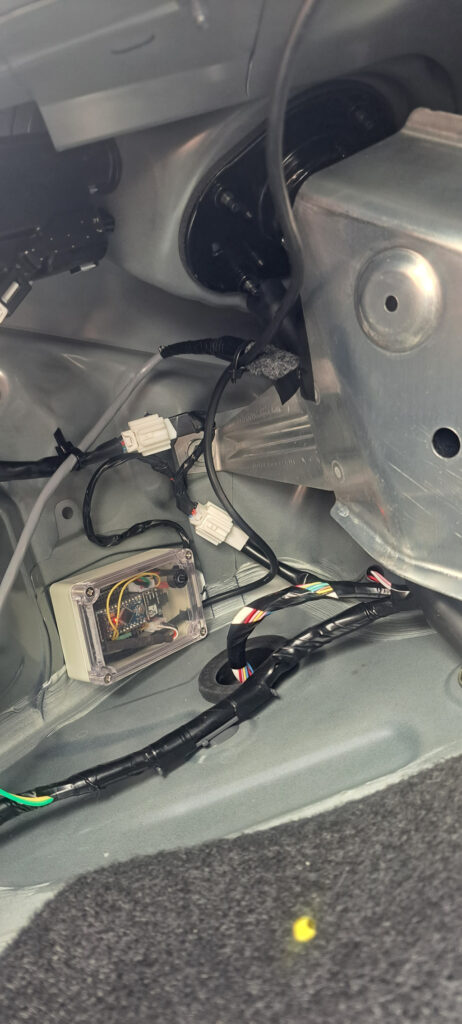
- Mount the controller, considering access to the sequence/brake mode button (there’s space under the upper left area outside the cowling). See sample pictures below.
- Before re-installing the cowling, verify the NeoLumn8 still operates correctly. Make sure you connect the other side of the harness connector to the tail light.
- Post-install check (Important!)
- Since this is a passthrough connector, confirm brake lights, turn signals, and running lights all function properly. This only affects the left tail light.
Good Stuff to Know:
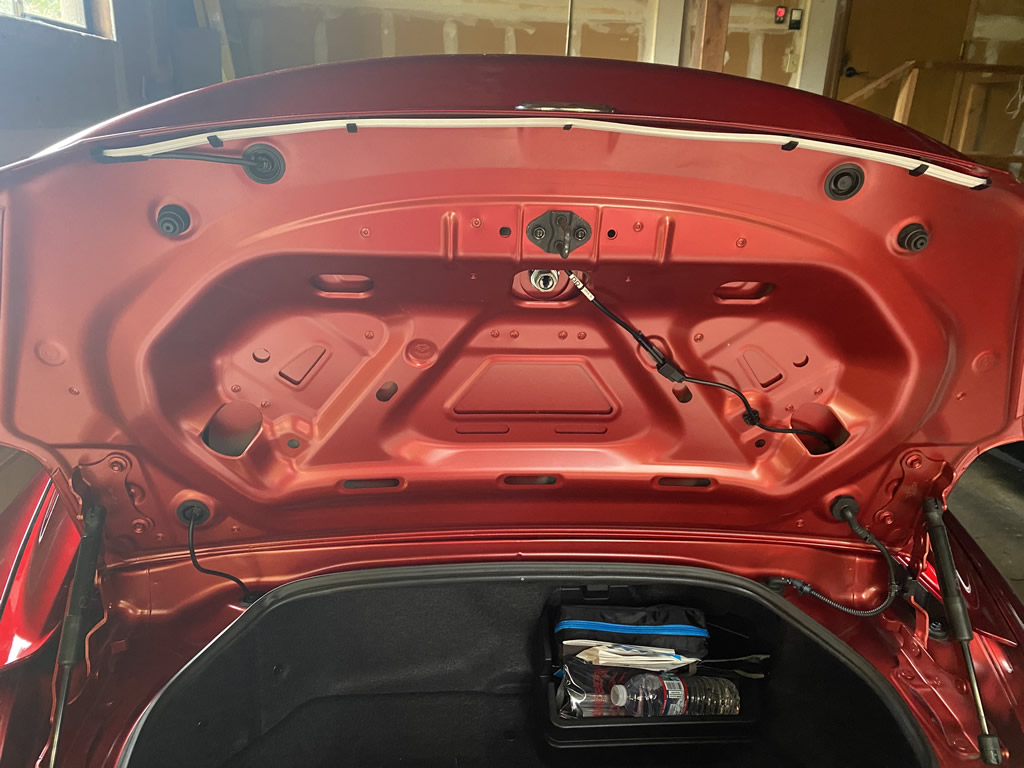
- The NeoLumn8 strip should be installed as high as possible under the trunk lid lip to ensure there is enough room (see pictures at bottom).
- Cold Weather – It’s not a good idea to mount the LED strip in cold weather as the 3M tape may not stick well.
- 3M Backing – there is tape provided on a number of the mounting clips. It’s a bit tricky to get the backing off. Use an hobby knife to get it lifted.
- The LED strip should be installed in the trunk/boot lid, not on the trunk opening (example). That area is directly exposed to water. The LED strip is not guaranteed to be waterproof, but is fully sealed never-the-less.
- Do not bend, or jerk the wire leading into the black housing on the NeoLumn8. Do not bend the LED strip beyond what you saw during packaging.
- To mount the LED strip, the side with the wire coming out goes on the left, and the 3M mounts secure to the upper inside of the trunk lid. Pay attention the strip has a translucent-white section where the light shines out. That must be facing down (when trunk closed). Mounting clips have been pre-installed to make this easier to follow.
- There are both large and small mounting clips. The large ones are 3D printed and pre-installed on the strip, The small ones are for the strip wiring.
- You will need to cut a small slot in the 2 black grommets in the trunk lid and back upper trunk area to run the strip wire through. Cut in the center (raised) area of the grommet. Be sure to seal them after completion – particularly the one that sits at the top side (near the rear window). I used Goop for this. Silicone may work as well, but not tested.
Connector Harness Mounting:
- The harness is plug-and-play and creates an inline connection between the rear tail light for NeoLumn8. You will find the vehicle rear light harness behind the cowling on the lower left side where the wires run to the left brake light unit. See installation video.
Controller Mounting Options:
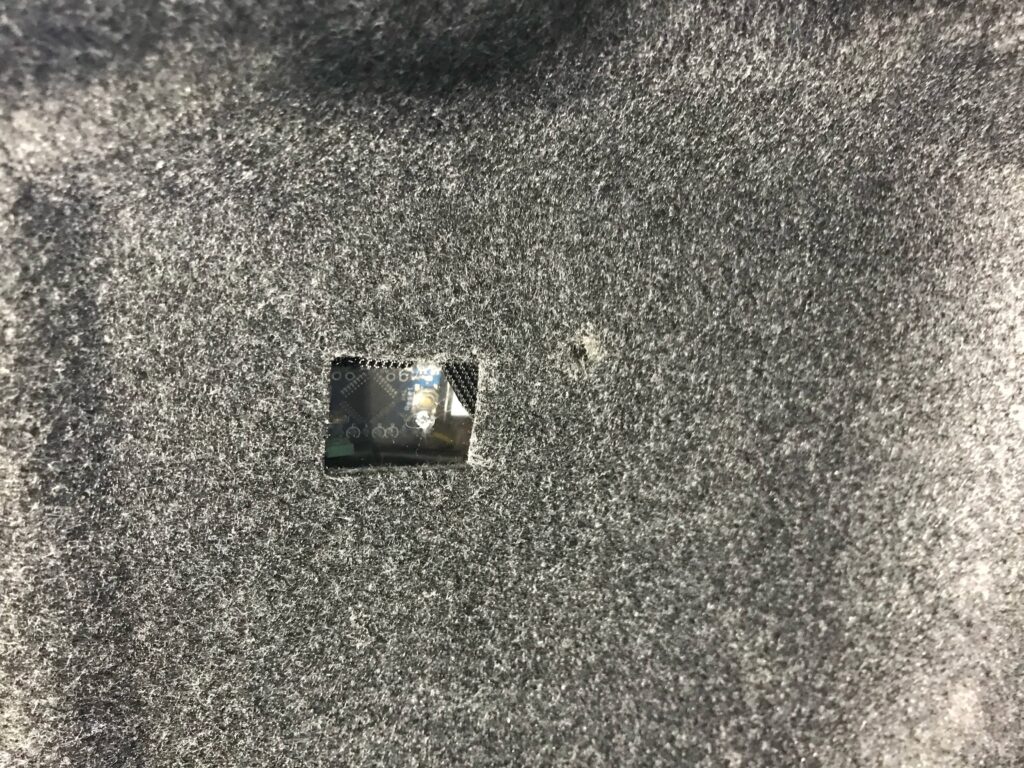
- If you plan on regularly changing modes, then you will need access to the controller as it has the mode button on top. There are a number of spots that it can be mounted on the upper inside of the trunk area near the back. It may be possible that it can be affixed to the black liner via velcro. Also see the below installation video for ideas. You can also mount it behind the cowling (per the video) and cut a small hole through it to access the Mode Button. See customer picture below (he cut a hole in the cowling).
Important Notes:
- Do not pull on any wires. Only pull by the connectors. Do not force anything beyond reasonable means.
- This device was developed to support the hardware components including the LED strip as provided. Modification of any sort is not supported and could cause failure of the device or damage to your vehicle. You do so at your own risk.
- Power (12V) should only be applied via the harness connector provide. It converts 12V to 5V for all the internal components.
- The wiring running out of the NeoLumn8 with the black cover/cap is fragile. Do not pull/force or bend this or the wire immediately exiting the back cover. Do not fold the LED strip. It is flexible, not foldable 😉
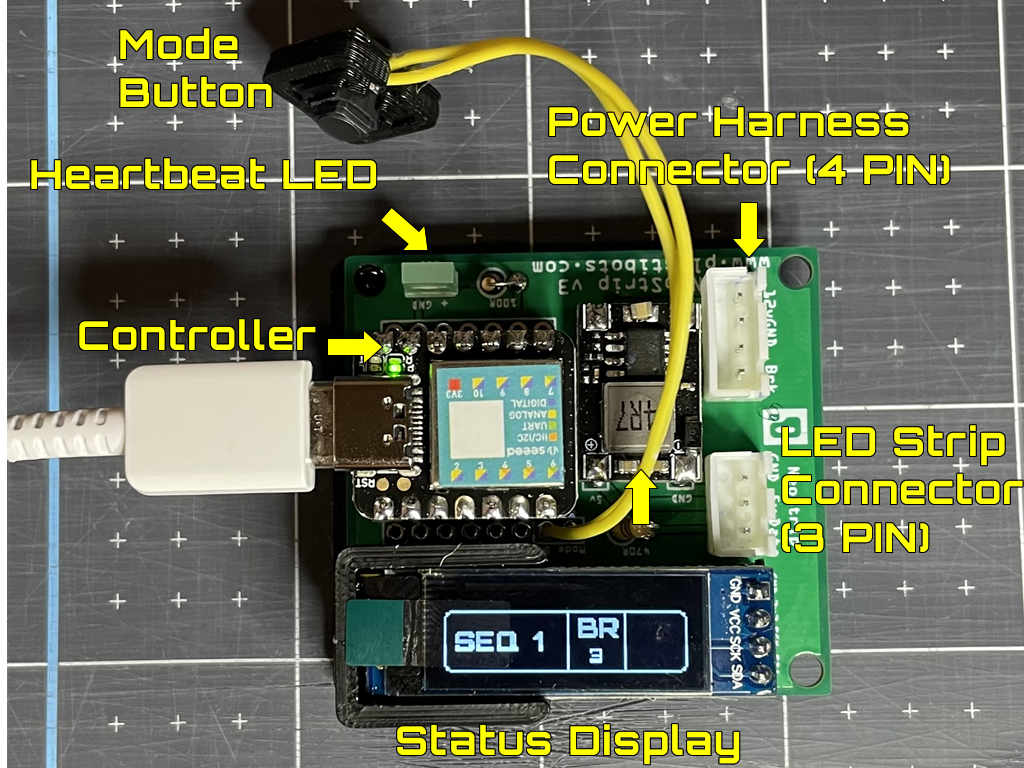
V3 Controller
V3: Samples of NeoLumn8 sequences:
V3 Usage and Sequence Demo:
Customer Installation Pictures:


NeoLumn8 Installation Instructions – Prior to V3


Comments: