
DominoBot
It had been a few months since I built my last robot (Climber). During the early summer of 2002, I received an email from Syngress. 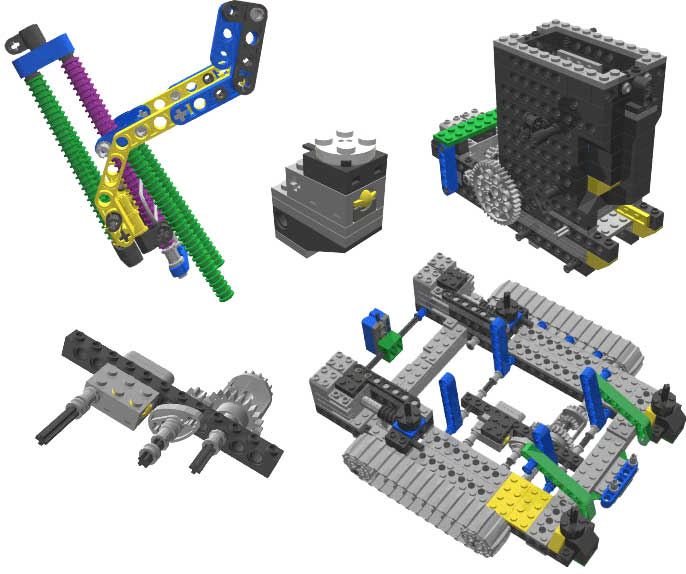
They had indicated that they were going to create a series of “10 Cool Lego Mindstorms Robots….” books, and invited me to produce a model for one of them. For some time I had the idea of building a robot that could mimic the activity of laying down dominos on a pre-determined path. It was the perfect opportunity and hence DominoBot was born… Given that I was in the midst of assisting with wedding plans, and moving our business, I had a busy summer already. But, I was not going to pass up this challenge. This is something that I had hope for since I began building Technic creations in my young days.
Update: View my NXT version of DominoBot.
[ad name=”GoogleAS728x90″]
One thing that I am not very good at is laying out my ideas on paper before jumping into building them. This project would be a catalyst to change this. DominoBot would require some careful planning as I was limited to the parts supplied in the RIS 2.0 and UBS sets of the Mindstorms series. I also had a new challenge. I would have to learn how to use LDRAW, LPUB, MLCAD, POV, EMACS, RUBBERBELT and a variety of other software packages to bring DominoBot to life on the screen in the digital realm. One of the requirements of this project was that the contributors would produce their model in a fashion similar to the building instructions you receive when you buy a Lego set. The book, “10 Cool Lego Mindstorms Ultimate Builders Projects” contains building instructions for DominoBot as well as 9 other models by other great Lego builders. Given that I am a contributor to this book, I will say that yes I am being biased here, but it is a well laid out and easy to follow book with some interesting robots. (more about this in my Review section).
Without giving away too much, DominoBot consists of sub-sections that are built seperately and the combined into the final model. The biggest challenge that I faced was using three motors to drive, steer, and lay the dominos. I met that challenge with the Loader mechanism (seen below), which has the ability of dispensing and placing each domino with one motor and sensor.
[ad name=”GoogleAS728x90″]
The Loader Arm was the most difficult to design. I had to find a way to carefully place each domino. This required a mechanish that was flexible so that it would allow a domino which is not standard in terms of Lego sizes to slide down a path and fall standing. The mechanism also had to ensure that it did not knock the domino over after it raised itself to get ready for the next domino. After 6 designs using bricks and pins, I decided to try something with flex-tubes. This proved to be a wise move, and hence the design you see below.
 T
T
he Distance Sensor enables DominoBot to place each domino a specific distance apart even while turning. The mechanism goes between the left and right drive systems. It connects them via a differential. Its purpose is to on trigger the touch sensor when both drive systems are moving forward. If either side is going the opposite way (turning), the cam gear sits idle until the robot is driving foward again. In the NQC code, the sensor was set-up as a PULSE sensor. The function will track the number of triggers and dispense a domino with every 3 pulses.

Below is the Loader touch sensor. Its job is to detect when a domino is being dispensed as well as when the Loader has reset itself and has another domino ready. For more information on DominoBot, I am afraid you will have to buy the book (above right).
[ad name=”GoogleAS728x90″]
Below is the base drive unit of DominoBot. It shows both drive sides as well as the Distance Sensor.
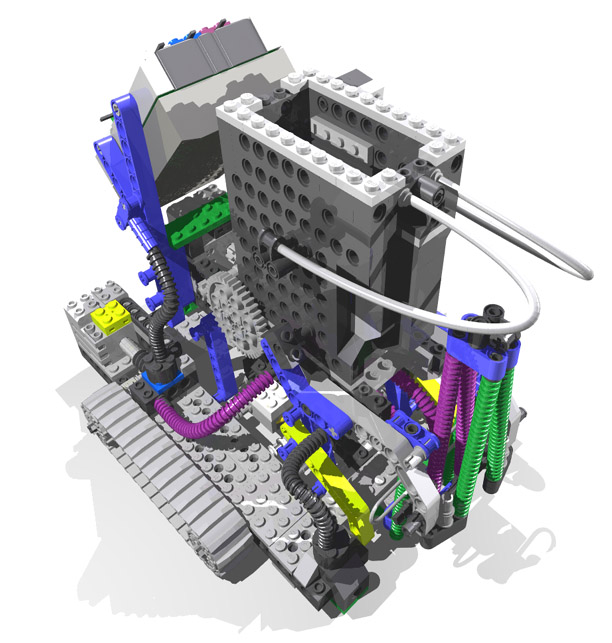
Playing with rendering…
![]()
Rate This Post:  (1 votes, average: 5.00 out of 5)
![]() Loading...
Loading...
Code: Domino_new.NQC

Comments: