
How To: TFT LCD with TouchUI on Raspberry Pi OctoPi Rig
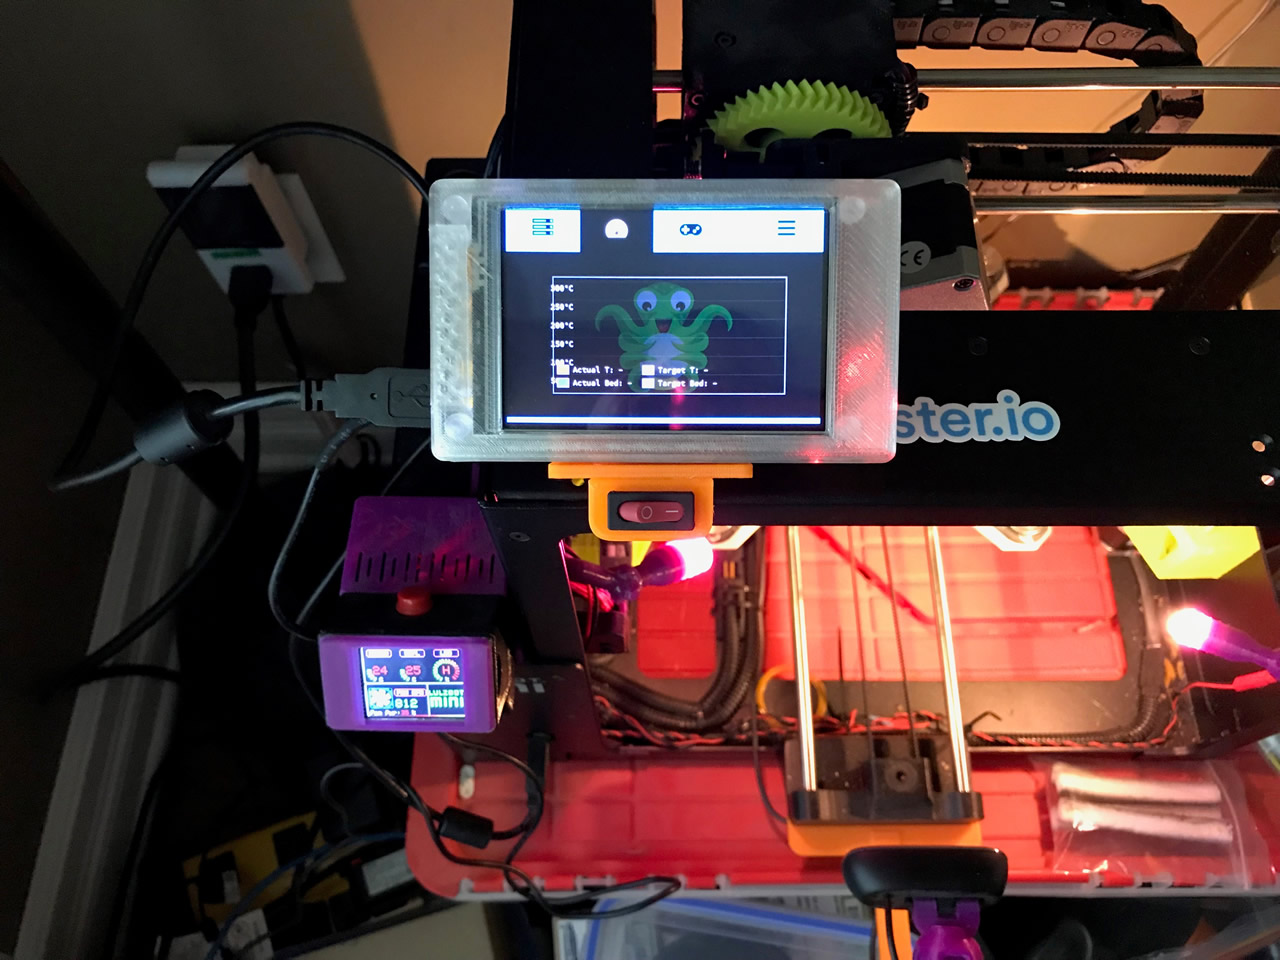
I recently ventured into adding a 3.5″ TFT to my LulzBot Mini. I already have OctoPrint running, but there are times (usually during filament failure events) I need to directly control the printer (heat the filament, move axis motors etc). After 3 painful days of messing around with different tutorials, I finally figured it out and it works dammit! I haven’t found a single source that has all steps in one place, so I decided to do a mashup of instructions based on my experience. There are others that deserve credit here – I simply brought together the steps for this specific TFT.
As most would have done, I started with the easy route trying to get it working. In this case, I attempted the Adafruit tutorial – no go. I also tried other methods using the LCD-show driver and others. After hours of tinkering, it was still a fail. I almost got there, except the X/Y axis were flipped and it had calibration issues. One of other problems was the amount of software updates these other approaches called for. I wanted a vanilla OctoPrint setup that started with a clean install and added the TFT from there with limited extra fluff. So, here’s hoping I’ve saved you days worth of work. if this works for you, consider supporting this blog by dropping me a few coins below. You can also check out the 3D printed parts. Find out more about the LED / fan controller (shown in pic above in purple)
Update Dec 2018: BillyBlaze, creator of TouchUI, has created an install helper that may make this even easier.
Before we get into the weeds a few important notes:
- The purpose here is to to demonstrate an end-to-end setup for an OctoPi rig with TouchUI on a TFT for a 3D printer (in this case a LulzBot Mini). It may work for other TFTs too.
- Also, if you are just looking to load the LCD drives, this step can be used to get it working for the Banggood TFT. It will get you to the CLI.
- Follow the steps closely and don’t ignore or jump around steps. I am guilty of this myself and it has messed me up on more than one ocassion!
- This may work for other 3.5″ TFT’s (i.e. Waveshare), but no guarantee.
What you need:
- Banggood 3.5 TFT LCD
- A Raspberry Pi. They say it works with Pi 3 Model B RPI 2B B+. (I have the RPi 2 Model B v1.1)
- A 3D printer would help. 😉
- OctoPrint software and others noted below.
- Putty terminal software (for SSH access to your Pi)
Steps:
- Total time to get this done should be <30 mins. Some of that is waiting for software to download / install.
- OctoPrint: Download OctoPi https://octoprint.org/download/
- Using Win32DiskImager or similar, follow steps to image it to the SD card.
- Then insert into your Pi, power it up and get it on your network. In my case, I use a LAN, so I didn’t configure the WiFi settings.
- Log into OctoPrint via your browser. http://octopi.local should work. Else, use your router to find the IP address. Follow the wizard to configure the setup of your printer and settings.
- Follow steps to install the TouchUI plugin here. I suggest the manual install via URL.
- Now open Putty and login to your Pi. (Tip: Default Raspberry Pi login is U:pi P:raspberry). Suggest you change that later.
- Tip: For all commands in the links below, you can copy them, then in Putty right click and it will drop the command into the CLI for you. Saves lots of typing and errors.
- 3.5 TFT driver: Install the 3.5 TFT driver, follow steps here: https://www.elecrow.com/wiki/index.php?title=3.5_Inch_480x320_TFT_Display_with_Touch_Screen_for_Raspberry_Pi
-
- Also created as a PDF.
- Don’t do step 1 or 2 as you have installed the OctoPi image already.
- Using Putty, login to the Pi using the IP address or octopi.local port 22. Start with Step 3, then do Step 4. Lots of installation will happen. You will be asked to confirm install at some point too.
- After the install is done, it will reboot. If it doesn’t enter sudo reboot.
- After the restart you should see the CLI. It should end with “OctoPi login”.
-
- Log back into your Pi via Putty. Run commands under Touch Screen Calibration. You wont have the option to do the calibration as this is an OctoPi install. Not sure this step was really needed.
- Reboot by entering sudo reboot in Putty.
- Run sudo apt-get update for good measure.
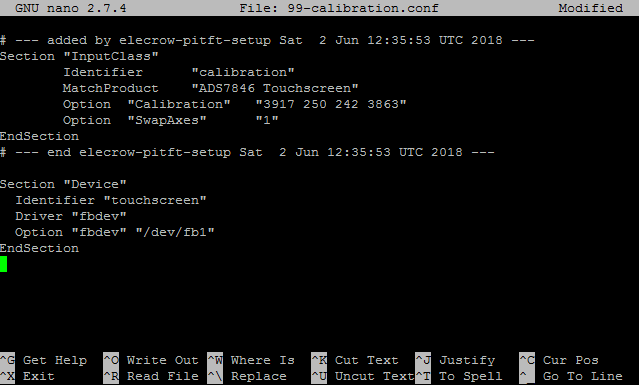
- Run the command sudo nano /etc/X11/xorg.conf.d/99-calibration.conf
- You should see the below details already in there: If not reboot the device and try again. If it still fails, something went wrong in a prior step and the TFT did not get configured correctly.
# — added by elecrow-pitft-setup Sat 2 Jun 12:35:53 UTC 2018 —
Section “InputClass”
Identifier “calibration”
MatchProduct “ADS7846 Touchscreen”
Option “Calibration” “3917 250 242 3863”
Option “SwapAxes” “1”
EndSection# — end elecrow-pitft-setup Sat 2 Jun 12:35:53 UTC 2018 —
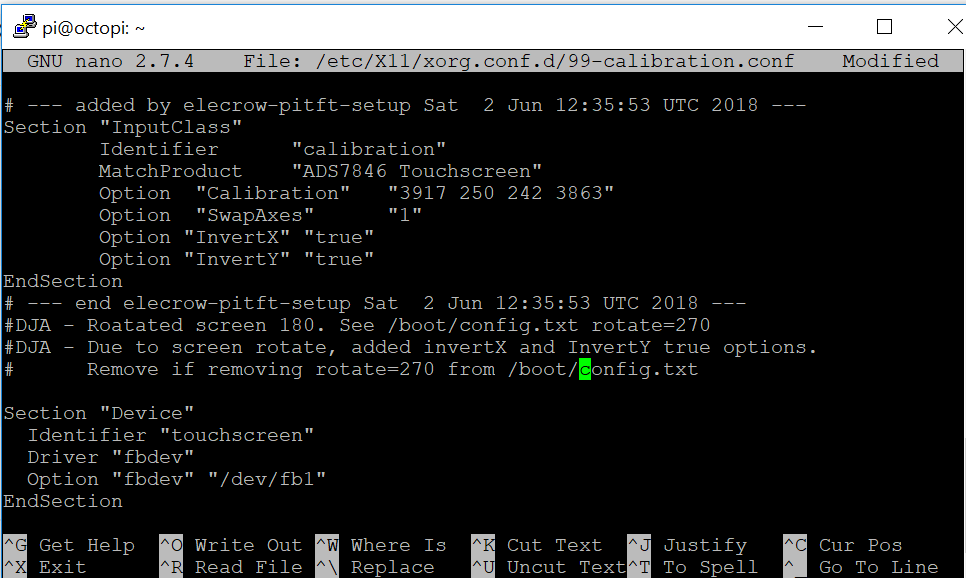
- Add the following lines to it. Important: make sure you double-check the quotes after pasting the content. It should look like below. Note – if you copy the text below, it may not work correctly. Be sure to drop it into Notepad++ first and verify the quotes are as shown. If it is not working, it’s likely because of some odd formatting with WordPress and the “. I suggest typing the quotes right within Nano to ensure they are encoded correctly.
Section “Device”
Identifier “touchscreen”
Driver “fbdev”
Option “fbdev” “/dev/fb1”
EndSection
It should look like below. When done. Hit CTRL+O, then hit Enter to save, then CTRL_X to exit.
14. Reboot the Pi. You should see the CLI scrolling text on the TFT by now? If it doesn’t work, edit the file above and change fb1 to fb0. See if that works. Else change it back to fb0.
15. Boot to TouchUI: Go to https://github.com/BillyBlaze/OctoPrint-TouchUI/wiki/Setup:-Boot-to-Browser-(OctoPi-or-Jessie-Light). PDF here.
Follow steps as noted on the page:
- Step 1: This would have ben done when installint OctoPi
- Step 2: Done per #2.
- Step 3: Done already in prior step. (sudo apt-get update)
- Step 4: Do this as it needs Chromium.
- Step 5: DO NOT RUN THIS STEP as your screen should already be showing you the CLI with content streaming.
- Step 6: Run this step. If it fails, you can ignore it.
- Step 7: Run this step.
- Step 8: Run these commands. Tip! Copy the commands, then right click in your SSH console (I use Putty) and it will paste and execute each. Don’t forget to press Enter after the last one though.
- Step 9: Run if you want. I got an error but it still worked. >> Warning Cannot Open Display
- Step 10: Reboot the device. After it cycles through the CLI commands you should see a cursor, then blank screen, then after a bit it will start loading TouchUI. Voila! Enjoy
Rotating the Screen:
The default setup has TouchUI oriented in such a way that the USB power cable is on the bottom and all USB/LAN ports on the right. In my case this is an issue as I want to mount the unit on the top left of my printer. In order to flip the screen, it’s a pretty straight forward mod with 2 key steps required.
Config.txt: Modify the /boot/config.txt file. Add rotate=270 to the 2nd config line item. Yup, that’s not a typo. 180 didn’t work for me:
# — added by elecrow-pitft-setup Sat 2 Jun 12:35:53 UTC 2018 —
hdmi_force_hotplug=1
dtoverlay=ads7846,cs=1,penirq=17,penirq_pull=2,speed=1000000,keep_vref_on=1,swa$
dtoverlay=elecrow35a,rotate=270,speed=22000000,fps=60
# — end elecrow-pitft-setup Sat 2 Jun 12:35:53 UTC 2018 —
99-calibration.conf : Just 2 lines are needed:
Option "InvertX" "true"
Option "InvertY" "true"
It should look like the following. When done, reboot the Pi and the touch interface should be correct.:
Support:
I use the funds to support my blog an projects I take on. I strive to document and share what I do so others can re-create themselves. Assuming it worked for you, and save your days of hair pulling, how about a small donation of $5? It’s a cup of coffee. Not even a Latte at Starbucks these days. 😉 You can support either via Ko-Fi or PayPal links below. Thanks!
Background research materials and credits:
Credit goes to the folks that put together the various instruction sets. My role was to bring them together to work for an OctoPi setup and this specific TFT with Touch UI.
- https://octoprint.org/download/
- https://github.com/BillyBlaze/OctoPrint-TouchUI
- https://www.elecrow.com/wiki/index.php?title=3.5_Inch_480x320_TFT_Display_with_Touch_Screen_for_Raspberry_Pi
- https://github.com/BillyBlaze/OctoPrint-TouchUI/wiki/Setup:-Boot-to-Browser-(OctoPi-or-Jessie-Light)
- https://www.raspberrypi.org/documentation/configuration/raspi-config.md use sudo raspi-config
Other references used with prior config attempts:
- https://github.com/goodtft/LCD-show – note this one worked to get to CLI but screen rotation was messed up. It may work as well but with contents of file as is in step 11.
- https://github.com/BillyBlaze/OctoPrint-TouchUI/wiki/Configuration
- https://github.com/BillyBlaze/OctoPrint-TouchUI/wiki/Setup:-Troubleshooting#boots-to-blackscreen

Excellent guide, just one comment. When you copy and insert this part of the text in nano the quotes are wrong. They should be like this ” and not like that “”. With this little detail wrong, you will get to the CLI but no TouchUI. Just replace all the quotes for the right one and everything will be allright.
Section “Device”
Identifier “touchscreen”
Driver “fbdev”
Option “fbdev” “/dev/fb1”
EndSection
Unclear what you mean as it does not add any additional quotes when I copy/paste mine. That said, I added a comment to warn others.
This is my go-to guide and is almost cut and paste the whole way through. Great job! I think what Hans is referring to is that you have quotes in your article that are at an angle (opening/closing quotes) such as: \\ //
However, they should be straight quotes such as: || ||
Maybe it is an automatic formatting in WordPress that is changing it?
Yes. I provided a note a while back on this based on Hans’ note. Seems it’s not being noticed. Time to bold and mark it red! 🙂
I followed to the steps i’m seeing the CLI with content streaming on the touch screen but I cant get it to boot to browser. The only thing I had a problem with is the 99-calibration.conf file wasn’t being created.
Hmmm.. That’s a problem as I’m pretty sure you need that file. Not sure what to say as that step worked for me. Wondering if there are permission issues with your setup?
I have the exact same problem, maybe a newer version of octopi doesn’t work with this guide?
maybe a dumb question, but how does the touch without stylus work/feel. is it usable?
It’s difficult without the stylus. The resistive screen feels like it has an air gap so you have to be specific when touching. I always use the stylus, so it doesn’t really bug me.
Did you get this to work on stretch or was it Jessie?
Standard OctoPi install based on their website. Think that’s Jessie.
Thanks for this nice guide!
But i found out, there are two little errors. First: in step 13. “Run the command sudo nano /ect/X11/xorg.conf.d/99-calibration.conf” you have to change ect to etc – thats the correct path. And the second: Hans told it in the first replay – the typos from step 15 are in a wrong format when you copy-paste the lines and insert them in the config file.
After these changes everything worked fine (newest Octopi image 0.15.1 and Touchscreen 3,5″ from banggood).
Greets Emanuel
Thanks for the catch. Fixed to “etc”. Per the second comment on quotes, not sure I can change this as this is copied from what was entered. Not even sure why it’s creating 2 “” as suggested. I suggest if someone is going to copy from this page, to first paste in Notepad++ to ensure the quotes are correct, then drop into Nano. I’ll add a note to that section to warn users to check the quotes.
Gah… I’m at my wits end… I have tried every permutation of quotes.. installed reinstalled… re re installed double triple checked everything… still getting CLI on boot. grrrrrrr so aggravated… The only anomlay I can find is that when I run… ls /dev | grep fb it keeps saying 0 instead of 1… any help? I’m so sick of typing in putty…
Sorry, I’m not a Linux expert. For what it’s worth, make sure you type out the syntax in Nano (don’t copy and paste from my blog content). I’ve heard some say that quotes get messed up when pasting in Nano.
Section “Device”
Identifier “touchscreen”
Driver “fbdev”
Option “fbdev” “/dev/fb1”
EndSection
Hi Dave,
After struggeling a while setting up the “Touch UI” in OctoPrint on a cheap 480×320 TFT display, I stumbled upon your excellent explanation. It helped me out straigth away.
In my Thiniverse design for a “Touch UI” enclosure I’ve included a link to this page. (https://www.thingiverse.com/thing:3263410). It could bring some traffic your way 😉
Best regards,
Rob
Hi Dave,
After struggeling a while setting up the “Touch UI” in OctoPrint on the cheap 480×320 TFT display, I stumbled upon your excellent explanation. It helped me out straigth away.
In my Thiniverse dein for a “Touch UI”enclosure I’ve included a link to this page. (https://www.thingiverse.com/thing:3263410). It could bring some traffic your way 😉
Best regards,
Rob
Good to hear. Thanks Rob.
Hi Dave,
Creator of TouchUI here, thanks for your detailed tutorial. Since a few weeks TouchUI now has an install helper, that would make the manual steps of TouchUI obsolete. Could you incorporate these new steps? Also could you let TouchUI setup the FB setup for Xserver? since the installer will resolve the FB automaticlly and make sure the right quotation is used.
Also the reason to use the install helper is to configure TouchUI on localhost to automatically login as an user since the new ForceLogin plugin in OctoPrint will not show TouchUI until an user is logged in.
Hi Dave.
Thank you very much for this excellent guide!
I mannaged to make it to work, but I only have one problem.
When I power up the RPI and it´s going into the login screen I can´t get the soft keyboard to show up.
I then need to connect USB keyboard so I can type in the credentials
When logged in, the soft keyboard do show up when needed.
Do you have any suggestion to what can cause this?
Thanks in advance.
Best regards
Jens
Hi Jens,
Sorry, I haven’t run across this issue before, so not sure.
Ok, thanks. I think I will start over again.
You can deactivate the ForceLogin plugin to get into the touch ui as read-only user. There the soft keyboard will work to login.
To boot directly into my admin user account I had to run following command with putty:
sudo ~/TouchUI-autostart/helpers/install
there you can select the auto login user name.
This seems very inspiring to me.
thanks!This article is very helpful for my project implementation.
Is this for connecting the touch screen directly to the Pi that is running Octoprint? I’m a little confused.
Yup. Read up on TouchUI. Just provides a similar (small screen) interface to OctoPi for when you are in front of the printer. I use it because my other devices are not close to the printer. I could bring my tablet close by but this provides a direct (on the printer) access to controls.
Hey me again! I took a brake from this project for a few months but I came back! This time I have gotten to the point where it will boot into TouchUI on the screen and auto login to it but now the touch part of the screen will not work! I can use a mouse to navigate the UI on the screen but I cant get the touch part of the touchscreen to respond. Do you have any idea how I could maybe reinstall just the touch part of the driver maybe?
Hmm.. Not sure. I suggest checking some of the links I provided as there may be reference to others having a similar issue. Or search for specific issues related to enabling touch features for the Pi as this would be more generic and not specific to TouchUI I think.
Above instructions didn’t work for me with latest octopi 0.16.0. I was unable to calibrate the screen (point 10). I was getting “Unable to connect to X server” error after invoking “DISPLAY=:0.0 xinput_calibrator”. You have to boot to browser: https://github.com/BillyBlaze/OctoPrint-TouchUI/wiki/Setup:-Boot-to-Browser. Then calibration command will work.
Hello,
Thank you very much for this manual!! It helped me to a working octipi with TouchUi. I had been at it for quite some time. I have a slightly different 3,5 inch screen and was unable to get it working. I eventually used the drivers from your screen. I know a risk, but pinouts are the same and it work. I’m not certain it’s a driver issue, as I did get the screen to work. But never the touchui on the device. Perhaps after making a diskimage backup I will try again with the Original drivers.
Thanks a lot for this manual!!
Tom
Glad to hear it helped.