
Remote Shutdown using a Foscam FI8918W
As a parent of 2 children and an obsession with cramming my hobbies in whenever I can, I decided to devise a means to remotely monitor my CNC (a ShapeOko) and also 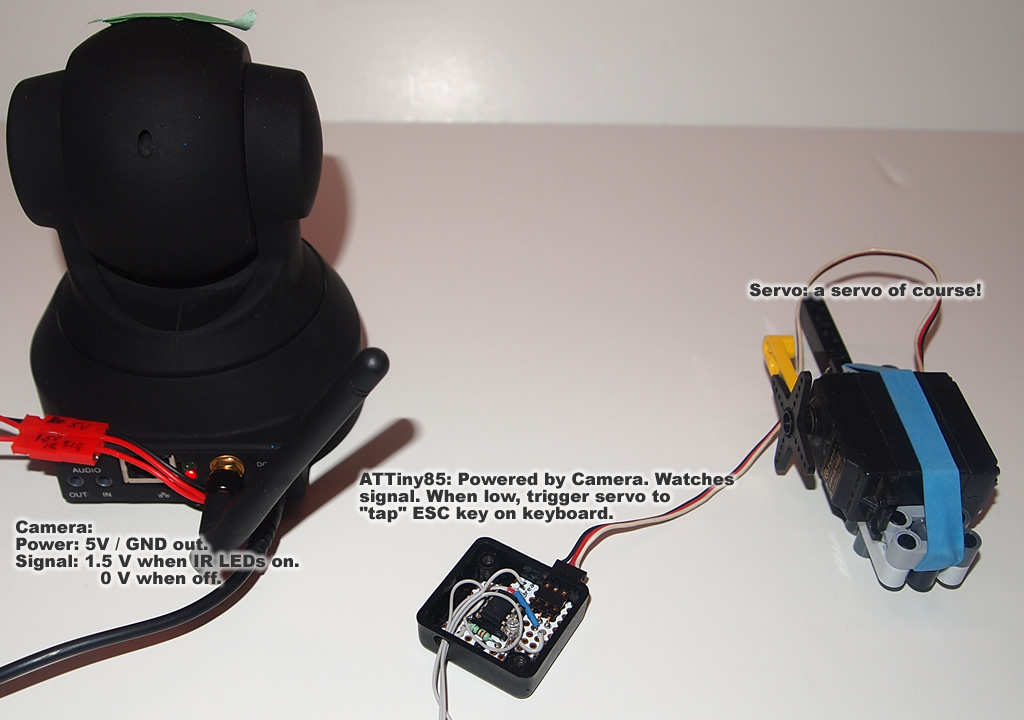 provide the ability for me to remotely shut it down if things go arwy during a milling session. I picked up a Foscam FI8918W IPCam at a ‘car boot’ sale (I love that name) when I was visting in England this past summer. For 5 quid nonetheless! I don’t think the folks selling it had any idea what it was worth. When asking the woman the standard “does it work” question, I knew I was going to get it regardless of my knowing that there was a good chance it would not work. Well, my luck prevailed, as the unit worked flawlessly with the exception that the smell of smoke was embedded in the plastic (would hate to see the previous owners lungs!). Yuk. Oh, and I also had to pickup a North American plug adapter – for all about$2 from DX.
My original plan was to pickup up an Arduino Network shield and use the camera to watch the CNC via custom webpage using streaming video and then, with some buttons, call the Arduino to trigger a servo to hit the Esc key on the CNC keyboard (which in turn would trigger Mach3 to shut down the CNC). There were a few problems with this. 1) I have to wait for the Network shield to come from China (about a month or so), and I did not want to run a lengthy network cable from my router in the basement into the garage. An Arduino WiFi shield was also out of the question as they are costly.
Then it hit me.. The Foscam has the ability to remotely trigger the IR LEDs to go on or off. I managed to trace the signal wire to a wire on the mainboard that goes HI (1.5V) when the IR LEDs are on, and LOW (0v) when off. Voila! Tapping this signal then bringing it out to an ATTiny85 with a bit of simple code, I could control a servo connected to the keyboard.. So, onto the Arduino IDE, and out came the soldering iron. A few hours later, here we are.
Foscam publishes an API to it’s camera interface which allows 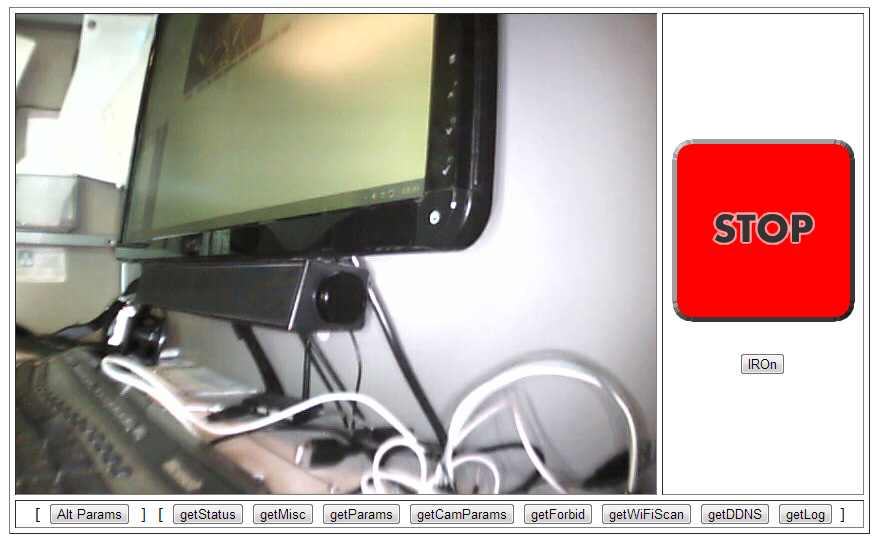 you to create your own pages and embed the camera stream and other functions in it. I just needed something simple – a video stream and a big STOP button. There area number of other buttons there to allow me to view various status outputs as well as change some settings. However, the only thing I need to do is stop the CNC (button triggers the call to turn the IR LEDs off) and turn the IR LED’s back on (small button below the Stop button). As part of the whole process, the IR LEDs need to be triggered back on in order to reset the control unit as this puts the voltage HIGH again. I had Javascript behind the Stop button doing this at first (triggering IR OFF, then IR ON), however, it caused reliability issues on my Andriod tablet (using Opera) and sometimes did not work (something that I could not have for this to work properly since the trigger HAS to work).
[ad name=”GoogleAS728x90ImgOnly”]
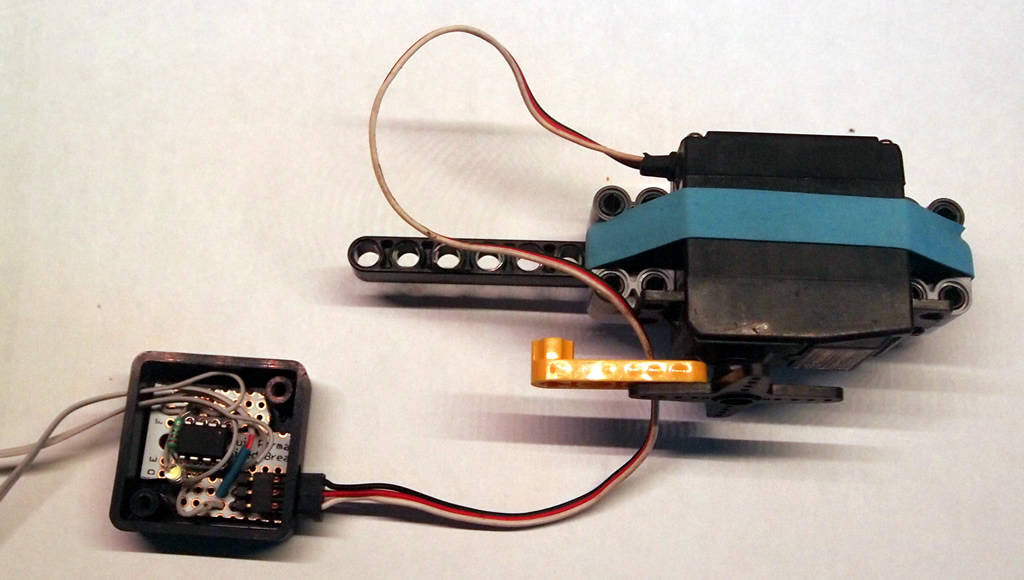
Showing the ATTiny85 circuit and the servo. The circuit is simple, the Tiny watches the output trigger from the camera, when it goes HIGH, it triggers the servo to ‘tap’ the Esc key. I also added an LED in there to provide visual feedback. Since the Tiny does not allow you to monitor via Serial, I was also using the LED as a debug tool. During testing, I wanted to make sure there were no phantom taps triggered (as I had this happen earlier). I used the LED to count the number of taps and blink that count.
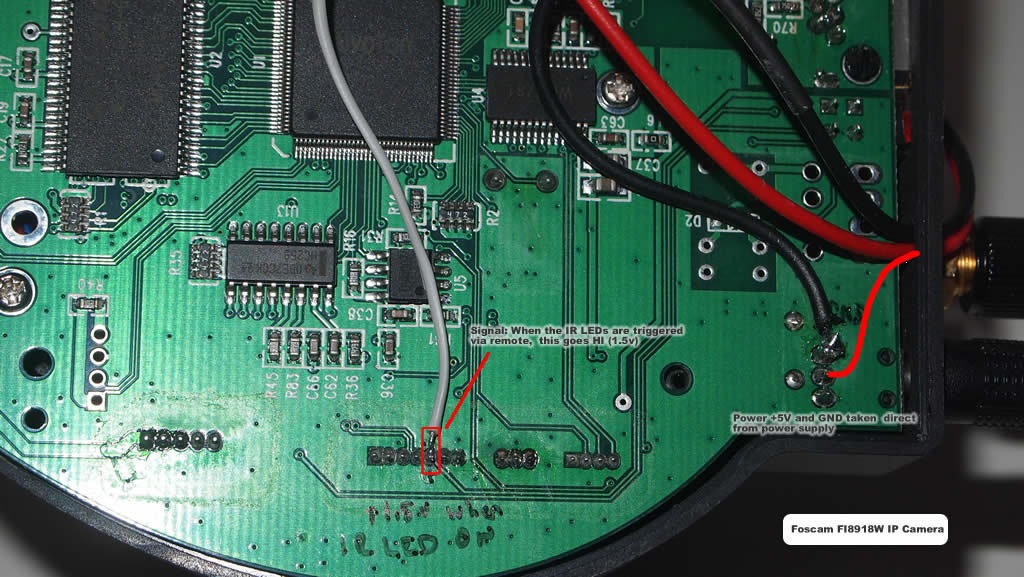
Showing the modifications to the Foscam IPCam. This is an earlier picture before I was taking power from the camera. Since then, I have power coming directly off the power adapter inputs (bottom right shown with the black wire and red (drawn-in) wire). The IR LED trigger signal is the gray wire connected to pin #3 from the right.
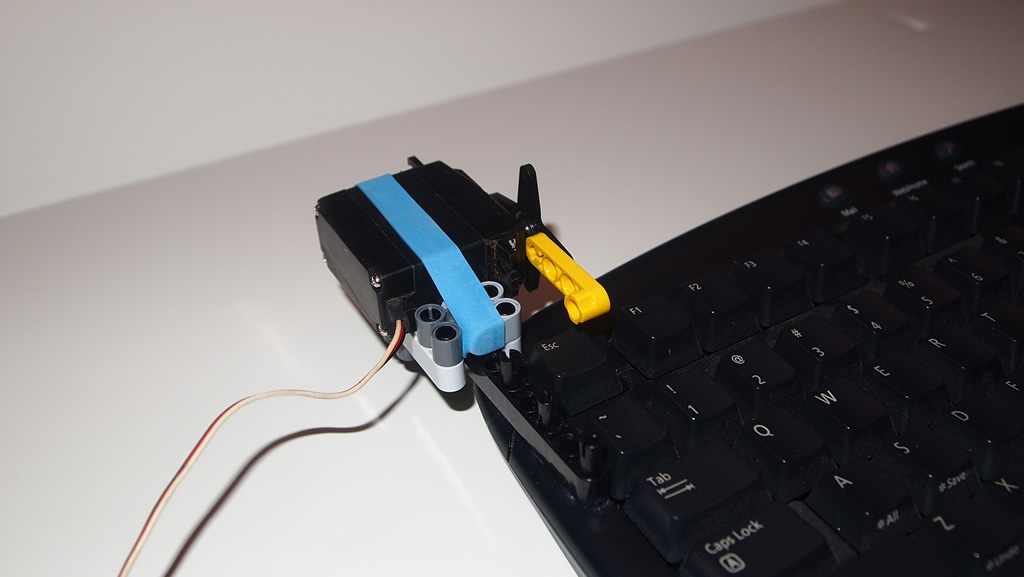
This is the servo mounted to the keyboard. … and of course, the ideal way to build custom mounting solutions – LEGO Technic. Check the rest of this site out if you are wondering why I use LEGO.
[ad name=”GoogleAS728x90ImgOnly”]
I wanted the ability to easily remove and install the servo to the keyboard. I used a set of Technic friction pins and glued them in. The servo is mounted to a Technic 15 hole beam so it slides on and off easily, but is also secure enough to stay in place when the servo is triggered.

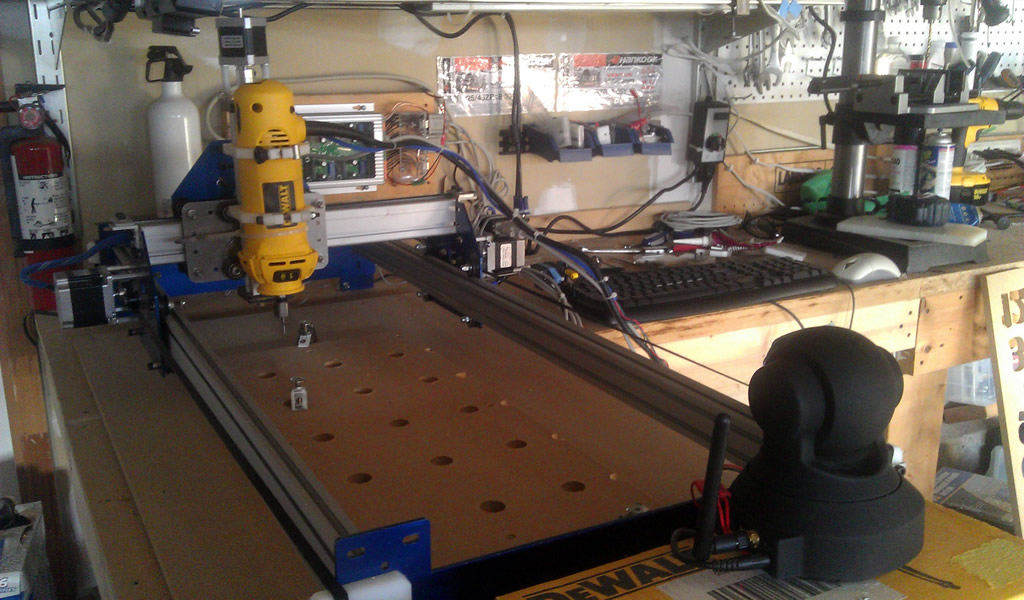
Here’s the ShapeOko & IPCam.
Here’s a video below of the system in action during testing. Now, I can roam around the house, be cooking dinner, etc.. while checking on the CNC and trigger a shutdown if needed. The Foscam also has a microphone, so I can also listen for those crazy noises you hear when your CNC skips a step and things go wrong – you know them, I’m sure you’ve heard it too!
(Link)
Improvements that could be done:
- The IR LEDs have to be triggered back on. Streamline the web interface component to ensure it automatically turns the IR LEDs back on after each Stop call. This could just be a Javascript timing issue. The code works by calling a new window, waiting a short period of time, then closing it. It does this for both the Stop call, and the call to turn the IR LEDs back on. During testing, I had both together in one call and it worked fine on my PC (networked), but did not work on my wireless tablet (it would miss either or both calls). By taking out the call to turn the IR LEDs back on, it reliably turns them off when called.
- The camera itself uses a photo resistor to turn the IR LEDs during daytime. This is not good considering that my CNC work area is well lit. Covering it with black tape does the trick. To solve the problem, I could modify the Foscam to not dim the IR LEDs (apparently this setting already exists for other Foscam cameras).
Other Thoughts:
- This could be used for other projects if you have a similar Foscam camera and want to remotely trigger actions using an Arduino or other microcontroller.
Files / Code:
Arduino 1.0.3 Code: CNCControlFoscamFI8918W_1_2 (must have Servo8Bit library).
//This is written to go onto an ATTiny85. If using an Arduino, change pin references. Also must change back to using the Servo library
//as Servo8Bit wont work.

//ATTiny85 Pinouts:
// ________
// Reset |1 8| VCC
// Pin 3(analog in 3) |2 7| Pin 2 (analog in 1)
// Pin 4(analog in 2) |3 6| Pin 1 (PWM)
// GND |4 5| Pin 0 (PWM)
// --------
//
//

#include "Servo8Bit.h"
Servo8Bit myservo; //create a servo object.
//a maximum of five servo objects can be created
int statusLED = 0; //shows as Pin 0 on ATTiny (pin 5 on board)
int pos = 0; // variable to store the servo position
//int foscamIRpin = A0; //when IR is on, pin is high 1.5v. Else LOW 0v
int foscamIRpin = 3; // shows as Pin 3(analog in 3) - labelled pin #3 on ATTiny85 board layout - when IR is on, pin is high 1.5v. Else LOW 0v
int state = 1;
int doneOnce = 0;
int CNCoff = 0;
int blinkCount = 0;
void setup()
{

myservo.attach(1,544,2200); //shows as Pin 1 on ATTiny (pin 6 on board)

//Serial.begin (9600);
//Serial.print("Started... running..."); Serial.println();
pinMode(foscamIRpin, INPUT);
pinMode(statusLED, OUTPUT);
//get the starting state of the IR LEDs
//if (analogRead(foscamIRpin) < 1) { startState = 0;} else {startState = 1;};
//Serial.print("StartState: "); Serial.print(startState);
//Serial.println();

//send servo to start position
myservo.write(0);

}

void loop()
{

//Stop button clicked - IR goes off - trigger CNC Stop - but only if it hasn't alread been triggered
//startState of 0 means IRs where already off - dont want to trigger keyboard stop
//startState of 1 means IRs are on at start - good this is what we want.
if (analogRead(foscamIRpin) < 1 && CNCoff == 0)
{
//IR LEDs are off

hitKey(2);
digitalWrite(statusLED, HIGH); // turn the LED on (HIGH is the voltage level)
blinkCount ++;
CNCoff = 1;
doneOnce = 0;
//Serial.print("Stop clicked - IR LEDs off "); Serial.println();
delay(500);
digitalWrite(statusLED, LOW); // turn the LED of

}
//this is to catch when the IR LED have been reset (switched back on). It will reset the system for the next round of cutting.
//will look for a way in the web form to have it automatically reset the IR LEDs after a triggered shutdown.
else if (analogRead(foscamIRpin) > 50 && doneOnce == 0)
{
//IR LEDs are on
//Serial.print("Start clicked - IR LEDs on "); Serial.println();
CNCoff = 0;
doneOnce = 1;
}
//Serial.print("IRVoltage: "); Serial.print(analogRead(foscamIRpin));
//Serial.print(" CNCoff: "); Serial.print(CNCoff);
//Serial.print(" DoneOnce: "); Serial.print(doneOnce);
//Serial.println();
delay(100);
//blink(blinkCount);
}
void hitKey(int spd)
{
//CNCoff = 1;
//Serial.print("CNC Triggered to shut off. ");
//Serial.println();

for(pos = 0; pos < 60; pos += 1) // goes from 0 degrees to 180 degrees
{ // in steps of 1 degree
myservo.write(pos); // tell servo to go to position in variable 'pos'

//Serial.println (myservo.read());
delay(spd); // waits 15ms for the servo to reach the position
}
for(pos = 60; pos>=1; pos-=1) // goes from 180 degrees to 0 degrees
{
myservo.write(pos); // tell servo to go to position in variable 'pos'
//Serial.println (myservo.read());
delay(spd); // waits 15ms for the servo to reach the position

}

delay(100);

}

/*
void blink(int cnt)
{
int i;
if (cnt > 0)
{
for (i = 0; i<=cnt; i++)
{
digitalWrite(statusLED, HIGH);
delay(10);
digitalWrite(statusLED, LOW);
delay(100);
}
}
}


This is great! Thanks for your effort. I adapted this into a garage door opener.
Thanks. Sounds like another cool way to use the Foscam!