
Dicontinued – BT Bot Control & IPCam Bot – Android App to control Arduino Robots
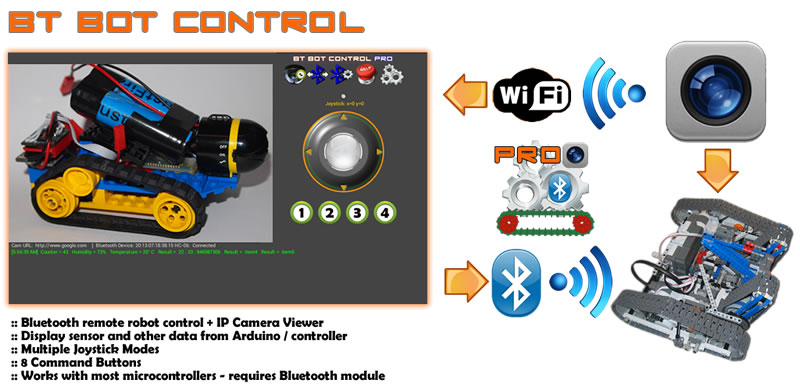
BT Bot Control is an Android application that allows you to remotely control a micro controller-based robot using Bluetooth (i.e. Arduino). It also allows you to (optionally) view a video stream from an IPCamera mounted to your robot. This could be any type wireless IP camera or phone that has the ability to broadcast a video stream/images to the web. Example Foscam, Ai-Cam etc. If you are looking to control your robot over WiFi, check out WiFi Bot Control. *** BT Bot Control is no longer available.
Features:
- Use Joystick via finger movement, or the orientation sensor on your device. (default is Joystick mode).
- Ability to poll and display sensor and other data from your micro controller.
- Supports 8 individual commands via Command Buttons. 4 on by default. 4 more can be turned on in the Settings section.
- Sends the x/y coordinates as positive and negative integers based on 4 quadrants of the joystick. Data is sent via Bluetooth and can be parsed to set both direction and velocity. (sample code below)
- Coordinates are generated as X+/- and Y +/-. These are packaged and sent in the following format sX=val,Y=vale i.e. sX=75,Y=-55e where ‘s’ indicates the start and ‘e’ indicates the end.
- Command button values are packaged and sent in the following format: sC=[val]e i.e. sC=2e where ‘s’ is the start, ‘c’ indicates the a command button as pressed, ‘2’ is the value and ‘e’ indicates the end.
- Configurable Bluetooth packet send interval – used to set the speed (quantity) of packets sent. Default of 200ms works well.
- Shows video stream of IP Camera mounted to robot. (see FAQ below for important tips on getting your IP Camera working)
- Configurable camera URLs (3). Remembers last camera connection for easy re-connect.
- Configurable Bluetooth connections. Remember last Bluetooth connection for easy re-connect.
- Sample Arduino Sketch provided (below).
- Screen auto re-sizes for smaller phones.
- Supports any micro controller that can parse Bluetooth data (bluetooth module required).
- Should be compatible with other Bluetooth / Arduino modules such as the BLEduino, RFduino, Arduino Bluetooth Shields the Cortado, and many others. Please drop me a line if you get it working with other BT devices and I will update the list. Update (2015) – lately, a number of fully integrated Arduino/Bluetooth micro controllers have come to market via Kickstarter. This app is not particular. As long as the controller / bluetooth module can connect to your Android smartphone, this app will work.
Note on Lite version: The Lite version is a fully functional version. However, Bluetooth data will be sent as ‘9’s. i.e. s9,9e and c9e which will provide you with enough to determine if this app is right for you. If you like BT Bot Control, the Pro version has full functionality enabled with proper data, and can be yours for less than the price of a coffee. Also, you won’t be pestered by that start-up message either! We hope you agree that the features and functionality provided are well worth the pocket change. 🙂
Note on Bluetooth: The control distance is dependent on a number of factors including; your Bluetooth device range, battery power, obstacles etc. Typical distance for Bluetooth is 10 meters for most Bluetooth modules. However, higher classed BT modules could extend the range.

Get BT Bot Control:

If you are an existing BT Bot Control user, drop me a line on your project so I can feature it here.
Arduino Sample Sketches:
BT Bot Control – Recent Versions:
This version includes sample code to demonstrate sending data from the Arduino to BT Bot Control (you must have v 5.1.0 or later). It uses a Timer (library here) to call sending data every second (recommended).
- BT Bot Control Arduino Sketch (for BT Bot Control v5.1.0 or later)
BT Bot Control – Earlier Versions prior to v 5.1.0:
- Default Mode Joystick Sketch: BTBotControl12DefaultModeJoystick
- Simple Mode Joystick Sample Sketch: BTBotControl12SimpleJoystickSample
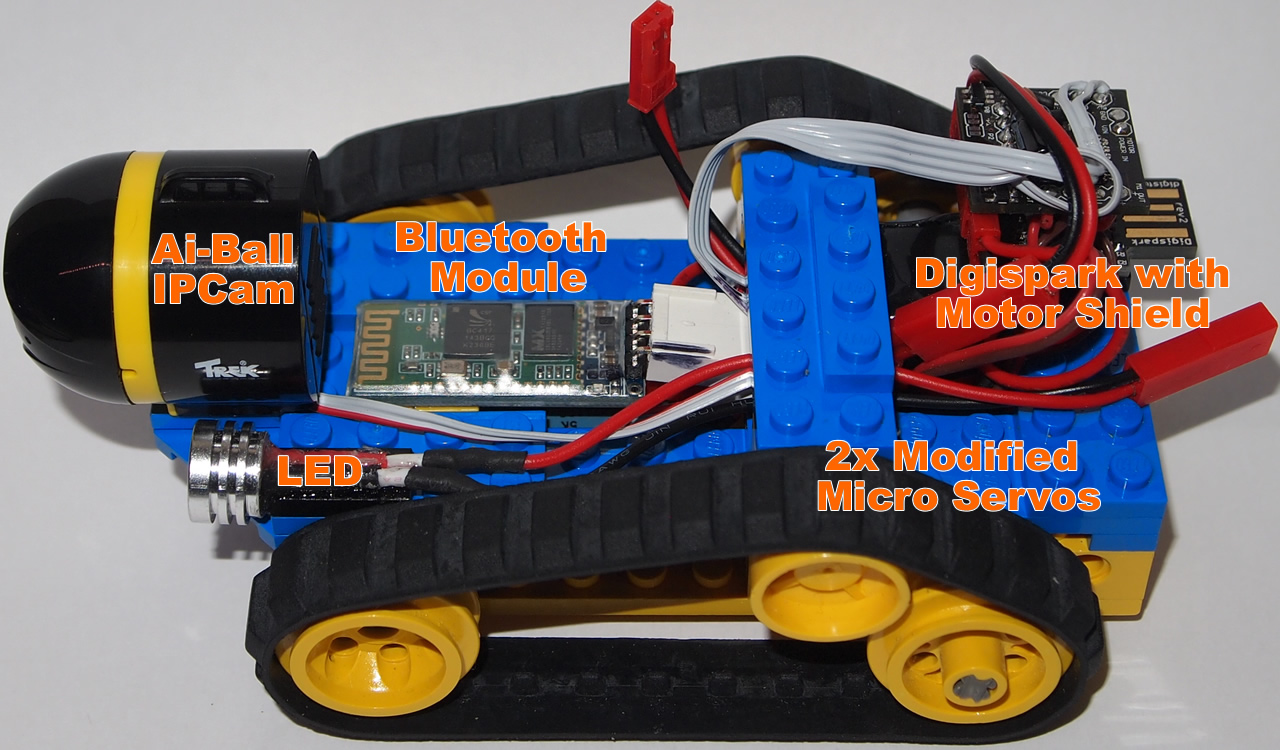
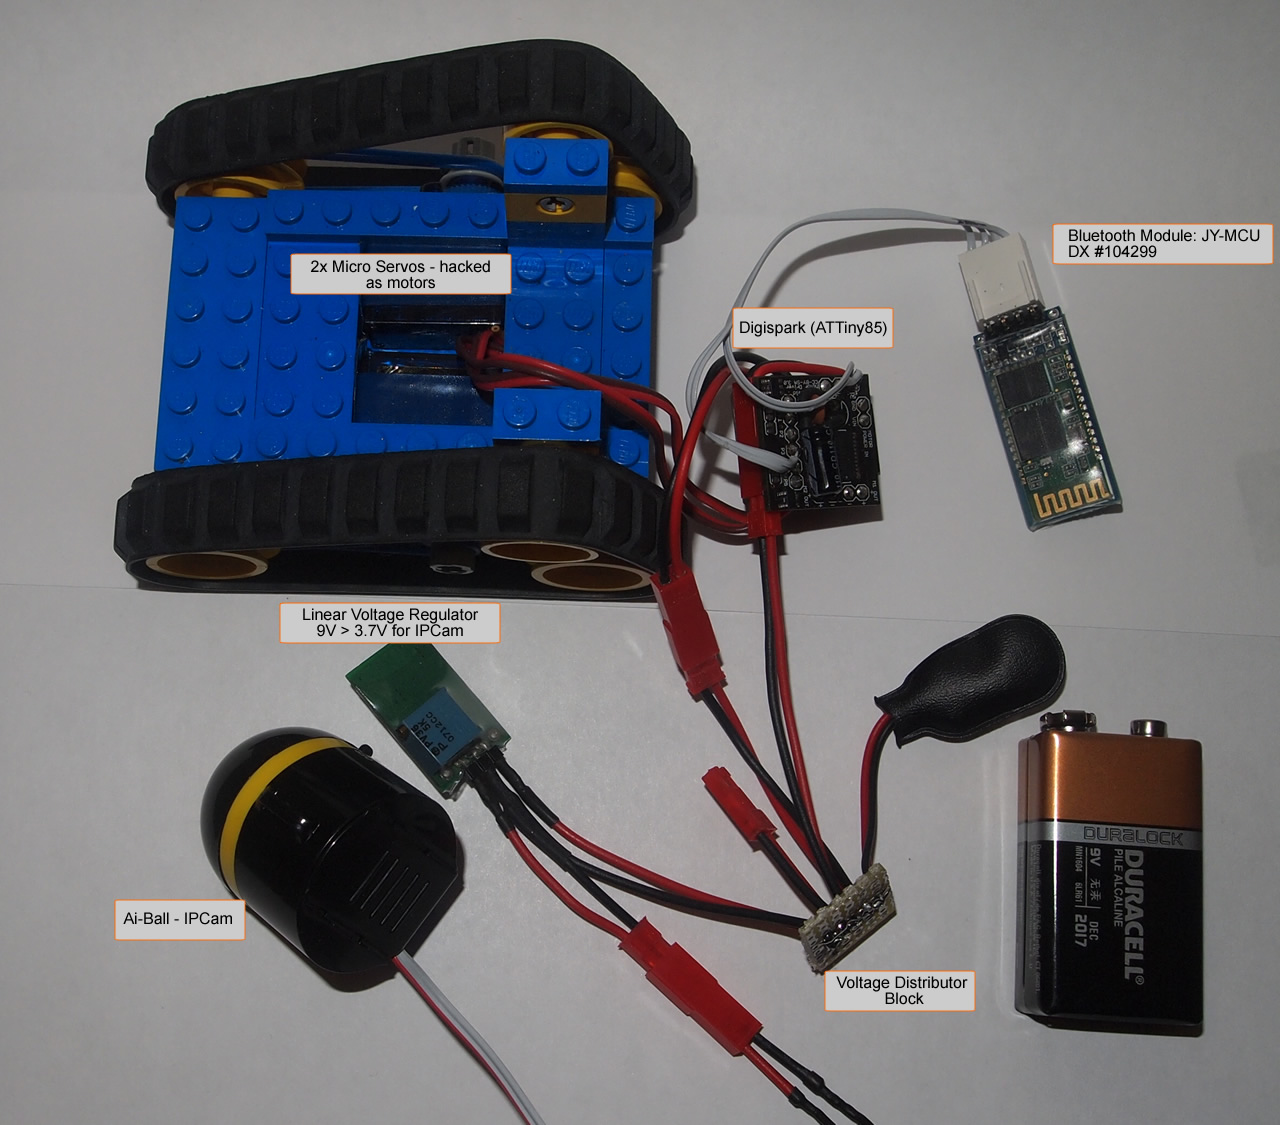
Note: For this project, I used a Digispark (Arduino-based micro controller). This sample sketch is targeted for a Digispark (ATTiny85), but was also tested on an Uno, so it should work for most Arduino’s. If using an ATTiny, remove any Serial.Print statements. Also watch the size of the sketch as there are limitations on the ATTiny85.
Displaying Sensor Data in BT Bot Control:
BT Bot Control (version 5.1.0 (14)) now has the ability to display sensor and other data from Arduino. Before getting into specifics, note that this feature is experimental due to the nature of both the joystick and sensor data using Bluetooth at the same time. Adding sensor polling may slow the robot’s response to joystick movements. Be sure to test this feature before implementing.
On the Arduino side, you need only add Serial.Print() commands to print sensor / data results to the serial port. The data also requires a start and end delimeter. For BT Bot Control, the “>” (start) and “<” (end) delimeters are uses. If you are passing more than one data item, each much be separated by a pipe character “|”. A simple single item example would be Serial.Print(“>MyData<“); This would display “MyData” once BT Bot Control has been configured. When enabled in BT Bot Control, the sensor / data information will show at the bottom of the main interface.
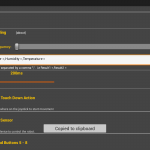
In BT Bot Control, go to Settings, check the box for “Enable Sensor / Data Polling“. This will reveal other options as follows:
- Manual / Timer base polling. In manual mode, you have to click the refresh icon that will be shown beside the data. Timer-based polling will automatically poll ever X seconds. The frequency can be configured by moving the slider (ranges from 1-30 seconds)
- Data Element Titles. This allows you to give each data element a title. If left blank, the app will use default values. i.e. Result =. To add titles, separate each item by a comma. i.e. Temperature =, Humidity =. Save the changes when done. Note that each title will be assigned to each data item parsed in the order it was passed. (example below)
Example Arduino code:
//Include and initiate the Timer library in the header section
#include “Timer.h” //get it here: https://github.com/JChristensen/Timer
Timer t;
//in the void Setup() section add the below code:
int sendData = t.every(1000, doDataSend);
//At the beginning of void loop() add:
t.update(); //timer for sending data
//The below flag is included in the code to stop data from being sent when data is being received from the joystick. It is highly recommended that this is include. The value is set to true in while(Serial.available() > 0) and set back to false after the motors are driven or turned off.
receivingCommands = true;
//Here’s a sample showing data being sent. Note that passed data must begin with a “>” and end with a “<” delimiter. All data sent via Serial.print within these delimiters will be passed to BT Bot Control.
void doDataSend()
{
//TESTING PRINTING SENSOR DATA TO BT BOT CONTROL
if (!receivingCommands)
{
Serial.print(“>”); //Start of String
Serial.print(counter);
Serial.print(“|73%”);
Serial.print(“|25° C”); //degrees = ALT + 0176
Serial.print(“|item4|item5”);
Serial.println(“<“); //End of Content
counter ++;
}
//END TESTING PRINTING SENSOR DATA TO BT BOT CONTROL
}
Based on the above example there are 2 data elements being sent. If you did not configure any titles in Data Element Titles, the results would look like this: Result = 75° Result = 45% If you added two titles; Temperature =, Humidity =. You would get Temperature = 75° Humidity = 45%
Note: During testing, it was observed that a sketch that ran very fast (i.e. with little delays), would not render data well to BT Bot Control. If this happens, try adding delay (100); or more to your code. Also note that this will affect the joystick commands and how the robot is driven. Alternatively, you can get creative by having the sensor data only send every x cycles (i.e. if your delay is 10 ms, put the sensor data print commands in a function and call them every X iterations. I suggest having them sent every 1 second.
Note that any Serial.Print command that is placed within the “>” and “<” will be parsed by BT Bot Control and displayed.
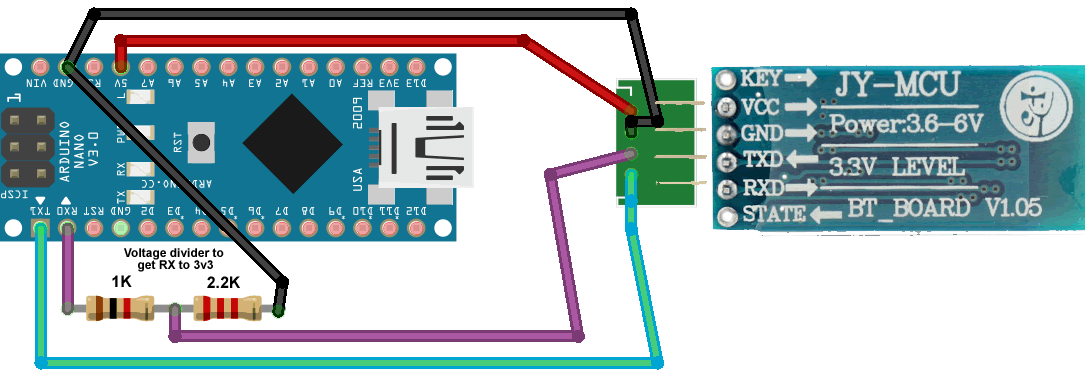
Bluetooth Wiring for Arduino (Nano)
BTBotControl - FAQ
BT Bot Control vs WiFi Bot Control – Which is faster?
Although the function of both these apps is the same, there are some underlying differences that are important to making your decision on which route to go. In general, BT Bot Control is faster in getting joystick commands to the robot. This is inherent in the design as it uses a direct link over Bluetooth between the Android device and your robot. WiFi Bot Control is slower as the commands have to a) share traffic with your WiFi network (this includes your IP camera stream), and b) are first sent to a server, and then to the robot. This is mitigated somewhat with the introduction of WiFi-enabled Arduino devices such as the Spark Core and Adafruit CC3000). However, if you do not have one of these devices, you would need to use a server with a webserver. BT Bot Control is also easier to set-up and configure. Once you have a Bluetooth connection, the sketch can interpret the commands. With WiFi Bot Control, there is the intermediary JSON configuration on the server side.
Posted in: BTBotControl - FAQ, WiFi Bot Control - FAQ
Configure IP Camera for Viewing
If you are having issues viewing a direct video stream from your IP camera (i.e. http://mycamera.com/videostream.cgi is not working), have a look at this site to see what varying modes your IP Camera has (be sure to search for your camera). If none of these work, you can setup a webpage to auto-refresh your camera in snapshot mode and then use the URL to the website in BT Bot Control / WiFi Bot Control. First, you must find the URL that your camera uses to view a snapshot.
Steps:
- You need a website – either a personal or access to a remote webserver / website where you can put some files. In this case, we will assume you have a personal webserver and use the following URL www.yoursite.com.
- Note: If you are setting this up on an internal server, you can refer to internal IP addresses (i.e. 192.168.x.x). However, if you are hosting the page externally, you will have to a) enable port forwarding from an external IP to your camera and b) refer to the camera (within the file below) by your network’s external IP and port #. For this example, all references will assume you have a personal webserver and the IPs are internal.
- Download these files and place at the root of the website you want to use.
- Open default.htm.
- You will need to change only the highlighted parts to the full URL that will be used to take a single snapshot image from your IP Camera. Before moving on, be sure that you are able to see a snapshot within your PC’s browser window.
- Once complete, call the www.yoursite.com/default.htm file in your web browser (not BT Bot Control / WiFi Bot Control). Make sure you see the snapshot image and it should be refreshing. The refresh rate is configurable at the bottom (currently set to 100 ms). If it works here, then you can plug this URL into BT Bot Control / WiFi Bot Control and you should be able to see the video stream.
- Note – don’t expect fluid video here folks. This is a crude approach to getting video streaming working in these apps. Also note that this is not a limitation of BT Bot Control / WiFi Bot Control but rather the web control implementation from Android.
Posted in: BTBotControl - FAQ, WiFi Bot Control - FAQ
Adding IP Camera URLs
Camera Options:
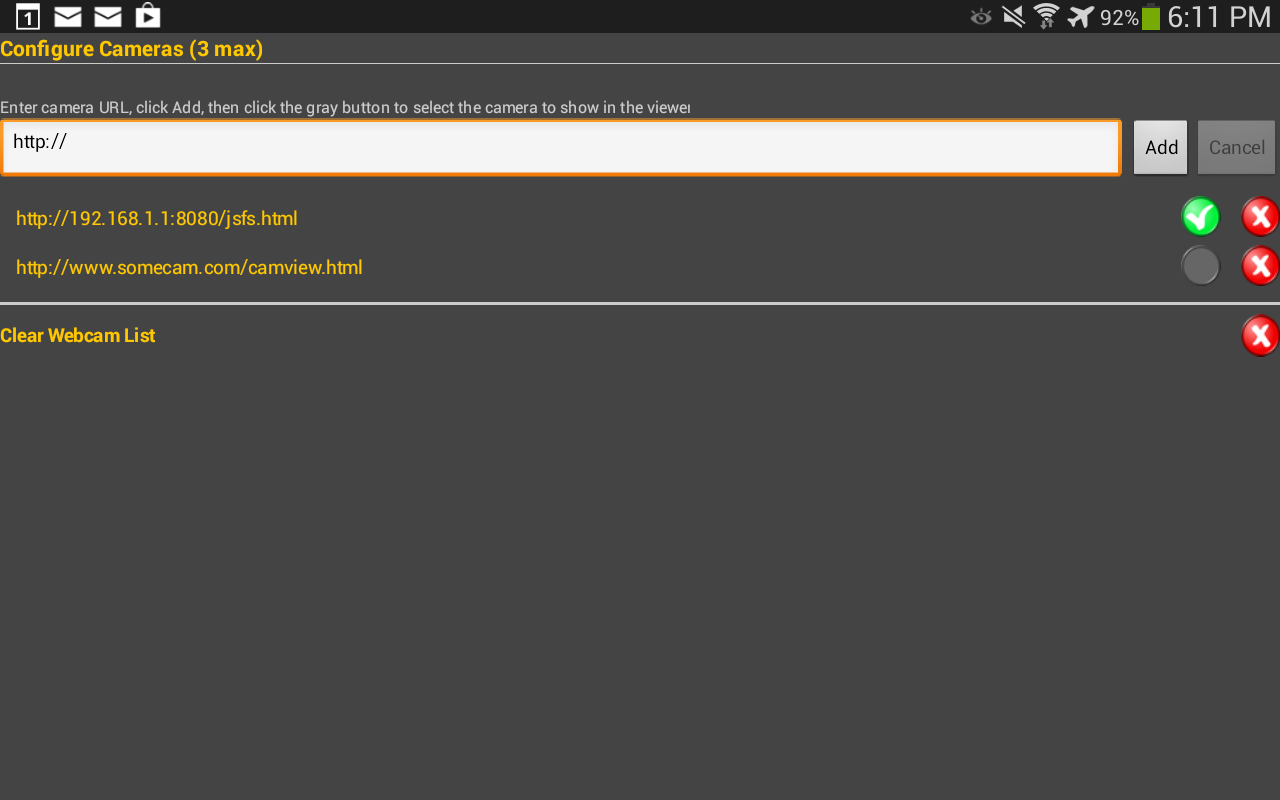
For this project, I used the Ai-Ball tiny IPCam. However, take my word for it, it’s a waste of money and a battery pig. It’s only advantage is that it’s small. If you are using the Ai-Ball or other similar webcam, the configuration is as noted below. If you have a spare phone laying around that has a camera, I suggest you get IP Webcam from Google Play. This great little app allows you to turn your mobile phone into a webcam and access its video stream. The full screen streaming Javascript seems to work best. Give it a try – use your local IP address: http://192.168.x.x:8080/jsfs.html (check IP Webcam settings).
Assumptions:
- You have an IPCamera that is configured and can be viewed in your web browser.
- You have the URL, username and password (if necessary) to access the IP camera.
- If you are viewing your IP camera outside your network, you will have to setup a dynamic DNS service and/or port forwarding to remotely access it.
- Click the Camera settings icon in the menu and setup your camera URL (see below)
- Enter the camera URL, click add, and check the button beside the camera you want to view.
- You can enter and store up to 3 cameras.
Posted in: BTBotControl - FAQ, WiFi Bot Control - FAQ
Configure IP Camera – Alternate Approaches
If you are having troubles setting up your IP Camera,the following are some approaches that may (or may not) work for your camera. Some of these are specific to certain camera manufacturers:
1) Generic interface to Foscam IP Cameras. You could build a webpage that displays the camera and then refer to the webpage URL in WiFi Bot Control / BT Bot Control. Once done, then use the URL you use to access the webpage in the apps.
2) Interface to Foscam H.264 Cameras. .. Right click this link, save to your website folder and edit the IP/PORT, user and password. Test in your browser befor adding the URL to the apps.
3) Check this site and search for your camera. It will show you various ways to get access to direct stream and snapshot modes for IP Cameras
Posted in: BTBotControl - FAQ, WiFi Bot Control - FAQ
Connecting to Bluetooth
 Setting up Bluetooth is easy:
- Before starting BTBotControl, make sure Bluetooth is turned on.
- Make sure the Bluetooth device you are connecting to is powered on and you have previously paired the Bluetooth unit to your Android device.
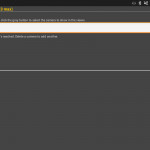
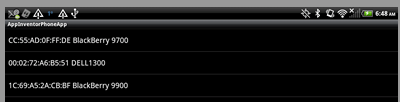
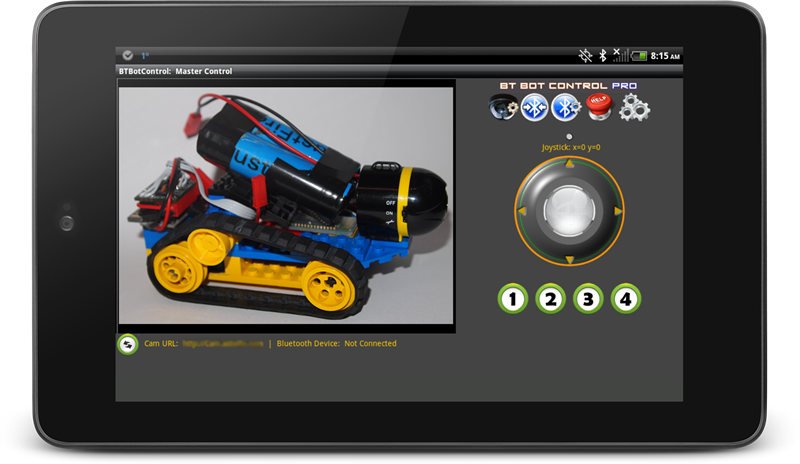
- Open BTBotControl and click the Bluetooth Settings icon (A). You will see a screen similar to below. Select your Bluetooth device.
- After a few seconds, your Bluetooth device should be connected, and you should see a message indicating this.
- The main window will update by showing the MAC address of the connected Bluetooth device (below the camera viewing window). The icon for Bluetooth Connect (B above) will also change (arrows facing out).
- To disconnect the Bluetooth device, click the Bluetooth Connect/Disconnect icon (B above). After it is clicked, the Bluetooth status will be updated to show “disconnected” (below the camera viewing window) and the Bluetooth Connect/Disconnect icon (B) will change to an icon with arrows pointing in.
- To quickly reconnect, click the Bluetooth Connect/Disconnect icon (B above).
Posted in: BTBotControl - FAQ
Bluetooth – Issues Enabling
If Bluetooth is disabled when you open BT Bot Control, the app will ask you if you want to enable it. Click yes to enable Bluetooth. Your Android phone will ask you if you want to proceed. Click Yes. If, Bluetooth still does not enable, check your Airplane Mode settings. If Airplane Mode is enabled, it will restrict the ability to turn Bluetooth on. You must disable Airplane Mode to turn Bluetooth on.
Posted in: BTBotControl - FAQ
How do I tell if data is being sent over Bluetooth?
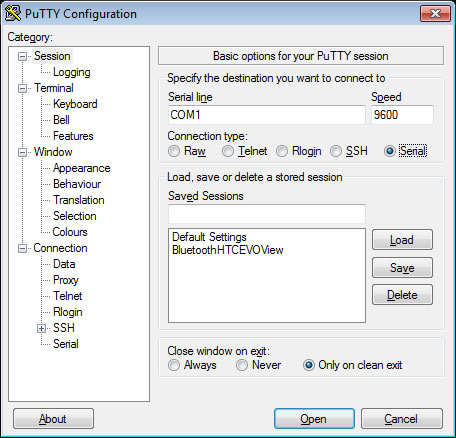
You can verify that BTBotControl is sending data over Bluetooth by using an application such as Putty. You can do this by connecting your Android device to your computer/laptop over Bluetooth. Before using Putty, make sure you have paired the two devices and they are connected. To configure putty, setup a serial connection pointing to the Com Port (Serial Line) that your Bluetooth device/dongle is connected to. Typical speed settings are 9600 (Baud). Once configured, open the connection and then connect BTBotControl to your computer. Once it is connected, you should see coordinate / command data stream through when using the controls on BTBotControl.
If you have verified that data is being sent using Putty, but something still appears to be wrong in the Sketch. Try using Serial Print statements within the section of code where Bluetooth data is parsed and watch the response in the Arduino IDE Serial Monitor.
Posted in: BTBotControl - FAQ
Joystick Modes and Sending Data Over Bluetooth
There are two joystick modes. Default and Simple Joystick:
*** Remember – the Free version will send the number 9 for all joystick (Default/Simple) and Command Buttons. The Pro version will send actual values.
Default Joystick Mode:
When you move the ball around, coordinates are generated as X+/- and Y +/- and can be used to interpret both velocity and direction. These are packaged and sent in the following format: sX=val,Y=vale i.e. sX=75,Y=55e where ‘s’ indicates the start and ‘e’ indicates the end. In this mode, when you press a Command Button, values are sent in the following format: sC=[val]e (i.e. For Command #2 sC=2e is sent) where ‘s’ indicates the start, ‘C’ indicates it is a command button, ‘2’ is the value that you want to parse and ‘e’ indicates the end. These values can be parsed to have your robot move and perform additional tasks. (sample Arduino code provided at link below)
Simple Joystick Mode:
In Simple mode, you tap the arrows which generate single character values depending on the arrow you tapped (i.e. the top arrow sends U). Values generated are: U (up), D (down), L (left), R (right). Tapping the center of the joystick sends an S value (stop). Tapping any of the command value sends the respective command number. i.e. tapping Command Button 3, sends 3. In this mode, your micro-controller code can be simplified as need only parse single character values.In this mode, when you press a Command Button, values are sent as single characters in the value of the Command Button. i.e. If you press Command Button 3, the value 3 is sent. (sample Arduino code provided at link below)
You can change between Default and Simple modes in the Settings section.
There are two example Arduino programs – one for Default mode, and one for Simple mode. They have routines built into them to parse the values being sent over Bluetooth and performing motor actions.
Posted in: BTBotControl - FAQ
Version History
Check out BT Bot Control on Google Play for the most recent updates.
V5.0.7 – April 16 2013:
:: Pro Version: Fixed issue with Default Joystick and data being returned from joystick movement. Only affects small screen devices.
V5.0.6 – April 12 2013:
Settings:
:: New: Added Simple Joystick Mode. Allows for simple joystick control using arrows. Sends single char data via Bluetooth as (U,D,L,R). Command Buttons send data as (1 to 8).
Help:
:: Cleaned up the Help page content.
About:
:: Added Simple Joystick Mode info.
v5.0.5 – April 6 2013 :
Settings:
:: NEW! Added option to turn on additional command buttons (5-8). Will send values as numbered. i.e. Command button 5 sends sC=5e. The enable them, go to the Settings section.
:: Discovered that an “emergency stop” on the joystick is necessary when in Orientation Sensor mode. When in this mode and controlling your robot, you may need to change a setting, add a camera etc. Tapping the joystick will temporarily disable the Orientation Sensor control and bring the Joystick to 0,0 so your robot does not move. Tapping the joystick again will turn the Orientation Sensor back on. Note – this only works when the Orientation Sensor is enabled in Settings.
v5.0.4 – April 3 2013:
Settings:
:: Updated Bluetooth Packet Delay component. New slider. Better notifications.
:: Updated notifications for Joystick Touch Down Action.
:: Added ability to switch between joystick or orientation sensor to control the joystick. You can now tilt/roll the phone to control your robot. Note – Joystick Touch Down Action is disabled when this is on.
Other
:: Cleaned up notifications.
:: Improved joystick response.
Earlier Versions:
Coming soon.
Posted in: BTBotControl - FAQ
Video: BT Bot Control In Action
Video: BT Bot Control Bluetooth Connection Testing
Pictures of CamBot:
User Projects
Check out Umur’s Omnidirectional Bluetooth Controlled Robot:
Check out Jon’s Place for a very cool 3D printed roboot.

RC Truck


add wifi support and I will bite.
Done. Check out WiFi Bot Control
sorry forgot to post this dont see an edit button so here goes.
http://www.kickstarter.com/projects/digistump/digix-the-ultimate-arduino-compatible-board-with-w
someone has to make a little wifi bot with one of these and if you guys support it all the better.
Hi,
BT Bot Control seems to work ok, I even got it working with the Android IP webcam app;-) The URL to use is http://:/jsfs.html , that seems to work.
Glad to hear you find the app use full.
One improvement suggestion: Can you keep the screen on when the `motion sensor’ is selected. In that case, I don’t need to touch the screen and it goes dark eventually:-(
Thx for the comment. I am not sure about this, but there are limits over what ‘influence’ developer can have an a users’s device. This may be one of those items that is left to the user to modify as opposed to an app changing default device behavior. Although I would want the same thing, it is akin to an app not allowing a PC’s screen saver to come on. Probably breaks some rule somewhere. 🙂
Something like described @ http://stackoverflow.com/questions/3723634/how-do-i-prevent-an-android-device-from-going-to-sleep-programmatically
Problem is, I don’t have access to the entire API due to the development environment I used to make the app.
Great app! or it would be if I could get the bluetooth to work. it comes up with “need BLUETOOTH_ADMIN permission: Neither user 10156 nor current process has android.permission.BLUETOOTH_ADMIN” which is a bit of a shame
Thx for the comment. BT Bot Control will attempt to turn Bluetooth on if it is off. However, you must a) your device must have Bluetooth and b) ensure it is working correctly. Sounds like you need to fix the Bluetooth issues on your device first.
Hey Dave, thanks for the reply. No the bluetooth on my device works fine, I have used many other bluetooth control (BT-Bots for example) apps. If you google the error, you’ll see its something to do with a description in a configuration file in the app. It seems like something you need to configure in your development system or something.
Please contact me offline so we can get to the bottom of this. picoware at gmail dot com.
I am going to begin a project soon and wanted to know if this will work with an arduino uno with an arduino motor shield by changing the pins for motor direction and speed to match those of the motor shield?
The sample code provided uses the digispark motor or shield which has 2 pins for speed, and 2 for direction. If this is the way the Arduino motor shield is setup, then it should be plug and play. Else, you will have to modify the sample sketch. Don’t forget that you need a Bluetooth module as well.
very nice keep it up where can I get full sketch.mail me
Not sure what you mean by “full sketch”. The entire sample Arduino sketch is available for download on this page.
very good projects .keep it up .
Thanks for putting this together Dave ~ bought your app and used your digispark idea to build out a smaller version (rover) that I hope to launch on a high power model rocket at some point. Great support too ~ patient and quick replies!
Cheers!
Hi Dave. I bought this application and it work very nice. Is it possible in a future update to include user defined labels for the 8 buttons?
Also, is it possible to receive data from the bluetooth module. Just a few field were we can receive for example battery information and sensor readings?
Thanks
Hi Tolisn,
Thanks for purchasing BT Bot Control. Glad you like it. I considered user-defined labels for the 8 buttons. Issue is that there is not a lot of room on small screens for this, and BT Bot Control is made to work on small to large screens. If there is enough demand, I’d look at some alternatives for larger screen devices. The idea for receiving BT data is also one I considered. If there is enough demand for it, I’ll consider some sort of ‘response’ box. Again, real estate is at a premium on small devices. 🙂
Hi Dave.
How can I connect to my ip camera? I have entered the camera URL in the form http://192.168…. but I cannot connect to the camera because it asks for a login.
Where do I enter the login info ?
I can see the IP camera interface and feed using firefox and the same URL but I cannot connect using you app.
Have you checked the FAQ? There is information in there that may help. The app uses a simple web control that may not handle video streaming and codecs such as a full blown browser like Chrome or Firefox. I had the same issue with my IP Camera. The FAQ provides instructions on how to set you your camera in snapshot mode using JavaScript to refresh the snapshots from the camera. Note that you will have to Google how to do this for your camera as I don’t think all camera’s are the same. Check the FAQ section and contact me offline if you still need help. You can also check this site for some ideas: http://www.ispyconnect.com/man.aspx?n=foscam
I have looked at the FAQ and tried what is juggested, but still nothing on video feed. I also went ot ispycoonect.com and found my camera (wanscam jw0008). tried the suggested url layouts but still nothing. How can I contact you offline ?
The approach would be the same for most any camera that does not work natively. Most all cameras have a mode that allows for a snapshot to be taken. ie. http://www.yourcam.com/snapshot.cgi. The sample I provided in the FAQ (which I assume you have tried) takes this mode and automates the process by taking snapshots in Javascript and showing the a video stream by refreshing the viewer. BT Bot Control will simply view the page. Provide me all the details you can about your camera and what you have tried. Camera name, model, etc Email me at picoware at gmail dot com.
http://admin:@192.168.xxx.xxx/index.htm
if it needs a password
http://user:password@192.168.xxx.xxx/index.htm
well that is what works for my camera
Hi, I just bought your app and after modifiying the arduino sketch to work with servos, I am able to control my little robot. The app acts a little funny sometimes, like lagging behind with the joystick inputs and then trying to catch up by moving the joystick by itself (and eventually crashing in the process). I also noticed, if you release the joystick, the zero position is not transmitted over bluetooth. You have to move the joystick to the zero/middle position with your finger and it is hard to hit the center, exactly.
Otherwise a great app, my son is having a ball with it. 🙂
Hey there.. Good to hear your son is having fun with the app. Some thoughts:
– When in the normal mode, the joystick should always bounce back to center when you let go of it. I have not heard anyone else have this issue. Are you sure you are not in Orientation mode?
– regarding the lag – this could be due to the speed of Bluetooth or quality of signal to the BT receiver you are using. Since you mentioned the catching up piece, this sounds like something you could try to tweak in the Arduino app as it appears the Android app is doing its job (sending all movements as you move the joystick). It seems like the Bluetooth buffer on your Arduino is where you need to check as it is simply executing the commands you have sent that built up in the buffer. Did you change any of the delays in the sample app? Check that, or consider shortening the delays.
hi just starting with arduno have a rover with plans for a basic arm this looks grate but ive used servos for my drive as thay are what worked for me and onley nead one I/o pin. any chance of a mod to the scech as Im having trubel under standing parts of code and others may go doune the same root
paul
A sample sketch has been provided. You can modify it any way you wish. Just make sure you keep the bit that brings the data in via Bluetooth.
I have tested your BT Bot Control app for Android and I always get the value x=9, y=9, c=… I forgot the value for c, maybe 1 if I’m not mistaken.
But I always get the fix value no matter what x-y and buttons combination I move or press.
Where can I get the previous version? I am glad that you add wifi camera viewer in your app and that’s what I barely needed.
Thank you in advance.
It sounds like you are using the free version. Please read the instructions on the Google Play listing (you need the Pro version).
Ups… Yeah.. My bad. I’ve just read it over. Well, then I should play with the 9’s first omitting the analog speed control ^_^ Thank you.
Hi, i thought it was the RX of the bluetooth that needed to be protected by the voltage divider?
e.g. http://forum.arduino.cc/index.php/topic,22570.0.html
Yup, you can do. See this post. I like to play in the danger zone! 🙂
Hola,en principio con una camara ip mas viejita me había conectado sin problemas por la url http://192.168.1.. y ahora con una camara ip p2p no consigo por ningún medio conectarme, me dice que no estoy autorizado, que necesito usuario y contraseña, pero no me presenta ningun medio para ingresarlos.
Con otras aplicaciones de camaras me puedo conectar perfecto. Como puedo hacer? gracias Lucas
With the help of Google translate, I believe you are having issues with the camera requiring a login to show the video stream. Did you follow the blog posting and read the FAQ? Most all camera’s require some sort of login. Remember, in BT Bot Control, you would be posting a link to the web page you created to show the video stream – not a direct link to your camera (unless it works). Since you are having an authentication problem, the URL you place in the Javascript will likely need to be the URL + username + password. The FAQ references this link. You can see many examples there that show how to enter a username and password in the URL. These are for Foscam, but you can search for other cameras. You have to find the prameters that work for your camera as you did not post the name and model here.
thanks for your application now it being connected in arduino it already communicate i just want to ask what pin number will be use for motor shield
Not sure I follow the question, but the pin numbers are identified in the code near the top. There are 2 – 1 for each motor. Being Arduino, you can change it to whatever you want based on the hardware you implement. This project is not just for the hardware I noted in the write-up. 🙂
someone help me please . i am beginner and i am work on Robot remote control & IP Cam viewer via WiFi and Bluetooth . but i have arduino uno and i need a default code for simple code modified for Uno .
The example provided here should work with the Uno as well.
i need Default Mode Joystick code for arduino Uno stp !!
The sample is included in this blog posting…
Would there be BT l298 motor controller sketches available ?
Hi. I don’t have anything other than what is there now. That said, it should be easy to modify. I suggest you look up some sample sketches for this controller, then modify the sketch I provided with the correct libraries and calls.
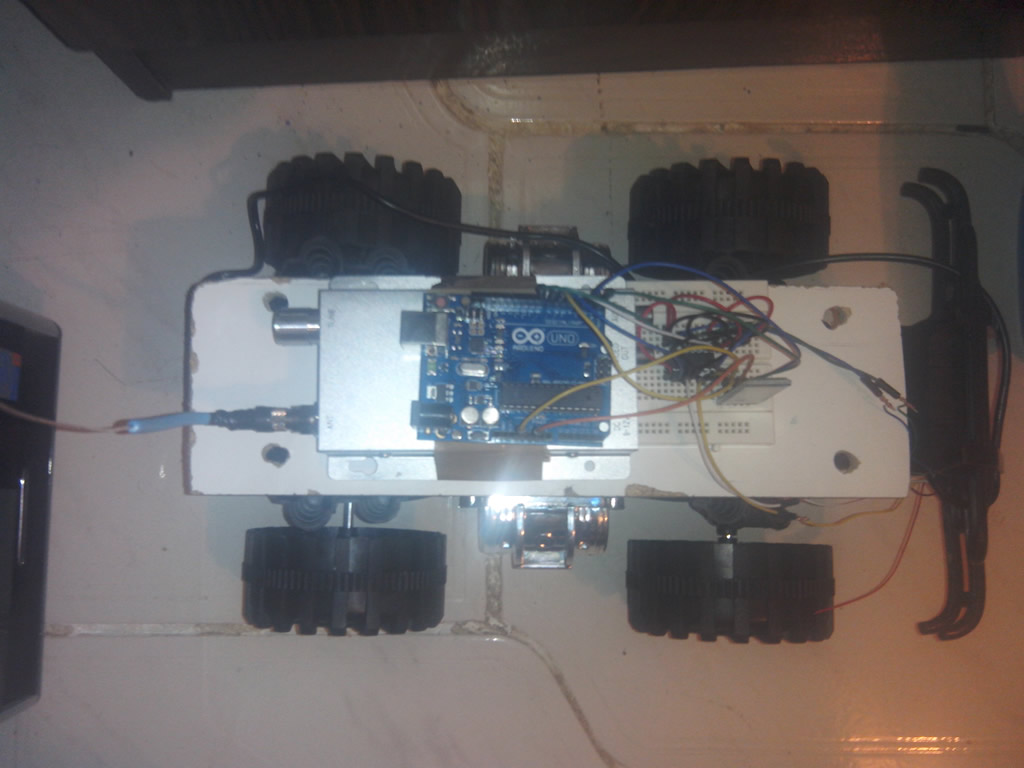
I have built a small tracked rover running an UNO R3 clone with generic servo/connector shield, and have used many differing way to control it; Your BT Bot Control is my favorite! (I purchased the Pro).
It took me awhile, but I finally (coding is not my forte) figured out how to control a servo (for high low gear) and a LED light using the numbered buttons and everything seems to work fine… except I have recently noticed that when “steering” the bot in any direction for more then a few seconds (Typically forward, but sometimes rotating left or right)… it seems to lock into that mode and I have to chase it down to reset it. Disconnecting and reconnecting the BT has no effect, only the arduino reset button.
To help in my troubleshooting, I am thinking of putting in an LED that will briefly flash on and off as the code cycles through (thus looking lit when code is properly cycling and off if the code locks), but I am at a bit of a loss in determining where to put that simple On/Off command that will show what I want without causing a lag or false indication. Any ideas? Thanks.
There could be a couple of reasons for this:
1) Insufficient power to the bluetooth board – degradation of signal. Also 30m is the limit with BT devices.
2) Sketch loop/processing time – it takes time for the bluetooth stream to be read, parsed, and executed. Make sure you have sufficient time between loops to allow for the data values to come through and do their thing. I suggest slowing down the loop and seeing if this makes a different.
Hello Gunner, Can you help me, on how you programmed the code to use the 1-8 buttons? i’m trying to include some servo’s and led light as well..
Hello Plastic Bot, Can i have the electrical diagram… how you connected the pins? Which pins to which pins? Thank you.
Its very confusing and the programming is hard as well..
Would be glad iif could help a lil bit…
Looking forward to it.
Thanks.
Hello!
Thanks for Your work on all projects!
I just got tank chassis for experiments, and now I am considering to try Your APK and Arduino code. I see from pictures You use hacked servos as motors. Could you please provide some hints and suggestions how to adapt code for popular motor drivers L293, L298 ? I would much appreciate any help. Thanks in advance!
Hi. …and thanks. Adapting should be easy.. There should be plenty of code samples / library references on Arduino.cc for various motor drivers you want to use. After implementing any require library, it’s likely 1-2 lines of code changes for each reference to the motors. The flow of the code should remain the same, just how you send direction and speed data to the drivers will change.
Thanks for the reply Dave, and sorry for really late response… health issue have been plaguing my ability to concentrate on learning Arduino code.
I guess I need to clarify, I wasn’t having any issues until I hacked in the button control; I am not even sure how, as that was awhile ago, but I apparently broke something in the timing as power distribution is discrete and stable to both Arduino and motor controller, and the range was within 10m.
Anyhow, I reverted back to your original code, so now I guess I need pointers on the PROPER way to utilize the existing buttons (that currently don’t seem to do anything??) to control digital pin output for servo and/or switching control. Thanks.
Well, you can disregard my request 🙂 After much comparison between your versions, I was able to break the code down and modify your ver.5.1.0 example for my L298N motor controller, tweak the joystick dynamics for smother straightaway and quicker extreme turns, as well as controlling a servo for gearing and a headlight on my tracked robot… and best of all, it no longer “locks up and runs away” once I determined proper timing 😛
I haven’t fiddled with feedback to the controller yet, but time will tell.