
Glo Control – Android App & Arduino Controller
Glow Control is an Android app that couples to an Arduino-based controller over Bluetooth allowing for control of various tasks including Landscape / Patio LED lights. You can either schedule the zones to turn on / off within a time range, or use a light sensor to trigger them when it gets dark. It also offers up to 4 additional customizable buttons that allow you to add functionality. You could use it to control garage doors, sprinklers, etc. The sky’s the limit since you can customize the controller and Arduino sketch to your needs. Under the hood Glow Control simply sends commands over Bluetooth to an Arduino controller. If you are a maker, then you can use this app to control pretty much anything you can imagine. For my project, I am using it to control 2 LED zones on my new patio.
**Note – Glo Control is no longer available in Google Play.
Background
Glo Control and the Arduino controller evolved from my wanting to create a custom controller for my new patio.
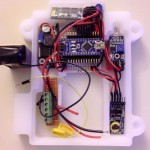
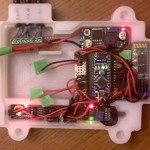
and deck LED lighthing. I have 2 zones and I wanted to be able to a) control them separately; and b) allow each zone to be controlled via schedule or when it is dark out. The Arduino controller, as you will see in later sections, was build with specific components for my needs. However, you can build whatever you want. The core of the controller is the Arduino nano (main processor), Bluetooth module (for communications to the Android device), a Real Time Clock ( for scheduling), a light sensor (to sense darkness) and a Solid State Relay (SSR) to allow for controlling the LED zones. It also has a temperature sensor to detect outdoor temps, but this was an afterthought.
After building it, I figured that others wanting to build a similar controller may find Glo Control useful, so I polished it up and put it up on Google Play. I also did a number of enhancements including; adding up to 4 customizable buttons so you can issue additional commands, the ability to send direct commands (so you can add custom features to the Sketch), and a temperature sensor with readings.

Features
[ad name=”GoogleAS728x90ImgOnly”]
What does it do?
Glo Control allows for:
- Control up to 6 zones in total
- Primary 2 zones schedule (turn lights on/off based on time)
- Primary 2 zones dusk sensor trigger (trigger lights to come on when it gets dark)
- 4 Customizable buttons.
- Display outside temperature (optional)
- Use speech control to turn lights on/off (** if supported by your device / ROM)
Customization Features:
- Customizable primary zone names
- Can hide/show outdoor temp and data console
- 4 additional customizable buttons (can define button name and value to be sent over Bluetooth)
- Set the controller real time clock to clock from the Android device
What else can it do?
Since this application simply sends commands over to an Arduino device, you could effectively customize the hardware and sample sketch to do all sorts of things Other ideas:
- Use it to control a sprinkler system.
- Use it control more landscape light zones.
- Use it to trigger outdoor lights on / off or based on a schedule
- Use it to open/close garage doors
- Use it to trigger animal feeders
- Use it to tune an HD antenna
- Control / monitor garage doors
How to Use It
Assuming you’ve built the controller, have tested Bluetooth connectivity between your Android device and the controller, here’s how to use it:
- Upon opening the app, click the Settings icon, click Select Device to select your Bluetooth connection. Once a connection is established, check the Auto Connect box. This will enable the app to automatically connect the next time it opens.
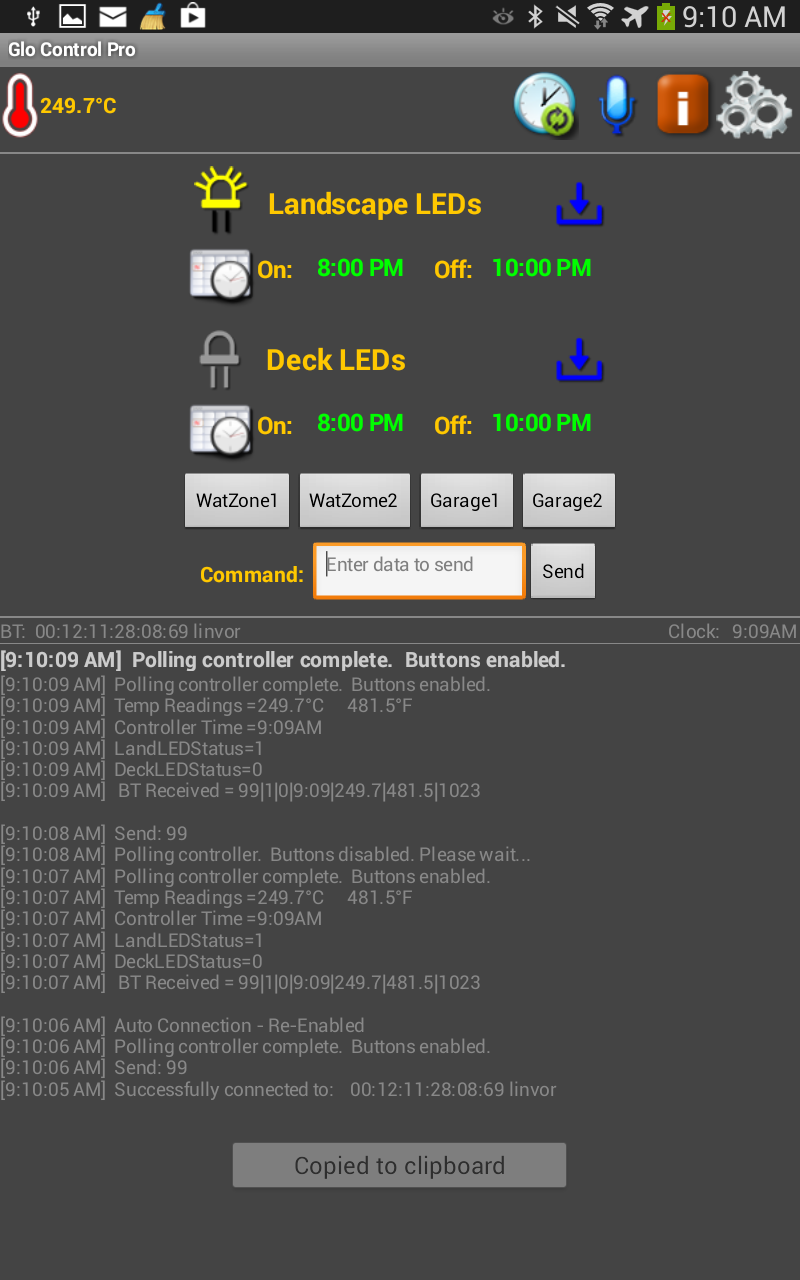
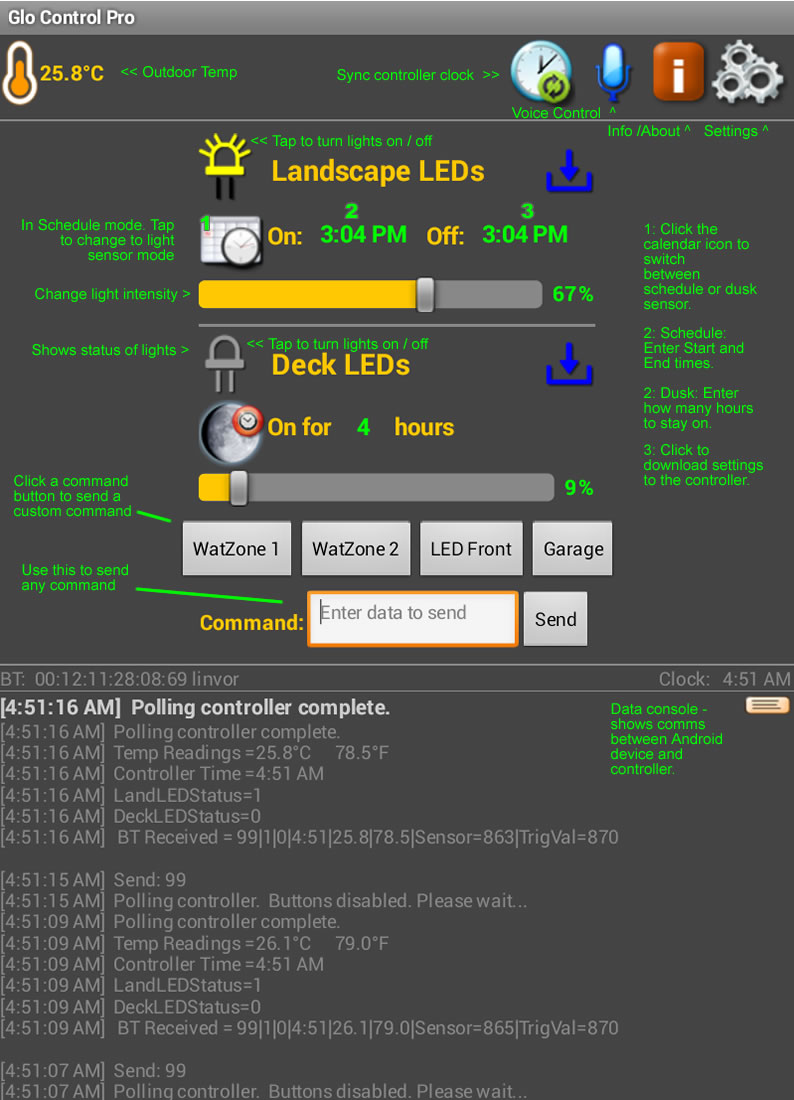
- The main screen has a variety of settings and information to display as shown below.
- Tapping the LED light icon for each zone will toggle the lights on/off.
- For Schedule mode, the schedule icon will show. Clock the time for “On” and set it, then do the same for “Off” time.
- If you want to use the sensor (to turn it on when dark), tap the schedule icon (it will change to a moon with a clock icon). Then set the number of hours you want the lights to be on for.
- The 4 buttons shown can be configured in Settings. You can configure the button name and its value. (note you will have to customize the sketch).
- You can also send any custom command (will require sketch modification).
- The Data screen shows communications between the Android device and the controller.
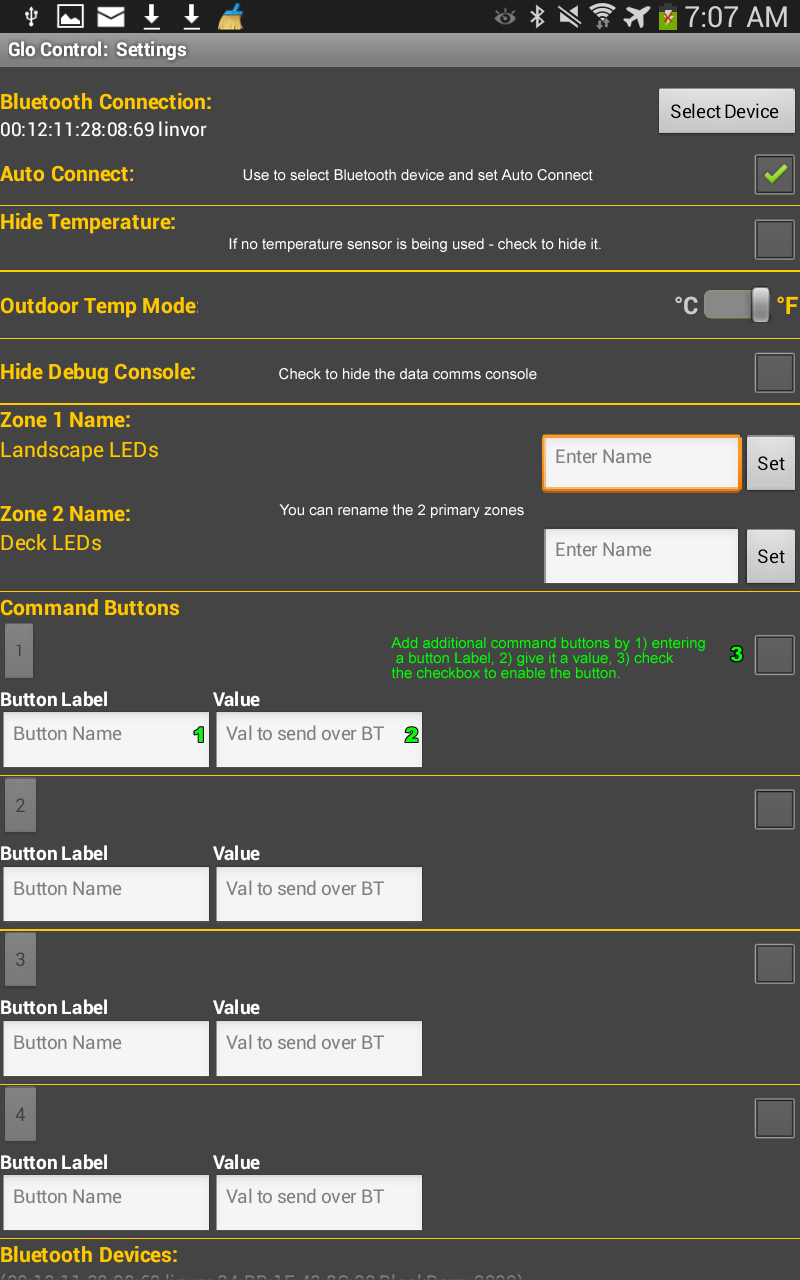
Settings: Use the settings to configure your app.
- On first start, clock Select Device to configure your Bluetooth connection. Note, you must first pair your phone to the Bluetooth device before starting Glo Control.
- Auto Connect: depreciated. The device will now automatically connect once a connection has been established.
- Hide Temperature: check this if you do not want to show the temperature readings.
- Outdoor Temp Mode: select C or F.
- Hide Debug Console: Check this if you do not want to show the data window on the main screen.
- Zone 1 – 4 name /values. Use this section to define custom buttons and their values. Be sure to check the box to enable the button on the main screen.
Arduino Controller
What equipment is needed?
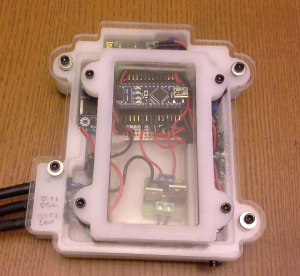
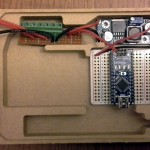
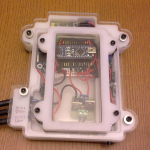
Glo Control works with a custom Arduino-based controller that is comprised of a number of component – some being optional. If you are a DIY’er, and comfortable with soldering and working with an Arduino, then you can build one yourself (details to follow). The bits:
- Arduino Nano (or other Arduino controller with sufficient Analog and Digital ports – i.e. the Uno)
- Bluetooth Module (other options out there.)
- Real Time Clock (RTC) Module (other options out there. )
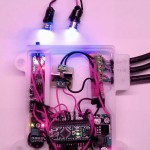
- Light Sensor Module (other options out there incl: photo sensors. You could even use an LED)
- Voltage Regulator Module
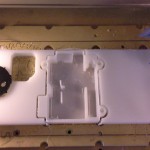
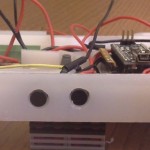
Solid State Relay (SSR) Module. Update: added LED intensity setting in App. Replaced with 30N06L MOSFET-based PWM light control. (schematic) (credit) However, most N-based MOSFET’s will work. Just make sure they can handle current & voltage for your setup.- Project Case, LEDs Outdoor power supply.
These modules are connected to the Arduino Nano. The sample Arduino sketch provides a fully functioning application based on the base build. You can also add customize the sketch to your liking as well as enable features that can be used by the 4 custom command buttons. What do you need to do to make it work? This application is a companion to a hardware device. The hardware is not off-the-shelf, but rather ‘hacked’ together by you – presumably a Maker! If you have some experience in electronics and working with an Arduino, this will be easy for you. If you have little experience, why not give it a try? The instructions provided at the link below should give sufficient information to do the build. Components are readily available. Also note that you will require a power supply that is capable of powering the controller (12V) and also the LED lights. In this case, the controller is a 40 Watt 12V unit that powers both the controller as well as the LED lights. Of course, you will require some landscape lights etc to power on as well.
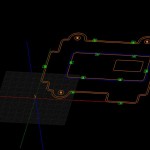
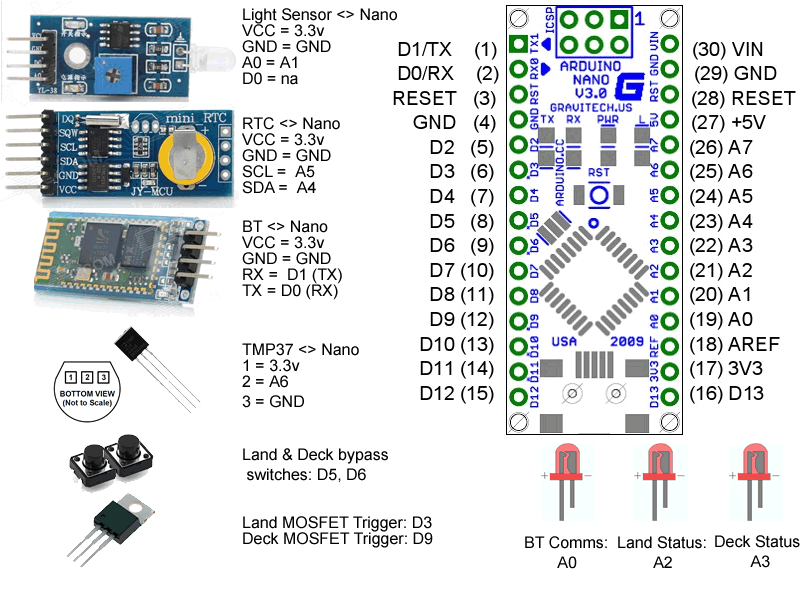
Arduino Controller Pinouts
Connections between the various modules and the Arduino Nano are as follows. Not shown are the DC step down linear regulator. There are also 2 power rails on the perfboard – one at 5V and one at 3.3V. Pics of the controller coming shortly…
FAQ
Q: When the app starts, I can’t click some of the buttons.
A: Glo Control needs to be connected to the controller via Bluetooth. It is either looking for your Bluetooth device, or waiting for you to pair your devices. You must first pair your Bluetooth device with your Android phone/tablet, then, in Glo Control, click the Settings icon to setup your connection. This only has to be done once, then Glo Control will auto-connect.
Q: Glo Control seems to lag sometimes when trying to go to Settings etc.
A: Glo Control polls the Bluetooth controller on a regular basis. The timing of this can be changed in Settings. Naturally, there will be a slight delay if the app is waiting for the response from the controller. However, this should be 1 or 2 seconds max.
Q: What if I don’t want to add a Temperature sensor?
A: The temperature sensor is optional and it’s reading can be disabled in settings. You can also disable the data console window as well.
The below Arduino sketch is based on the original controller used with the Glo Control Google app. It can be used as-is if you build the same controller and want the same functionality as described here. It can also be customized should you want to customize your controller and add or change features. Check it out:
For Glo Control v1.0.5 or higher : Glo Control Arduino Sketch
For Glo Control v1.0.4 or lower: Glo Control Arduino Sketch


Hi,
you made the really interesting think I though to do.
Could you please modify it with those needed ideas and share a tutorial to know how to also made it by our self (for us newbie electronic guys) ?
– replace the temperature reader with a temperature and humidity
– when humidity level is over then activate a (computer) fan to extract the humidity from the room where this sensors are placed
– it could becomes perfect if we could set two random (light on/off) period to simulate presence when we are out of the house. Example, make some noices during the day we are working and also activate (on/off the light) when we goes to holidays.
Sincerely thanks for the consideration you may take about those ideas and have a nice day,
Miguipda 😉
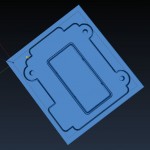
I am dying to put this together…is cnc polycarbonate the ideal….or can i just fab this up in a random box of my choosing? Any chance you would share the file on the CNC’d box? (i have never cnc’d anything, but always wanted to)
Also, does the glow control splice in on the front or backside of the 12 V controller / inverter. I am a novice electric project newbie, but read Wired and am peripherally familiar w/ Arduino controlled devices and this one seems worth my time. Super rad project my friend!!! I can only assume you are employed in CIS.
Thanks for sharing,
-JV
You can use your own box if want. Send me a msg and let me know if you want the CamBam file. Id post it, but dontvthink many would have CB software… As for your 2nd q, not sure I understand. GC is an android app that connects to the Arduino controller which is connected to 12 mains and controls power distribution to the LED zones.
hello, i want to build this, but it always fail the only one working is BT comm status, i think everything is right except the mosfet.
can you help me with the full schem including the mosfet?
Hi. Unfortunately, I don’t have a wiring schematic. There is only the pinouts diagram. However, this should provide enough information to understand how the bits connect together. For the MOSFETs, they follow the typical setup where you have the low voltage pins triggered by the Arduino (i.e. D3 for one light) but have the power connected to the mains (i.e 12V) source. Just keep in mind that the source and # of LED’s (and their respective voltage) matter. You have to do the math here on your setup. i.e if you are powering 3 LEDs that are 2.6V units, you need the appropriate resistor to ensure they don’t blow if you are feeding them 12V. Also be aware of the current you are drawing and the limits of the MOSFETs. The ones I have listed are good for 32Amps each. Also be aware of any necessary cooling on the MOSFET if you are going to be drawing a lot of current.
I am a beginner android developer, and I wanna develop an android app to control the arduino via bluetooth! Can I get the source code of that android app?? Can u mention any android development for arduino tutorials ??????????????? plzzzzzzzz, help :/
Have a look at MITs App Inventor. A very easy way to develop Android apps.