
HC-06 Bluetooth Module – Getting this sucker into AT Command Mode
 After spending nearly 3 hours scouring the Web trying to find a way to configure my HC-06 Bluetooth module. There are a lot of great tutorials out there. Many of them refer to setting the key pin HIGH, or a combination of LOW then HIGH while powering on the module. However, none of these approaches worked for the unit I have. Read on to see how it can be done. Oddly, I found the answer in the DX discussion forums related to this module. Here’s the thread. Read on for how I managed to get it working.
The fluff & Warning:
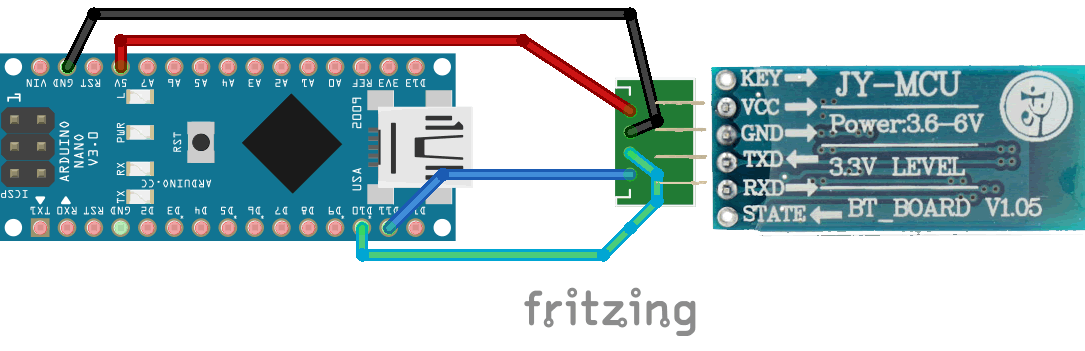
Before we start, I’ll throw this warning out there… Nearly all samples I’ve found, suggest that the connection (Arduino TX to BT RX) must be 3v3 as I’ve shown here. Although I now use this approach with BT Bot Control, it did not work for me when trying to set AT Commands. As such, I decided to gamble on connecting the pin directly to D10 (5V when high) and it worked. Also note that I’ve run this particular module for months with no 3v3 level shifting, and it has worked without issue. If you “try and fry” your module and let out the black smoke, you’ve been warned.
In case you need…
|
|
|
|

Update:
Based on some of the user comments, it might be wise to try the following:
- Use 3v3 level shifting to provide the correct voltage to the BT module.
- Pull the KEY PIN up as one user suggested to get AT/comand function.
Wiring:
| Arduino to BT Module
GND <> GND 5V to VCC (5V) D10 to TXD D11 to RXD |
|

The Sketch:
The void Setup() section carries a number of sample AT commands. Un-comment the ones you need. You can also find an AT Command reference here (but note it’s for the HC-05, but most should work). Note: If you change the baud, be sure to set the new baud for mySerial in the sketch for communicating to the unit. The Serial baud should remain the same as it is used to display the responses in the Serial window.
Here’s a excerpt from the sketch:
delay(1000);
mySerial.print("AT");
delay(1000);
mySerial.print("AT+VERSION");
delay(1000);
//mySerial.print("AT+PIN1234"); // Set pin to 1234
//delay(1000);
mySerial.print("AT+NAMEJY-MCU-HC06"); // Set the name to JY-MCU-HC06
delay(1000);
mySerial.print("AT+BAUD8"); // Set baudrate to 115200
//mySerial.print("AT+BAUD4"); // Set baudrate to 9600
delay(1000);
Demo Sketch: JY-MCU HC-06 Command Mode – Arduino Sketch
Reference Info More reference (specific to the HC-05)


Hi, I tried your sketch, but it doesnt work. The wiring is correct, so is the Baudrate (tried it with different ones). The SoftwareSerial example works. The data I am sending through my phone shows up in the Serial Monitor. Then I disconnect my phone (BT Module blinking), and upload the sketch to change the baudrate. Nothing happens. Baudrate isnt changing. I also tried many other sketches like SoftwareSerial Example and manually send the AT commands, but I do not get any response from the HC-06. Not even an “OK” when i ping it with “AT”. Everthing else is working exept the AT settings. Any Ideas? Thanks
I recall having some challenges like this as well. I did this a while ago and don’t recall how I solved it. I recall that the BT module I have could not be set to 115200 but lower value could work.
FYI. Something for everyone to remember. Once you change the baud rate to something new, if you want to change it again, your starting baud must match the last value you just set.
It’s weird here too … I also have an HC-06 (MASTER only) v1.05 (same as yours above) … I was able to program mine but only the ONCE … the LED stopped blinking, like it should then went full on and done it’s thing and then finished … but now I can’t write back to it … it just sits there blinking …
I “did” use it for my GigaPan setup (using PapyWizard on my Android) … it pairs to my Samsung S3 ok and accepts the Password (1234) but it just sits there in a loop trying to connect to my Merlin Mount … so now I cannot control anything, which I could before the flashing … and it worked well … why did I have to play with it … lol? …
Anyhow I’m stumped …maybe these MASTER Units are program once only? … or the fact I DID NOT level out the Tx pin fried the little thing … or could it be that fact that it was programmed with 57000Baud and now my Merlin Mount cannot communicate at that speed? …
As a NOTE:
I have also hard-wired the KEY pin to the smaller piggybacked BT board, as the free solder pad (for KEY connection) is not connected directly to KEY …still nothing …
I used a similar Arduino (Nano) sketch I got from OpenPilot Telemetary page …
http://wiki.openpilot.org/display/Doc/Serial+Bluetooth+Telemetry
I’ve now ordered an HC-05 MASTER/SLAVE 6pin module …
Gem
You have to pull up KEY PIN then u get AT/comand function.
Dave, tnx for the solution. AT commands were unavailable directly through arduinos UART port (I was AT-ing arduino, not the JY-MCU HC-06) , KEY PIN up just didn’t change anything. Using SoftwareSerial solved it, as it communicated a AT commands from arduino throuth the D10 and D11 ports to JY-MCU HC-06. There’s some logic to it afterall 🙂
Hi guys, I’m new with this stuff and I have the same problem with hc-06, so what do you mean with pull up key pin??
the hc-06’s key pin has a hole so, do i need to connect this pin with the arduino?
Hi Rafe,
“Pull up” means connect to 5V as far as I know. I don’t think the key pin does anything on the HC-06 (on the HC-05 it’s needed to put it into AT Command mode, whereas the HC-06 is always in AT Command mode…supposedly).
I’m still also trying to get this to work. I can connect to the HC-06 from my phone and multiple computers, but AT Commands don’t work. I’ll let you know if I get a solution.
Thanks
Hey Rafe/all,
This worked for me.
—
SoftwareSerial mySerial(10,11); // Pin 10 connected to TX on HC-06
void setup() {
mySerial.begin(9600);
mySerial.print(“AT+NAMEICHI”);
delay(2000);
}
—
Hope this helps 🙂
Hi
Make sure you did not pair the hc-06 with another device, the light on hc-06 will flicker.
Use a sketch that will pass your keystrokes from serial monitor through your arduino to the hc-06.
Change the line end stings to “No line ending”
Now you should be able to send AT command to hc-06.
The hc-06 firmware makes the board slave only and when not paired it is in AT command mode.
Hope this help.
Thanks all for your help. I managed to get it to work after a while. I had to change the pin numbers for D10 and D11 in the code. I use arduino Uno.
Here’s the code that worked for me
void setup() {
Serial.begin(115200);
Serial.println(“starting!”);
//mySerial.begin(4800);
mySerial.begin(9600);
//mySerial.begin(19200);
//mySerial.begin(23400);
//mySerial.begin(38400);
//mySerial.begin(57600);
//mySerial.begin(115200);
Serial.write(“.”);
//mySerial.begin(57600);
//mySerial.begin(115200);
delay(2000);
mySerial.print(“AT+NAME?”);
Serial.write(“.”);
delay(2000);
if (mySerial.available())
Serial.write(mySerial.read());
mySerial.print(“AT+NAMEnewName”);
Serial.write(“.”);
delay(2000);
mySerial.print(“AT+PIN1111”);
Serial.write(“.”);
delay(2000);
mySerial.print(“AT+BAUD7”);// Set baudrate to 57600
Serial.write(“.”);
delay(2000);
}
need some help, could not send AT commands, it only had Goodnight moon on the serial monitor,no AT had been sent. I’m using HC-06 with Arduino UNO
I just purchased a BT module from Amazon that is HC-06 with master AND slave functions. I’ve tried everything to get this sucker to master mode (or whatever its called) including pressing the button on the module like the Amazon description says. Nothing has worked and nothing is returned from the module when I type ‘AT’ into the serial monitor. Both the Nano and BT module I received today, but that shouldn’t effect anything, right?
Hi John,
As far as I’ve experienced, you don’t need to do anything to get the HC-06 in a mode to accept AT commands.
Try this sketch.
Thanks,
Ibrahim
/* This program is used to modify the name of the bluetooth module HC-06 */
/*HC 06 AT commands are limited, all I could find are given here.
(source http://www.instructables.com/id/AT-command-mode-of-HC-05-Bluetooth-module/step5/AT-commands/)
AT : check the connection
AT+NAME: Change name. No space between name and command.
AT+BAUD: change baud rate, x is baud rate code, no space between command and code.
AT+PIN: change pin, xxxx is the pin, again, no space.
AT+VERSION
*/
#include
const int rxPin = 10; // Connect to TX on BT
const int txPin = 11; // Connect to RX on BT
SoftwareSerial bluetoothSerial(rxPin, txPin);
char generalBuffer;
void setup() {
Serial.begin(9600);
Serial.println(“AT”);
// ONLY ONE ‘AT’ COMMAND CAN BE SENT AT A TIME!!!
bluetoothSerial.begin(9600); // Open the software serial port with the Bluetooth module
delay(10); // Initialisation delay
bluetoothSerial.write(“AT”);
bluetoothSerial.write(“AT+NAMEhi”); // CHANGE TO THE DESIRED NAME. DO NOT LEAVE A SPACE AFTER AT+NAME
delay(1000);
Serial.println(“Name set”);
//
// delay(500);
// Serial.println(“Programming complete”);
}
void loop() {
while (bluetoothSerial.available()) {
// Read incoming from Bluetooth then print to serial
Serial.write(bluetoothSerial.read());
}
delay(10);
while (Serial.available()) {
// Write our input to Bluetooth
bluetoothSerial.write(Serial.read()); // Send command to BT
}
}