
COVID-19 Daily Stats on a Nextion HMI using ESP8266
While Covid-19 picks a fight with humanity, keeping busy and your mind clear is important for all of us. In addition to getting out on hikes and biking with the family, what better way to pass the time than to built IoT stuff! Since I had a new 7″ Nextion HMI screen sitting around just waiting for a project, and had some vacation time, I decided to buffer up my skills and get to work.
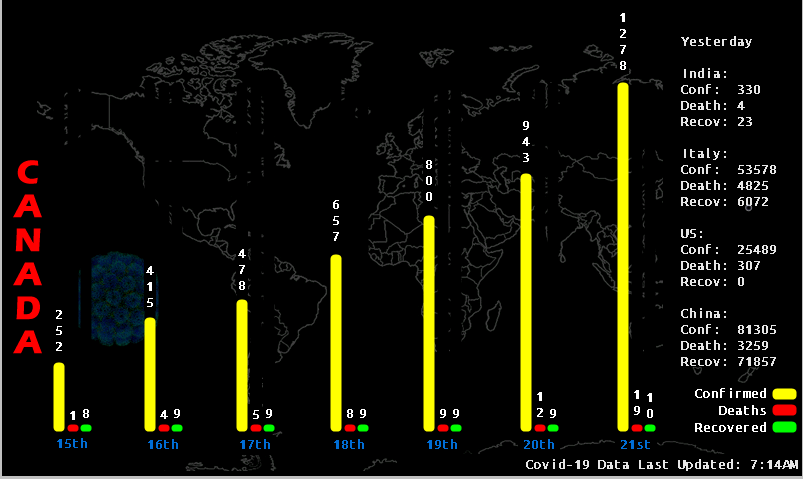
What does it do? Simple, it takes a Covid-19 JSON feed, processes it, parses out 3 Countries of over 100 Countries worth of data, and passes it along to the Nextion to display in a meaningful way. Specifically, it extracts the last 7 days’ data for Canada (home), and then the most recent daily stats for Italy (since that’s my roots) and for the USA.
Boring alert! It’s a short video and not much action, but what did you expect for showing data on bar graphs? 🙂 There’s a lag between the Canada dataset and the other 2 due to the need to parse through over 800kB of data (which is growing daily).
Read on for a more in-depth view and some discussion on new learning I’ve gained working with complexities of char arrays, pointers and some dyanmic variable assigment tricks.
Hardware:
From a hardware perspective, this is an easy build. I’m using a NodeMCU Mini ESP866 (ESP32’s or Arduino MKR’s should work too). The below video shows the data being refreshed on the Nextion IDE in debug mode with the NodeMCU hooked up to the PC via USB and providing the Serial feed to the debugger. Components listed below.
Dataset:
The data set is large 800+ kB consisting of 100’s of Countries, and growing daily, so processing time is intensive. Currently, I’m searching 6 Countries (Canada, Italy, USA, China, India, UK). Because I live here, Canada gets the primary display of the last 7 days’ worth of data. The rest get the most recent (yesterday) data. For comparisons, I did some tests on both an ESP8266 and ESP32. The former, takes ~45 seconds from boot to process all the data. Of that, Canada and Italy come in the first 15 seconds as they are at the front of the dataset. On an ESP32, processing is about 15 seconds total. Once booted, re-queries are faster for both devices, but the ESP32 is clearly faster.
Software:
With each new project I discover better ways and new tricks to make processing data easier. I have a continuous battle with processing char arrays, pointers, and working with them. No matter how many times I re-visit new projects, char arrays and pointers always mess me up. That said, I’ve got some useful code now that does some interesting things.
From an example standpoint here are some tricks that I built in:
- Added some new functions in the Nextion library to combine Longs and Ints with Char data to pass through for display.
- To minimize code in loops, came up with a way to dynamically assign variables that are passed to the Nextion. (this is not dynamic variable assignment within the ESP).
An example:
myNextion.sendCommandLong(getVarName(“d”, i, “1.val=”), covidConfirmed[i]);
myNextion.sendCommandLong(getVarName("d", i, "1.val="), covidConfirmed[i]); dynamically creates d11.val=, d21.val=, d31.val= etc as variable strings passed into the Nextion. This shrunk 70 individual variable assignments to 10 in code.
Heads-up!: I’m using ArduinoJSON and due to the size of the document, the code processes the data as a stream in a loop which allows for each Country to be searched and then parsed. As the processing is one-way, you may see errors if the source order of Countries changes (has happened once already). I’ve built in error-catching, but you will notice this happening when you see entire Countries missing in the data (0’s). If you are unsure, look at the order of processes in code and match it to the file.
Nextion HMI: This specific project uses a 7″ Intelligent Nextion HMI unit. Others can be used but there are some things you need to be aware of.
- The code is base on 800×480 pixels, so you would have to adjust the progress bar sizes in the HMI, and play with the math in the
getpos()function as it assigns the height of the progress bar based on the screen. - You would have to adjust the background graphics for size. As these graphics were borrowed, they will not be passed along in the attached sample.
Next Steps:
- Building out Blynk components to add the data rendering to my phone.
- Baking this into my WIoT App.
- Continue to refine and add features as I go.
Hardware:
- Screen: Nextion 7” HMI model NX8048P070_011R-Y.
- MCU: NodeMCU ESP8266 Mini. Can be made with other WiFi-enabled MCU’s.
- You will need to power both with a sufficient 5V power supply (suggest 2Amp +). Powering via computer USB port may cause issues. USB 3+ should be fine.
Software:
- Arduino IDE v1.8.12 but should work on others
- ESP8266 boards library v2.6.3.
- Nextion library (customized) below. This needs to go into your libraries folder.
- ArduinoJSON (V6.x minimum). You will need to download. I encourage you to donate to this project and purchase his e-book. It’s been very helpful to me.
- This project uses the Blynk libraries as I intent to later integrate this on my phone. Currently it only uses the Blynk RTC feature. All you need to do is download the blynk app, on your phone and create a blank project with RTC widget and get the Auth code which you need in the attached code. Read up at https://blynk.io/ for how to do this. It’s easy.
- JSON Dataset Feed (Note: I have no control over this feed. If it changes, it could break this code).
The code is included free below. However, I would like to ask you consider donating a few bucks (it’s a coffee! :-). I think you will find some valuable examples that will save you time. Have a look. A lot of time goes into making and documenting these projects on my blog. Of course there are also costs involved. I use support funds toward future ideas, projects that I blog about here and share with others. Please consider supporting me at PayPal or Ko-Fi below.
- Update Mar 25 v12: Bug fixes
- Update Mar 24 v11: Fixed issue NULLs coming through the data. Streamlined code.
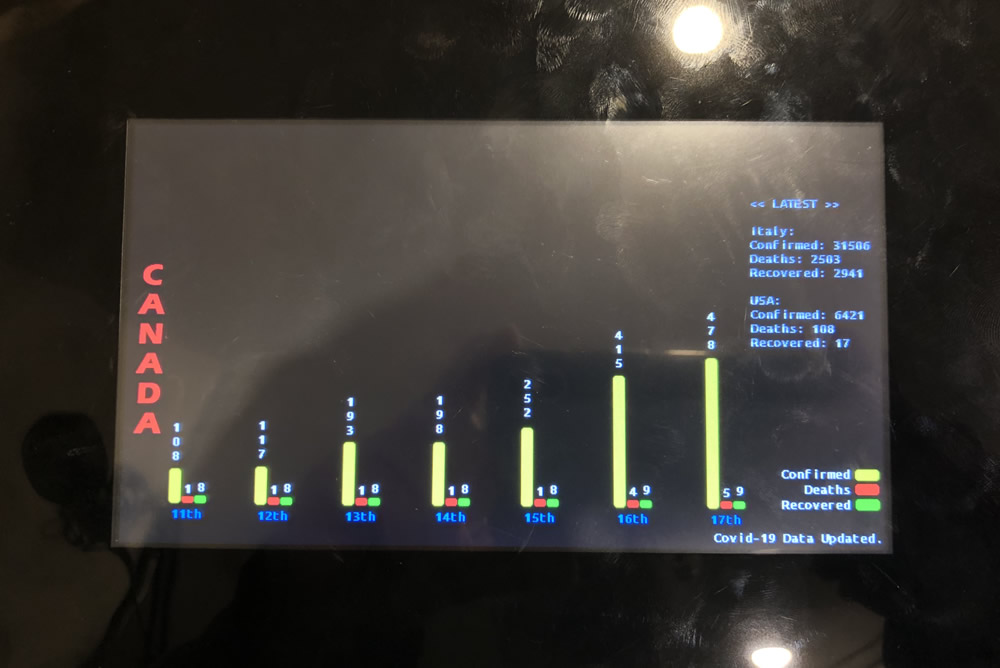
Below showing the an earlier iteration on the Nextion HMI 7″ screen.


Comments: