
ESP8266 Fancy OTA Form
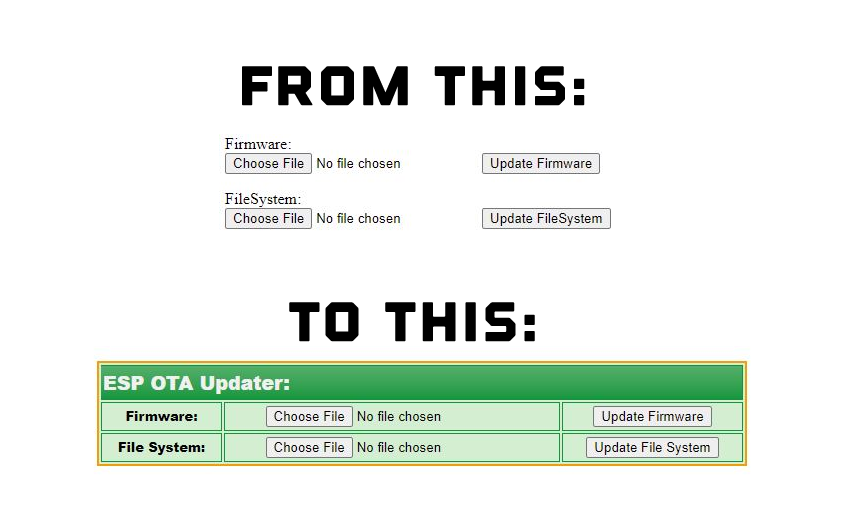
If you are a user of the ESP8266 OTA web update feature you’re likely familiar with the above form when doing updates to your project over the air. Well, I’m going to show you how to spice up the form visual (hint – it’s easy!). I just added this to my WIoT-2 Weather Project, which now makes updating a breeze.
Background: There are a number of ways to do OTA updates on your ESP8266 (or ESP32 for that matter). This version is based on the ESP8266HTTPServer update sample. I like this one best as I can never seem to get the Arduino IDE method working! The below information assumes you have already gotten this type of OTA working on your device. All that’s needed is to swap out the default HTML code provided in the library. Note! This is intended for the ESP8266. The process is similar for the ESP32 – Google should provide lots of examples.
Steps 1: Locate the file ESP8266HTTPUpdateServer-impl.h which is part of the ESP8266 library. Typically this can be found in: C:\Users\[YOURUSERNAME]\AppData\Local\Arduino15\packages\esp8266\hardware\esp8266\2.7.1\libraries\ESP8266HTTPUpdateServer\src.
Step 2: Local the serverIndex[] array at the top. This defines the default table formatting (first sample in above image). We are going to update this.
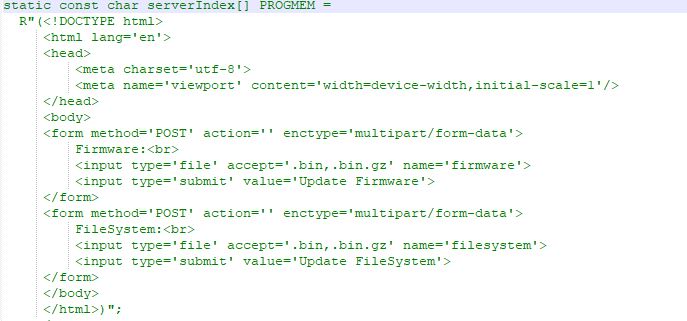
Step 3: There are a variety of HTML online editors out there where you can create your own forms. I used this one and hacked together a table template and then substituted the key form elements from the above code. I’ve also copied the HTML needed below if you just want to use what I have.
I suggest first creating a simple HTML file and testing that the form looks ok. Once done, you extract the code from the opening HTML tag “<html….” to the closing tag </HTML>”.
Step 4: Comment out the original variable to maintain it. Copy it and paste. Remove the original HTML and drop in the new content using the new form code you created. Save it, re-compile your project, upload and test the web page again to ensure it works. Make sure you test the upload functionality.
Heads Up!: You should assume this library may get overwritten each time the ESP8266 libraries are updated, so keep a clip of this code with your project so you can add it back later. Worse case, it reverts back to the original plain form. 🙂
  static const char serverIndex[] PROGMEM =
  R"(<!DOCTYPE html>
    	<html lang='en'>
     <head>
         <meta charset='utf-8'>
         <meta name='viewport' content='width=device-width,initial-scale=1'/>
		 <style>
		 table.greenTable {
			font-family: "Arial Black", Gadget, sans-serif;
			  border: 2px solid #F49B0A;
			  background-color: #D4EED1;
			  width: 650;
			  align: center;
			  text-align: center;
			  margin-left: auto;
              margin-right: auto;
			}
			table.greenTable td, table.greenTable th {
			  border: 1px solid #24943A;
			  padding: 3px 2px;
			}
			table.greenTable tbody td {
			  font-size: 13px;
			}
			table.greenTable thead {
			  background: #24943A;
			  background: -moz-linear-gradient(top, #5baf6b 0%, #3a9e4d 66%, #24943A 100%);
			  background: -webkit-linear-gradient(top, #5baf6b 0%, #3a9e4d 66%, #24943A 100%);
			  background: linear-gradient(to bottom, #5baf6b 0%, #3a9e4d 66%, #24943A 100%);
			  border-bottom: 0px solid #444444;
			}
			table.greenTable thead th {
			  font-size: 19px;
			  font-weight: bold;
			  color: #F0F0F0;
			  text-align: left;
			  border-left: 2px solid #24943A;
			}
			table.greenTable thead th:first-child {
			  border-left: none;
			}

			table.greenTable tfoot td {
			  font-size: 13px;
			}
			table.greenTable tfoot .links {
			  text-align: right;
			}
			table.greenTable tfoot .links a{
			  display: inline-block;
			  background: #FFFFFF;
			  color: #24943A;
			  padding: 2px 8px;
			  border-radius: 5px;
			}
         </style>
     </head>
     <body><br><br><br><br><br><br>
		<table class="greenTable">
		<thead>
		<tr>
		<th colspan=3"><b>ESP OTA Updater:</b></th>
		</tr>
		</thead>
		<tbody>
        <tr>
		<form method='POST' action='' enctype='multipart/form-data'>
		<td><b>Firmware:</b></td>
		<td><input type='file' accept='.bin,.bin.gz' name='firmware'></td>
		<td><input type='submit' value='Update Firmware'></td>
		</form>
		</tr>
		<tr>
		<form method='POST' action='' enctype='multipart/form-data'>
		<td><b>File System:</b></td>
		<td><input type='file' accept='.bin,.bin.gz' name='filesystem'></td>
		<td><input type='submit' value='Update File System'></td>
		</form>
		</tr>
		</tbody>
		</table>
     </body>
	 </html>)";


Comments: