
WIoT: Weather Station & IoT Notifier
Update: Check out my latest version of this project WIoT-2.
This is a project that I have been wanting to do for some time. Since the marrying of IoT with microcontrollers, the world of cloud-connected devices 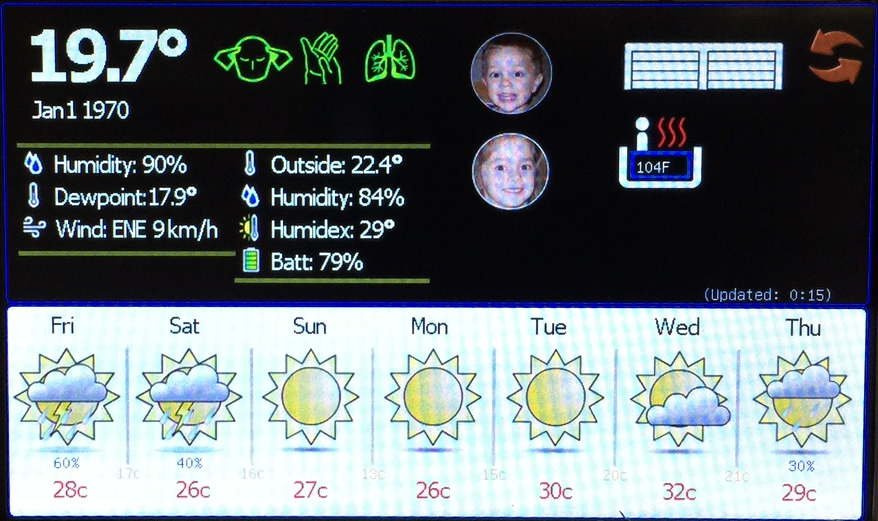 has taken off. I had a hard time naming this thing because its sort of a swiss army knife of IoT. I keep coming up with new ideas as to what to connect to and control. I’ve done other similar projects (like my garage door monitor / opener project), but this is the first complex project that I’ve embarked on. (BTW – It also now integrates that garage controller I just mentioned!)
All too often, we are in a rush to get out the door (kids school, soccer games, dance etc). We often want to know what the weather is or I want a status update on other things (i.e – hot tub temperature). I wanted something that was (BAM!) in our faces, at the door and had the info right there. I also wanted to be able to expand on it. A few wifi enabled controllers, some sensors, an LCD and other bits later, and WIoT was born. Read on for details… BTW, I am also interested in knowing if there is a market for such a thing. Drop me a line if you have ideas or are interested…
So, what does it do you ask? Lots!
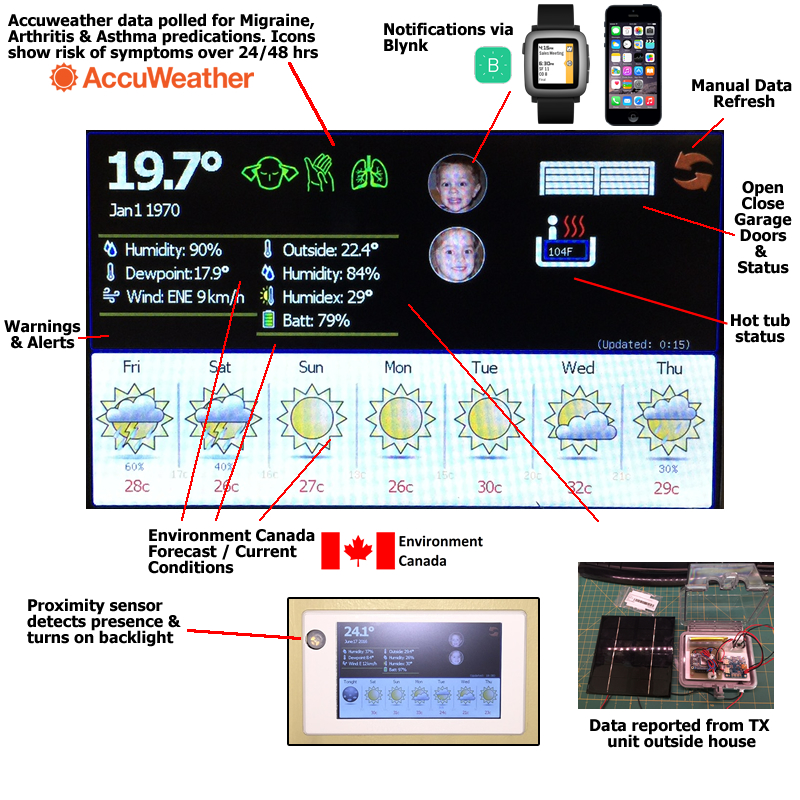
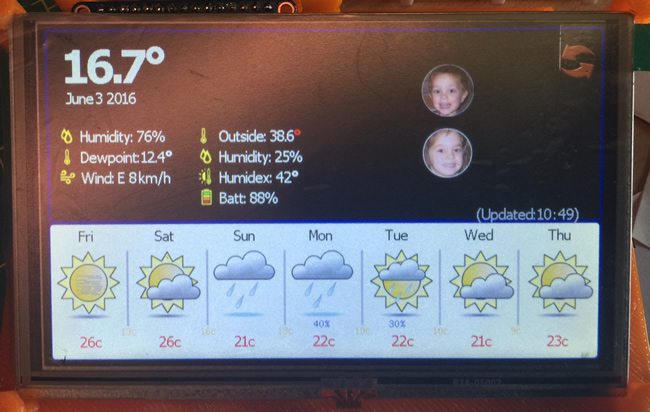
- Displays 7 day forecast weather from Environment Canada XML feed.
- Displays Accuweather health indicators for Arthritis, Respiratory and Migrain predictors.
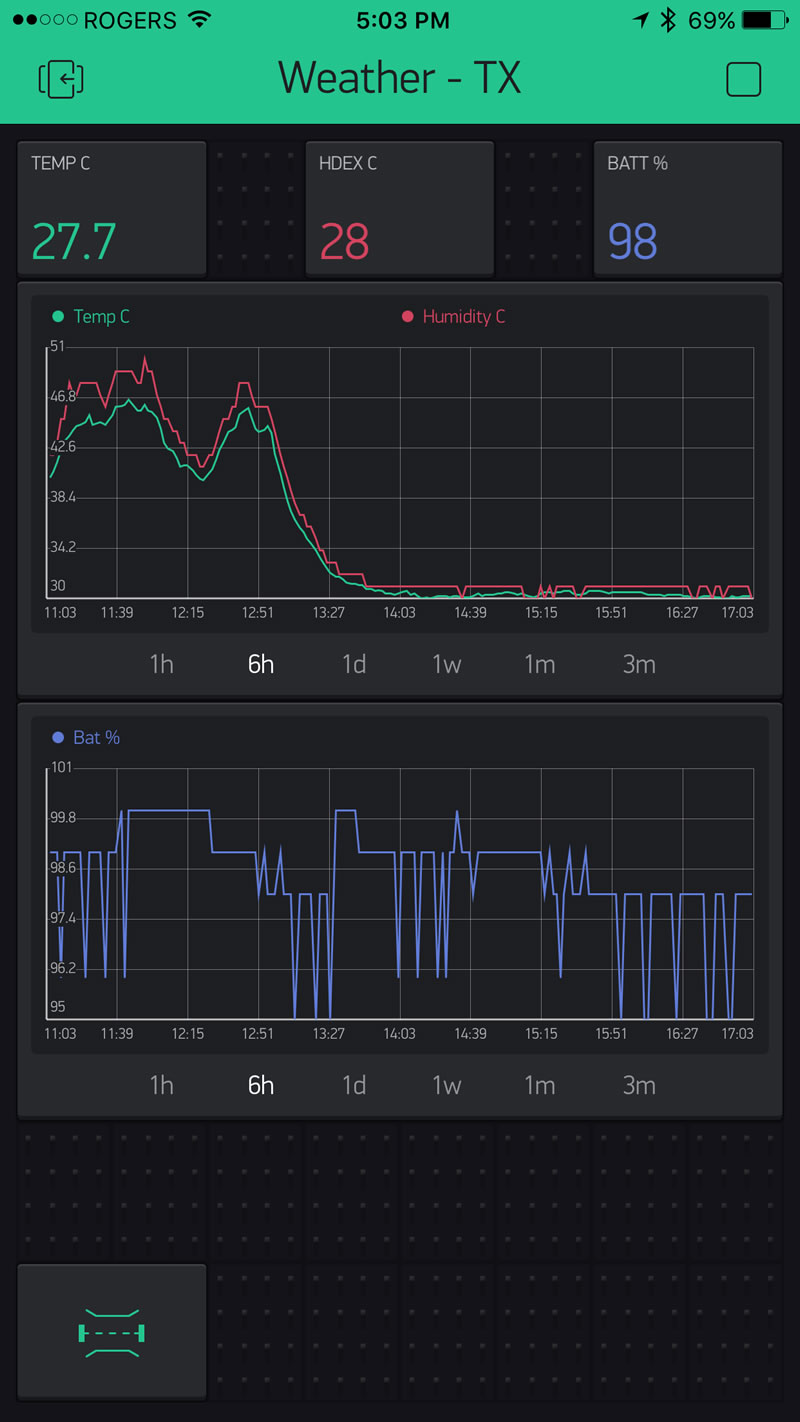
- Displays outside temp, humidity and battery level data from a solar powered external monitoring station outside our house. (the accompanying Blynk app also displays this info as well as tracks history)
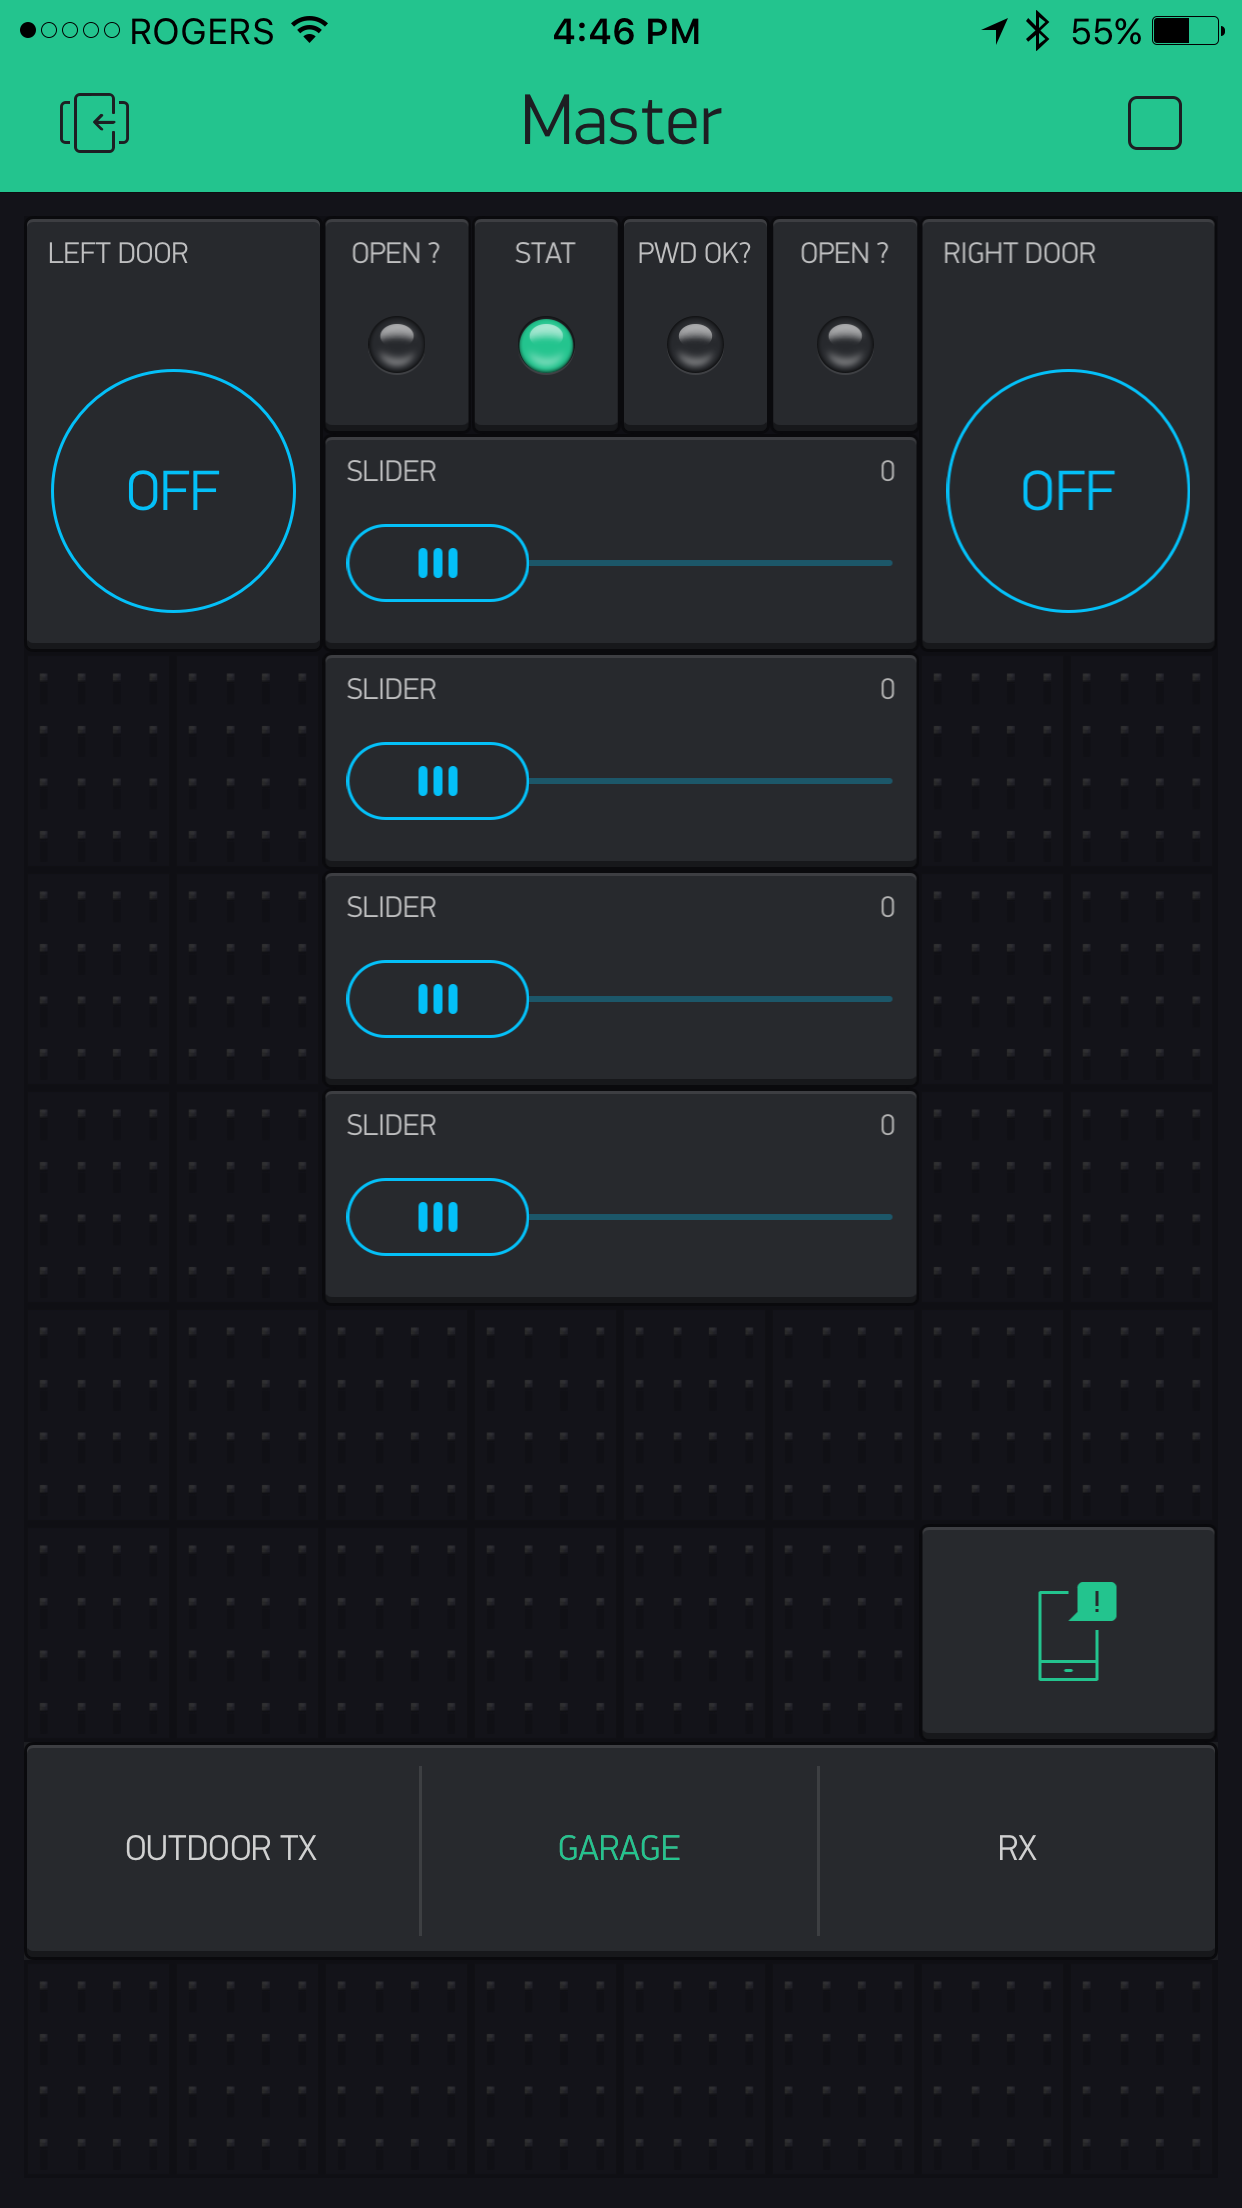
- Integrated my Garage Door Monitor monitoring to show the state of both doors and allow them to be opened/closed.
- Allows our kids to notify us when they get home or go out and play with friends using Blynk notifications. They just touch their face icons and bam! We get this info on our phones as well as my Pebble Time watch.
- A PIR sensor is mounted on the front of the main unit. When a we are not in front of it the LED backlight is turned off. When a person is detected, it turns on for a preset amount of time. Good for saving power.
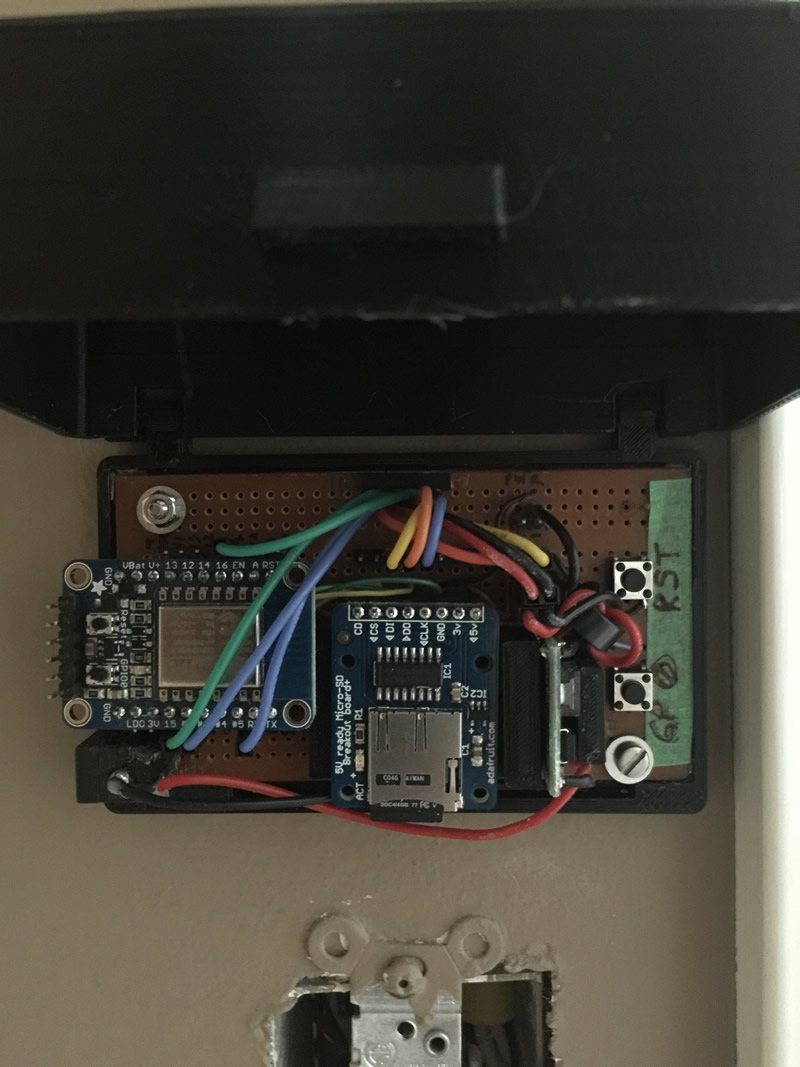
- The package consists of a TX unit (outside data) and RX unit (the TFT LCD). The outside unit is not required. They both use Adafruit Huzzah ESP8266 boards and are connected via Blynk. They share data between themselves and my Blynk app.
- We just stumbled into a free hot tub. I cant have it go solo and not be connected to the cloud! That would be so 2012! 😉 In the coming weeks, I’ll be adding an ESP to it so we can monitor the temperature. I will also use it to send Blynk notifications if the hot tub temp gets too hot or too cold (in the winter).
- I’ve got a few other ideas up my sleeve including using it as a post-it like device for my wife and I to leave messages for the kids. Using Blynk on our phones, we can type a note and assign it to one or more of the kids and it will show for them. i.e. “get your homework done by…” Or… “go easy on the cookies!”
Video Showing Base Features (does not include recent additions)
There are 3 main parts to this project:
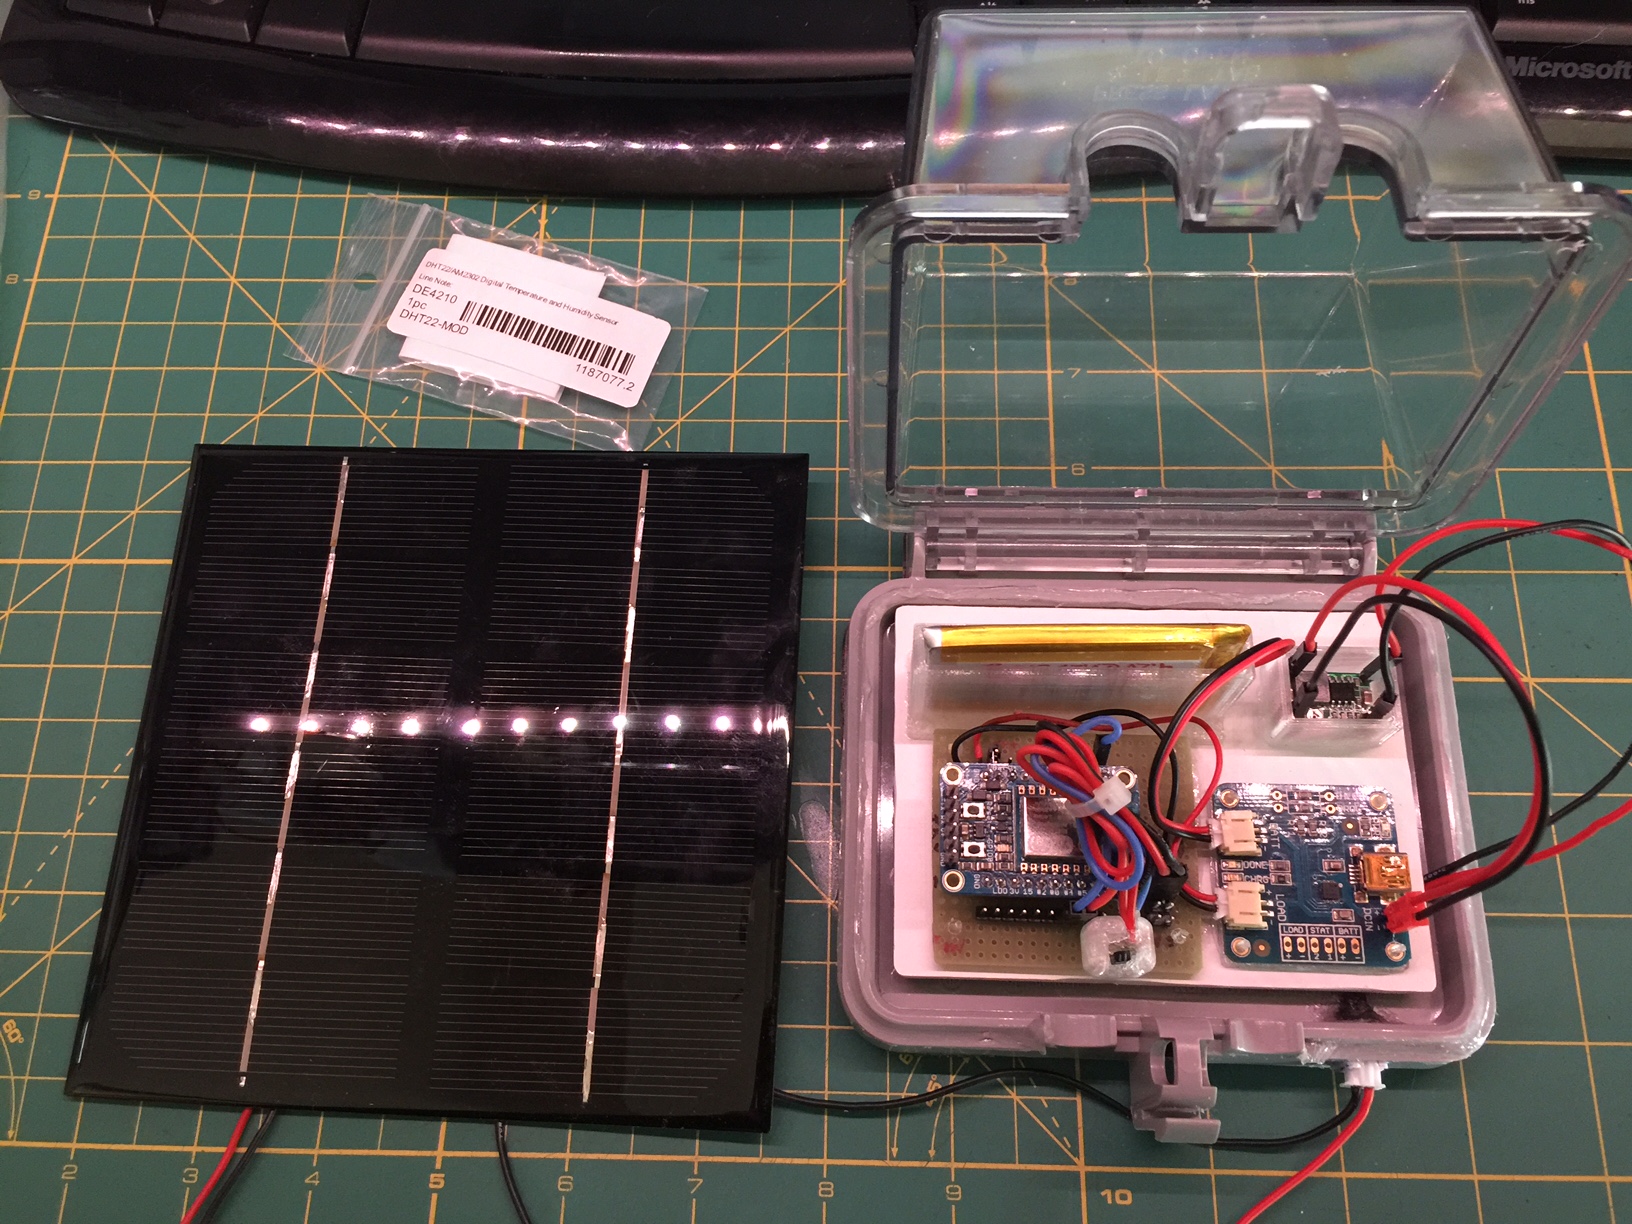
- Transmitter (TX) – this is a solar powered unit that reads data every 15 minutes from a SHT-11 temp/humidity sensor and relays the data via Blynk to the RX unit and my iPhone. It uses the Huzzah ESP8266 with low power mode enabled. It wakes up on a timer to send data, then goes back to sleep. It’s been running for 3 months now and the solar panel keeps the battery topped up daily.
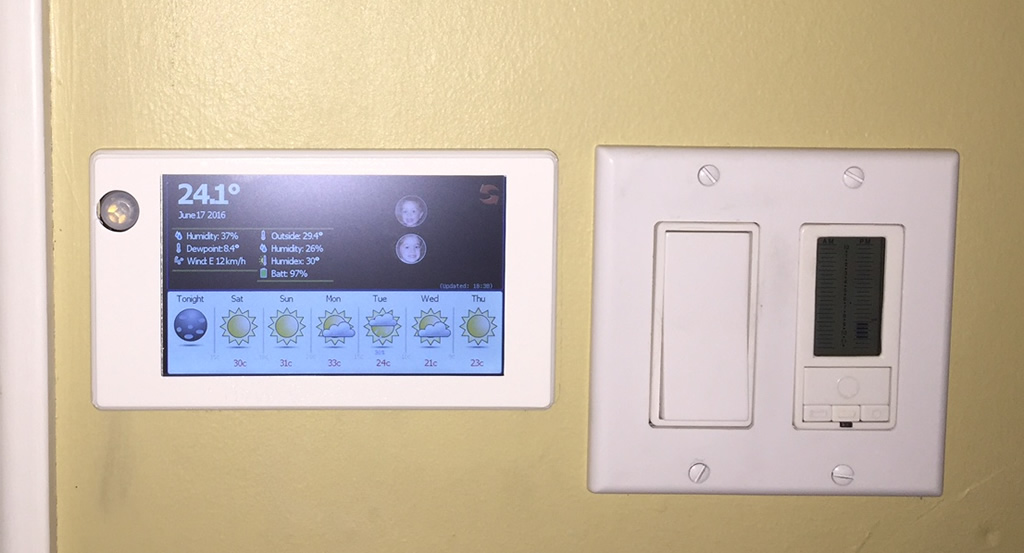
- Receiver (RX) – this unit pulls weather forecast info from Environment Canada as well as the temp / humidity / battery info from the TX unit. Data is rendered to the display. Refreshes every 15 minutes.
- Blynk App – displays the outdoor temp and battery info from the TX.
| TX Unit | RX Unit | Blynk App |
|
 |
  |
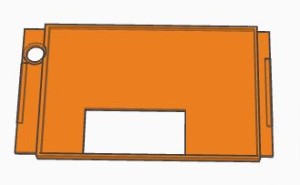
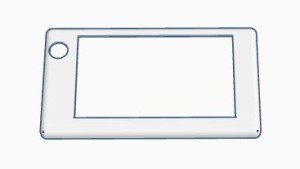
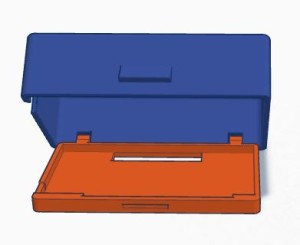
| 3D Printed Parts | ||
| RX – Back Plate | RX – Bezel | RX – Controller Box |
 |
 |
 |
Features:
- Displays real-time weather conditions and forecast information from Environment Canada.
- Displays Accuweather predictive data for Migraine, Arthritis & Asthma risk over the next 24 / 48 hrs.
- Data refreshed every 15 minutes. Manual refresh option on screen.
- Pulls temp, humidity, humidex and battery level information from outside the house (from TX unit).
- Displays TX unit temp, humidity, humidex and battery level on Blynk App.
- Uses Blynk notifications to allow my kids to notify us when they are home. (see video)
- Future features to add:
- Allow for sending of messages / reminders to unit from Blynk
- Remote refresh weather data
- Got any ideas? Send them via the comments pls!
Components:
- RX Unit:
- Adafruit Huzzah ESP8266
- Adafruit 5″ TFT LCD
- Adafruit RA8875 TFT controller
- Adafruit Micro SD card reader
- PIR Proximity sensor
- Switching power supply
- RX unit: 3D printed controller box with flip-open cover, 3D printed backplate, 3D printed bezel.
- TX unit
- Adafruit Huzzah ESP8266
- SHT-11 (or equivalent)
- Switching power supply
- 3.7V LiPo battery
- Adafruit Solar power charge controller
- Solar panel
- Outdoor water resistant case
- Other useful components
Other:
- Time to build – 4 months (incl waiting for parts)
- Hours of coding – too many
- Code Iterations – 26 (RX), 5 (TX)
- RX unit –
22002600 lines of code - TX unit – 337 lines of code
- Silcone wiring (must have for projects like this – hint does not melt when soldering!)
- Libraries used:
- Blynk & ESP8266 (Blynk widgets, RTC & bridge)
- SHT1x
- TextFinder (for parsing XML web data)
- TimeLib
- Adafruit mfGFX (modified with custom fonts – Tahoma for this project)
- SPI
- Wire
- SD
- Adafruit RA8875
Source Code and Libraries:
- This project has evolved into WIoT-2. Check it out here.
| RX – Testing | RX – Test 3D Parts | RX – Controller |
 |
 |
 |
Ramblings:
SPI: As I waited for the parts to arrive, I started researching all the bits and pieces I would need for this project. One common theme I repeatedly stumbled upon was that there will be comms issues on the SPI bus when you connect the ESP and other devices. In my case, the ESP (Huzzah) + 5″ TFT + SD card would all be SPI. What I was hearing was a need to run the CS lines through a 74HC125 CMOS buffer chip to allow these devices to play happy together. I was also looking into the SumoToy RA8875 driver as he’s done some great things with this and it supports layering etc. However, to date, he has had challenges with ES8266 not playing well with SPI. I decided to take a leap and ordered a 5″ TFT + SD Card breakout and RA8875 driver board from Adafruit. I already had a spare Adafruit Huzzah ESP8266 laying around. Not sure if they did some tricks with SPI, but I was able to put all these bits together on SPI without the CMOS buffer. The Huzzah ESP, SD card reader, RA8875 are all playing well in the sandbox.
RA8875 Drivers: One of the things I liked about the Sumotoy RA8875 driver was that it had layer support built it. This would allow me to draw (for example) background graphics while allowing me to refresh data over top – without going through the slow process of reloading images. Unfortunately, this feature is not available in the Adafruit RA8875 library, and I’m not skilled enough to write the bits needed for it (its all there waiting in the RA8875 datasheet if anyone wants to take this on). Anyway, it’s a small sacrifice and I am happy with the result.
Parsing XML: One of the first things I looked into was a library to parse XML data. I suppose I may be old school here, but for the maturity of the Arduino world, I was surprised to see that there was next to nothing out there for parsing XML. After digging for a bit, I stumbled across the TextFinder library. Although it had its limitations it solved my problems and I give kudo’s to the developer. Some of the issues I faced was that my searches had to always be forward moving. You could not find an element, then go back to get something. As a result, the structure of my key searches varied depending on the type of key and the data within. In addition to this, the Environment Canada XML element definitions were not as clean as they could have been. Ideally, you want elements such as <todayTemp>25</todayTemp>, but that was often not the case.
Adafruit mfGFX Library: As I was using a 5″ TFT LCD, the last thing I wanted was to upscale system fonts and have them look all blocky and ugly. After a lot of digging I came across the Adafruit mfGFX library that solved this problem. It allowed me to create fonts as graphics and then define them in the library itself. There’s lots of info out there, but in essence what I did was use TheDotFactory (tool) to generate font data, dump that data into the library, and then create the correct pointer. Since I was using an ESP8266 as a core, I had about 1MB to play with – so I was good with space. If you go this route, dont expect much with an Atmel chip as you will eat up all the memory very quick.
Reducing Font Footprint: Another trick I learned to reduce space was to generate the full font from TheDotFactory, and then with the resulting source data, and using the FontDescriptor (to help ID the character), removing the line that defines the character as well as the line in the FontDescriptor (this will all make sense when you look at the output). This was useful when I generated a 72pt Tahoma character set for the temp values. I only needed numbers and the “.”. TheDotFactory comes with a PDF that contains a lot of good info. It also saved over 400K of data being pushed to the ESP. There are also other nuances that the code does not take care of. For example, you need to add the start and end characters to the first line.
Blynk Bridge: This useful feature of Blynk allowed for the sending of data between the TX and RX units. The interesting part is that you don’t really need the app. Well you do, to create the necessary auth tokens for both sketches, but then you simply establish the bridge between the 2 sketches and use it to send data back-and-forth. What is not clearly defined is that you need 2 apps within the Blynk app to establish 2 different auth tokens so you can create the bridge. However, you don’t necessarily need buttons and other widgets to handle the data. In this case, not only did I use Bridge, but I also created the app to display the data from the TX unit (shown above). I do have an RX app, but right now there is just test stuff in there. I am toying around with the Terminal widget as a means for me to send messages to the RX unit. Have it working, but not implemented yet.
Challenges:
- Blynk notifications are limited to 1 per minute. The reasons for this are obvious (think anti-spam). However, it would be nice to have some options. In the case of this project, both my kids can’t check in at the same time. They have to wait 1 minute between notifications. As indicated by the Blynk team, this is easily solved by setting up your own Blynk server. I’m willing for deal with the issue as I am not (currently) bothered setting up my own Blynk server.
- Memory. GLCD fonts can eat up memory quickly. I had to be careful selecting and using fonts. Even though I had over 1MB of space (far more than an Arduino 328), I was touching 94% total memory space until I thinned out the Tahoma 48pt font I was using. After removing characters I knew I would not use, it dropped to 36%. In the end I landed on Tahoma 16pt (full character set) and 48pt (numbers + “.” only). I also created matching fonts with the “degree” symbol to display it as well.
- During the many iterations of coding the sketch against the ESP, I often ran into WDT reset issues on the ESP. There is a known issue with the ESP core that it requires time to allow it to process the IP stack and deal with web connections etc. I found that by scattering yield(); calls through areas of code that sometimes could take longer solved the issue. This allows the ESP to break for a few MS to deal with it’s own housekeeping. If you run into WDT errors, don’t give up. It’s often just because it crashed.
- Mounting – I 3D printed all the baselplates and controller box for the RX unit. It took a lot of time and multiple prints to get the dimensions correct. To mount, I had to come up with crafty ways to get mounting bolts in the walls. On one side, I was able to simply screw into the 2×4 behind the drywall. For the other side, I printed nut holders and had the bolts coming out from the all with nuts mounting unit.
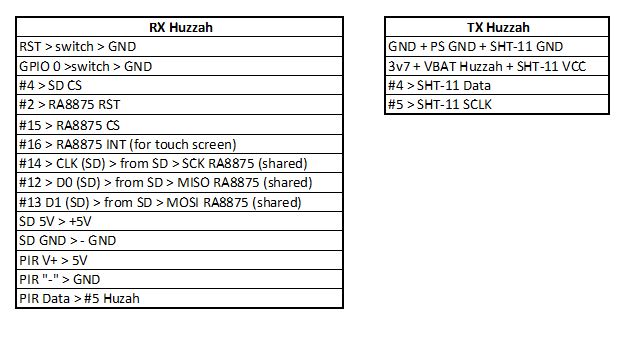
Pin-outs and Other Stuff:
I like to use my own blog as a personal reference. Below is useful information as I’ll probably do something like this again:
Environment Canada feed: Forecast iteration is 12 from 3PM to 4AM. From 4AM till 2PM its 13. This is the number of loops that need to be done to get the 7 day forecast data. The additional iteration is for the “tonight” data that comes as the day progresses.
Pinouts:


Great project. I can appreciate the “hours of coding-too many”. Thanks for sharing and providing the details of your project.
Great project! Can we take a peek at the source code to help us better understand how you integrated the HW and Arduino/Blynk pieces?
Thanks. I’ll be posting code soon. Making a few tweaks and cleaning some stuff up first.
Yes this is really nice. Good job. Sounds like you learned a ton and that’s great. I am just a beginner as well. and can admire your work. Thanks for showing it to us.
Thanks.. I learn something new with every project I do.
This is great, we’re on the same path, except i was using adafruit’s feather m0, which i am abandoning due to too many difficulties with usb and my iMac (other boards are fine). I”m tempted to go the micropython way … Thanks for sharing!
As for weather in Canada, (i am in qc), i use their services, works great: https://darksky.net/dev/