
Dicontinued – WiFi Bot Control & Arduino Bot (Eddie) – Android App to Control Robots

Wifi Bot Control is an Android app that allows you to remotely control a robot (or other device) via WiFi. You can also (optional) view a video stream from an IP camera mounted to the robot. WiFi Bot Control also provides up to 8 additional customizable command buttons that allow you to perform additional tasks on your robot / device. You could use these commands to initiate other activities such as enabling/disabling sensors, moving other servos / arms / picking something up, turning a LED on/off etc. With the provided sample sketch, you can customize the robot to do what you want. Note: WiFiBot Control is no longer available or supported. There are other options that can serve a similar purpose. Have a look at Blynk. Thanks for those that supported in the past.
|
Update March 2017: I’ve posted how to get WiFi Bot Control working with a NodeMCU (ESP8266). This removes the need for a separate webserver and JSON data. Check it out.
What You Need

** If you are looking to use Bluetooth to control your robot, also check out BT Bot Control. Also note that because the Android app links directly to your robot via Bluetooth,this is a faster method of control. However, it is limited to approx 10 meters (Bluetooth limitation).
How to Use It
WiFi Bot Control consists of 3 main components:
- The WiFi Bot Control Android application for your tablet/phone.
- A robot – this could be anything as long as it has WiFi capability. For the purpose of this tutorial / build, I used an Arduino Nano with an Adafruit CC3000. All samples are based on these components.
- A webserver. The purpose of the webserver is to act as a go between the robot and WiFi Bot Control. It interpretss the commands sent by WiFi Bot Control, and provide a file by which the robot can read to determine commands being sent to it. This webserver can be part of your robot, or can be a separate server. However update speed becomes an issue if this server is remote, so keep this in mind. By now, it may be possible that the Adafruit CC3000 libraries have enabled the local webserver and you can modify the code to allow for the updating of the files within the robot. Drop me a line if you managed to get this working and I can add details for others to follow. Note: You have to have access to a webserver. References to “www.yourserver.com” should be replaced with the URL of your server.
WiFi Bot Control – Joystick Modes:
Default Joystick Mode:
When you move the joystick, x and y coordinates are packaged into a configurable URL string and transmitted. The following is a sample URL where the x value is 22 and y value is 44. Note the URLmode value is 1. This information is parsed into a json file and then read from the Arduino robot / device.
http://www.yourserver.com/cc3000sample/updatestatenew.php?URLmode=1&URLxval=22&URLyval=44&URLudlr=&URLcmdVal=
Simple Joystick Mode:
In Simple mode, the joystick has 4 arrows representing Forward (U), Reverse (D), Left (L) and Right (R). When you tap the arrows, the respective character is packaged into the URLudlr value and the URL string is transmitted. Tapping the center or releasing a button sends an S value (stop). Tapping the Up arrow would look like this:
http://www.yourserver.com/cc3000sample/updatestatenew.php?URLmode=2&URLxval=&URLyval=&URLudlr=U&URLcmdVal=
Command Mode:
You can add custom features to your robot / device with additional commands and customize the sample sketch provided. When a Command button is clicked, a value (1-8) is passed to the URLcmdVal variable. (i.e. Command Button #4 sends URLcmd=4) Also note the URLMode value passed is 3. Below is a sample URL string:
http://www.yourserver.com/cc3000sample/updatestatenew.php?URLmode=3&URLxval=&URLyval=&URLudlr=&URLcmdVal=4
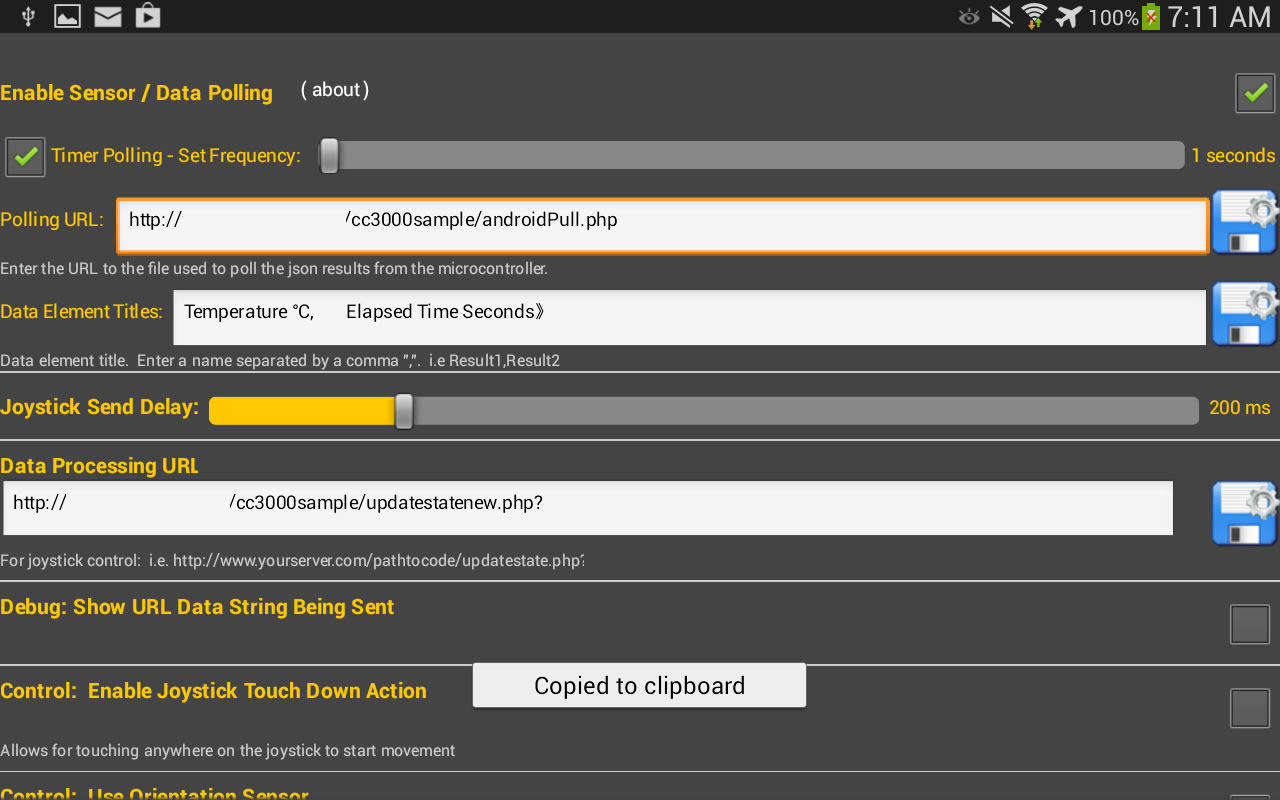
WiFi Bot Control – Settings Screen:
- You can set the WiFi send delay in the settings. The default of 200 ms is sufficient.
- Enter the URL that points to the server and location of the php file that updates the state of the json file (updatestatenew.json) Here’s a sample of the URL with the part you enter in orange:
- http://www.yourserver.com/cc3000sample/updatestatenew.php?URLmode=3&URLxval=&URLyval=&URLudlr=&URLcmdVal=4 (enter the orange part in WiFi Bot Control and the rest of it is created by WiFi Bot Control)
- Debug: Show URL Data String Being Sent allows you to see the content being parsed into the URL on the main screen (at the top).
- The other features are pretty self-explanatory.
WiFi Bot Control – IP Cam Config Screen:
This app uses the same approach for viewing an IP Camera stream as BT Bot Control. Detail can be found in the instructions. Also see the FAQ section below.
Server Components & Set-up
At the time of this writing, there wasn’t a library to allow the Adafruit CC3000 to act as a server and process data requests directly. Instead, I implemented a fork of this sample (thanks and credit Marc-Olivier Schwartz). The basic idea is that when using WiFi Bot Control, the app constantly sends a URL request to a PHP file on a server (or a computer with a webserver on it). The request contains updates to the x/y/command values (samples below). The PHP file is called and populates the data file. This is whole process is done rapidly from WiFi Bot Control. At the same time the robot (sketch sample below) is constantly polling the server and calling a PHP file that parses the JSON file for the data contents. It extracts the variables and uses them to drive the motors or act on commands.
You can host the server locally or remotely. It must also have PHP on it, and write permissions to the JSON file(s). On the Arduino side, the sketch points to the server IP address. On the Android side, it can be the URL or the IP address of the server. Note, if you are doing this within your own personal environment, you will have to ensure that the necessary port (usually 80) is open. Also, the PHP file needs write permission on the json file(s).
Remote Control Only Files (can be downloaded below):
- updatestate.php – this file is called from WiFi Bot Control to update robotstate.json with updated values from the joystick / command buttons
- robotstate.json – this file contains the actions for the robot. This file must be writeable by the IUSR web account of your webserver. Example contents: {“mode”:”1″,”xval”:”0″,”yval”:”0″,”udlr”:””,”cmdVal”:””}
- server.php – this file is called from the Arduino robot and parses the json file (robotState.json for this example)
- Be sure to check out the demo from the Adafruit Learning System.
- Server files for this sample can be downloaded at the bottom of this post.
Remote Control & Read Arduino Data Files (download at bottom):
WiFi Bot Control has a feature (in Settings) to enable reading of data pushed from your Arduino device. In addition to the above files, use the below files for reading sensor data. The latest sketch (below) has a sample to show how to do this. The below files are needed on the server to receive the request from the Arduino, process the results and also allow WiFi Bot Control to request them. Details:
- arduinoPush.php – This file is called from the sketch and populates the results in the json file (below). You can add as many fields as you like here. You must also update the URL request in the sketch to match. The current sample is setup to write numeric values (i.e {“result1″:null,”result2”:3333}). To write text values, arduinoPush.php has to be modified to write value as text (i.e. {“result1″:”testA”,”result2″:”testB”})
- arduinoPushResults.json – This file contains the sensor and other readings from the Arduino device. Note – this file must be writable by the IUSR web account of your webserver. The file also read from WiFi Bot Control.
- androidPull.php – WiFi Bot Control uses this file to parse and read the json file (above) and use it to display sensor and other reading results.
To use this feature, go to Settings and select Enable Sensor / Data Polling. Then, configure if you want to use manual or timer-based polling. The value for Polling URL tells WiFi Bot Control where the androidPull.php file is. You can also configure custom titles for each data element passed. To do this, enter the titles you want to use in the Result Titles box with a comma “,” separating each. For example, if you have 2 values that you want to display, you could enter: “Temperature C =, Humidity =” (without the quotes). If you choose not to enter any values, it will simply display as “Result1= Result2= etc“.
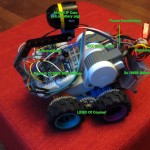
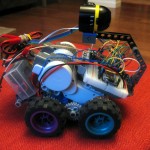
Arduino Robot – Say Hi to Eddie
Eddie is comprised of a mix of Arduino Nano, LEGO components as well as an IP Camera. The Nano uses the Adafruit CC3000 WiFi unit to talk to the server. Buried below is a power supply drive by 2x 18650 LiIon batteries (series @ 7.2v) as well as a power supply that drops the power to 3.5v for the IPCam and 5V for the Nano and CC3000.
What equipment is needed?
WiFi Bot Control talk to a robot that you can build. Here’s a breakdown of the main parts required:
- Arduino Nano (or other Arduino controller with sufficient Analog and Digital ports – i.e. the Uno)
- Voltage Regulator Module
- Adafuit CC3000 WiFi module, Spark Core**, or Arduino WiFi shield. (** – will need to validate this once my Spark arrives).
- Digistump Motor Shield (most any motor controller will work).
- Robot
- IP camera (optional).
- Motors – I used a set of these cheap servo’s. You will have to mod them by removing the position sensor tabs on one of the gears inside. An easy mod for most. There are also continuous rotation servo’s out there if you are not into modding.
- Batteries – for the robot, I used 2x 18650 batteries wired in series to provide 7.2V to the voltage regulator. From there, I push 5V to the various Arduino components, motor shield and the CC3000. The motor shield provides the power to the servos. The Digistump unit supports up to 15V 3.x Amps combined, so you can use more powerful motors.
- I also added a small blue LED to serve as a status light. It blinks with data communications between the robot and the server. I also suggest another LED that comes on once the CC3000 has established a connection. Maybe muti-coloured to show different connection states as the unit takes some time to get connected initially.
- You will need a webserver as well.
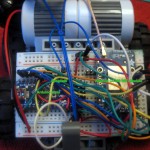
The CC3000 and motor shield are connected to the Arduino Nano (pinouts below). The sample Arduino sketch provides a fully functioning application based on the base build. You can also add customize the sketch to your liking as well as enable features that can be used by the 8 custom command buttons.
Arduino Controller Pin-outs
Connections between the various modules and the Arduino Nano are as follows. Not shown are the DC step down linear regulator.

Arduino Sketch:
The below Arduino sketch is based on the original robot used with WiFi Bot Control. It can be used as-is if you build the same controller and want the same functionality as described here. However, the expectation is you have experience with Arduino coding and plan on customizing it to suit your needs.
** be sure to subscribe for update as the below sample code may change. See top right.
Latest Jan 2 2014: WiFi Bot Control Sketch
- If you downloaded the above sketch before Dec 10/13 and are having issues, download this one and try it. It has an Idle Time-out parameter that provides stability of your server closes it’s connection too fast.
- Simplified motor driving function – (can do with further tweaking)
- Added sample to demonstrate sending sensor and other data to WiFi Bot Control (must have the latest version of WiFi Bot Control)
Earlier Version: WiFi Bot Control Demo Sketch
Server Files:
Download these files if you are only using WiFi Bot Control as a remote: ServerFiles
Download these files if you are using WiFi Bot Control as both a remote and also reading data from your robot: ServerFilesSensorRead
WiFi Bot Control - FAQ
BT Bot Control vs WiFi Bot Control – Which is faster?
Although the function of both these apps is the same, there are some underlying differences that are important to making your decision on which route to go. In general, BT Bot Control is faster in getting joystick commands to the robot. This is inherent in the design as it uses a direct link over Bluetooth between the Android device and your robot. WiFi Bot Control is slower as the commands have to a) share traffic with your WiFi network (this includes your IP camera stream), and b) are first sent to a server, and then to the robot. This is mitigated somewhat with the introduction of WiFi-enabled Arduino devices such as the Spark Core and Adafruit CC3000). However, if you do not have one of these devices, you would need to use a server with a webserver. BT Bot Control is also easier to set-up and configure. Once you have a Bluetooth connection, the sketch can interpret the commands. With WiFi Bot Control, there is the intermediary JSON configuration on the server side.
Posted in: BTBotControl - FAQ, WiFi Bot Control - FAQ
Configure IP Camera for Viewing
If you are having issues viewing a direct video stream from your IP camera (i.e. http://mycamera.com/videostream.cgi is not working), have a look at this site to see what varying modes your IP Camera has (be sure to search for your camera). If none of these work, you can setup a webpage to auto-refresh your camera in snapshot mode and then use the URL to the website in BT Bot Control / WiFi Bot Control. First, you must find the URL that your camera uses to view a snapshot.
Steps:
- You need a website – either a personal or access to a remote webserver / website where you can put some files. In this case, we will assume you have a personal webserver and use the following URL www.yoursite.com.
- Note: If you are setting this up on an internal server, you can refer to internal IP addresses (i.e. 192.168.x.x). However, if you are hosting the page externally, you will have to a) enable port forwarding from an external IP to your camera and b) refer to the camera (within the file below) by your network’s external IP and port #. For this example, all references will assume you have a personal webserver and the IPs are internal.
- Download these files and place at the root of the website you want to use.
- Open default.htm.
- You will need to change only the highlighted parts to the full URL that will be used to take a single snapshot image from your IP Camera. Before moving on, be sure that you are able to see a snapshot within your PC’s browser window.
- Once complete, call the www.yoursite.com/default.htm file in your web browser (not BT Bot Control / WiFi Bot Control). Make sure you see the snapshot image and it should be refreshing. The refresh rate is configurable at the bottom (currently set to 100 ms). If it works here, then you can plug this URL into BT Bot Control / WiFi Bot Control and you should be able to see the video stream.
- Note – don’t expect fluid video here folks. This is a crude approach to getting video streaming working in these apps. Also note that this is not a limitation of BT Bot Control / WiFi Bot Control but rather the web control implementation from Android.
Posted in: BTBotControl - FAQ, WiFi Bot Control - FAQ
Adding IP Camera URLs
Camera Options:
For this project, I used the Ai-Ball tiny IPCam. However, take my word for it, it’s a waste of money and a battery pig. It’s only advantage is that it’s small. If you are using the Ai-Ball or other similar webcam, the configuration is as noted below. If you have a spare phone laying around that has a camera, I suggest you get IP Webcam from Google Play. This great little app allows you to turn your mobile phone into a webcam and access its video stream. The full screen streaming Javascript seems to work best. Give it a try – use your local IP address: http://192.168.x.x:8080/jsfs.html (check IP Webcam settings).
Assumptions:
- You have an IPCamera that is configured and can be viewed in your web browser.
- You have the URL, username and password (if necessary) to access the IP camera.
- If you are viewing your IP camera outside your network, you will have to setup a dynamic DNS service and/or port forwarding to remotely access it.
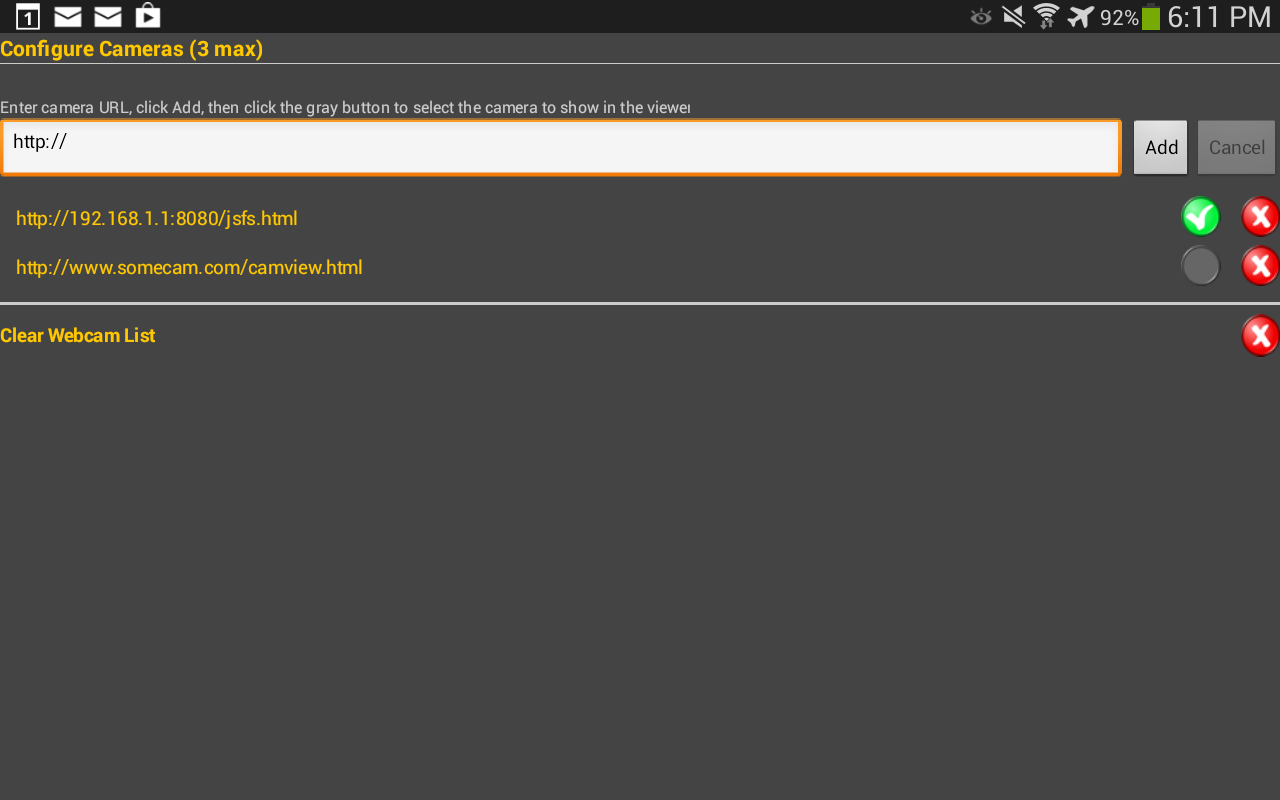
- Click the Camera settings icon in the menu and setup your camera URL (see below)
- Enter the camera URL, click add, and check the button beside the camera you want to view.
- You can enter and store up to 3 cameras.
Posted in: BTBotControl - FAQ, WiFi Bot Control - FAQ
Configure IP Camera – Alternate Approaches
If you are having troubles setting up your IP Camera,the following are some approaches that may (or may not) work for your camera. Some of these are specific to certain camera manufacturers:
1) Generic interface to Foscam IP Cameras. You could build a webpage that displays the camera and then refer to the webpage URL in WiFi Bot Control / BT Bot Control. Once done, then use the URL you use to access the webpage in the apps.
2) Interface to Foscam H.264 Cameras. .. Right click this link, save to your website folder and edit the IP/PORT, user and password. Test in your browser befor adding the URL to the apps.
3) Check this site and search for your camera. It will show you various ways to get access to direct stream and snapshot modes for IP Cameras
Posted in: BTBotControl - FAQ, WiFi Bot Control - FAQ
How to tell if WiFi Bot Control is sending data correctly?
WiFi Bot Control sends joystick and command data through a configurable URL. You configure the main part of the URL (ie. http://www.yourserver.com/folderWhereFilesReside/updateState.php?). Don’t forget the “?”, as it won’t work without it. To test this out, there is a really easy solution.
- Open robotstatenew.json (or whatever you called the file that is written to by updatestatenew.php) in a text editor such as Notepad++. Ensure that your Android device is connected to the network and proceed to use the joystick.
- WiFi Bot Control should return a status of 200 (bottom) constantly. This means its reaching the PHP file (updatestatenew.php) based on the server URL you defined.
- Next step is to look at the json file in Notepad++. If you click another window, then click back to Notepad++, it should alert you that the file contents have changed and ask you to reload it. Do it, and you should see the values have changed.
Also note, that you should see the values for x and y go back to 0 if you remove your finger from the joystick. This is by design. To see actual values, keep moving the joystick while performing the above activities.
Posted in: WiFi Bot Control - FAQ
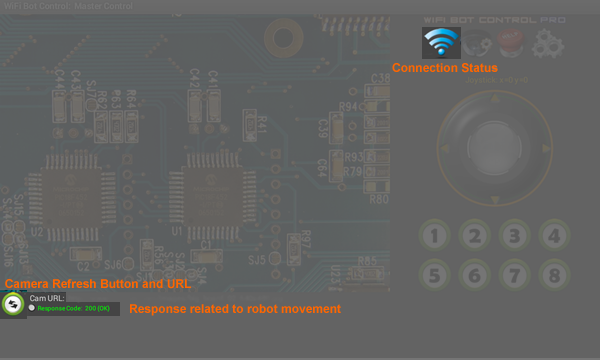
Understanding the Refresh and Connection Status Buttons
WiFi Bot Control has 2 may web components:
** This page is outdated. Update coming.
There’s the IP Camera Viewer that you see on the main screen to the left, and then there’s a Web Component that is a background service that processes the joystick and command buttons. The Web Component is not visible and has nothing to do with the IP Camera Ciewer, so don’t get them confused – they are completely separate.
IP Cam Viewer – Use the Settings to setup a pointer to your IP Camera. Once this is done, you should see the video stream in the viewer. The Cam URL button (shown bottom left in picture below) simply refreshes the Camera URL.
The Web Component sends commands to the robot. This value is set in the Settings, and the rest of it is constructed to make a complete URL (see above for samples). When moving the joystick or sending commands, the values are parsed into the URL string and a background call is made to the Web Component. You can view real-time update of this by going into Settings and checking the option (“Debug….”) to view the URL as its being created and sent. It will appear at the top. If there is a problem with the URL, the Response Code value (shown at the bottom – pic below) will update with an error code (usually 1101). Clicking the [view] link will pop up a message showing you the last URL that was sent. Note – you should expect to see 0’s in X and Y values as the joystick always moves back to zero. If you are experiencing errors and you have verified that your devices is connected, check your URL carefully. You may even want to re-create the same URL on your PC browser to test it to ensure it is correct. It’s most likely that something is wrong with the core URL part you set in Settings.
The Connection Status button at the top (pic below) is simply to test your Internet connection. It tries to connect to www.google.com. If it fails, there will be an error in the Response Code section at the bottom that you can view. If this is failing, its most likely your WiFi connection is down. Also note that clicking this button will not load www.google.com into the IP Cam viewer as this is configured to point to the URL you defined for your IP Camera. It a completely separate component. Note, if it fails the first time, give it a few more tries as sometimes it has a brain fart.
Posted in: WiFi Bot Control - FAQ


thanks
I have arduino uno r3 and a X-bee. Is it possible with these components
I have not tested with an X-bee. I suppose if there is a way to connect the X-bee to your wireless network and it becomes just another IP device, then I don’t see why it shouldn’t work.
Can u help me.to.do.the same
Is it possible to do this with my new arduino Yun?
It may work, download the lite version and give it a try. If you get it working, please post a comment with results.
The sketch included has three lines that do not compile:
StopWatch MySW;
StopWatch SWarray[5];
SWarray[0].start();
Are these necessary? If I take them out it compiles and I don’t know what function they serve.
Thanks!
Also, there are some lines in the setup:
// Local server IP, port, and repository (change with your settings !)
//uint32_t ip = cc3000.IP2U32(192,168,0,1);
uint32_t ip = cc3000.IP2U32(192,168,2,10); //Looking to webserver wifibot.xx.com
int port = 80;
I assume this IP needs to be changed to something relevant? Should this match the IP address of the arduino on the local network?
These were based on Adafruit samples as noted in the posting. They compiled fine for me, so not sure why they would not compile on your end. It’s also hard to diagnose without providing information on the error messages you have received. You may be missing additional required libraries. Have a look at the compiler error message as it gives hints if a library is required.
Hi
i am trying to use this app, and iam having trouble with the camera url it says that the page request a user ID but i don’t know where to set up the username and password, i need some help please
regards
Max
Did you follow all the instructions here and read the FAQ? You need to get your IP cam working in a browser first. Use your PC browser to test your IP cam video stream. Then focus on getting it working in WiFi Bot Control. This app just uses a browser window to display your cam view.
have you considered using a Raspberry Pi onboard the robot – host web server, either a USB cam or RaspiCam as your “IP Camera” and local connection to
Arduino. – No wifi shield needed. That’s the route I’m going to go, and your App just took a huge load off of my shoulders – one less thing to worry with down the road. Thanks!
Great idea.. Once you get it working, if you blog about it, drop me a link so I can post it.
Hello,
I am using this app, an Arduino Uno with CC3000 shield, and a L293D IC to control the motors. I am serving the files on Windows IIS. When using the old version of the arduino code, the serial monitor output goes up to “got here 3”, then skips to “got here 6”. Is there any obvious reason why this would happen, such as server configuration, etc. The server seems to be running fine, the stat led flashes, and the app gives a good response code.
Thanks!
Some of the challenges with using WiFi over Bluetooth is lags in the overall process and system for transmitting commands. For example, in BT Bot Control commands are send directly between your Android device and your robot – there is no intermediate step. In WiFi Bot Control, commands are sent over WiFi to the server, and then sent to the robot. If your Webserver is busy performing other tasks, you will notice a lag in your robot receiving commands. You can toy around with delays in the Arduino code to see if this helps. Sometimes it just requires trial and error. I am not sure what experience other folks have had with it, but my demo experienced slight lags which can be seen in the video I posted.
Thanks! I shall keep on with my trial and error. Another question I had was about the String repository line. It is in the section with adjustable settings like IP of the server and port. Does this line have to point to a specific file on the server?
Thanks again
Please provide sample code as it is unclear what you are referring do. Suggest contacting me offline @ picoware at gmail dot com.
What webserver are you using? On the computer? Because some say that you could have a webserver on the Wifi shield?
Sorry for a noob question, This is my first time to make this kind of project for my final project design. Hope you could reply 🙂
Im using a PC based webserver. However, you can likely use the webserver locally on the device (i.e Spark Core, Raspberry Pi) provided it can handle the throughput.
What I’m going to do if I would want to add commands on the 8 other buttons?
That’s somewhat of a vague question.. You can do whatever you robot and imagination leads you to? Each command button allows for a single unique parameter to be sent. Maybe you want to use them to trigger an LED on and off. Lots of things can be done.
Sorry for that, my bad. What I mean is what or is there any changes that i will do to the WiFi bot control sketch if ever i will add commands, like for us we plan to add an arm on it.
And one more thing, we do not have available adfruitcc3000 here so is arduino-ethernet-shield-standard router could be a possible replacement? and if ever it could be, is there any changes that I will do on the Wifi bot control sketch?
Anyways what are the use of those server files? Are those still usefull if ever we would want a local webserver.
when i compile the arduino sketch it always have errors ”’ it says ‘ ‘Adafuit_CC300’ does not name a type . . .how to fix this??
Did you change the default name for the instance of the CC3000? Your spelling “Adafuit_CC300” is not what is provided in the sample code provide for the CC3000 from Adafruit. It is “Adafruit_CC3000“
That’s it ! I have compiled it already :)) thank you sir,
Can I add 3 or 2 different speed of motors?
You can do whatever you like as long as you find a way to use the data being passed.
can I ask? I have arduino mega and CC3000 .. i downloaded the sketch .. I changed the name,pw, and sec type of my wifi , when i compile it there’s no error .. all the connections and pin condigurations are okay .. but when i upload the program and and run the control of wifibot control apps .. nothing happens.. what’s wrong?? do i need to change your setting on the other files I downloaded??
Have a look at the FAQ at the bottom of the page.
on wifibot control pro setting , i filled the data processing url with – http://www.yourserver.com/cc3000sample/updatestate.php?
is that correct? my problem is that the arduino cannot receive the data beingsent from my android phone ..what is wrong? can you help me? thank you . I cannot finish my prototype because of that problem .
Hi. Have a look at the instructions again. You have to replace “yourserver” with the domain name or IP address of your webserver.
if i replace “yourserver” with the domain name or IP address of my webserver ,do i have to change other settings like on the php files or other files you uploaded? thanks
You have to replace “yoursever” with the name or IP address of your server. Not sure what other settings you are talking about. Have a look at the instructions again. Pretty sure there are no other settings that you have to change. It’s really up to the user and can be customized somewhat.
is it possible cmos camera for video streaming instead of ip camera?
Yes possibly and no… The possible yes: “The app only cares for a URL that will be able to produce a video stream in the window provider. If you can find a way to convert the cmos camera to some sort of web-based video stream that works, then it should. Short answer – no.
Hi
I am interested with your project and planning to do it soon
Where I should install the webserver files? and how is the step? it’s still unclear to me
Hope you can help me
Thank you
Hi, details are provided here in this posting and the FAQ. However, this presumes users have an understanding on the set-up or use an webserver. Once you have the server setup, you can follow the instructions provided here.
I see that you used pc to run the webserver
have you succesfully installed the webserver on adafruit wifi shield?
At the time of writing this project the Adafruit libraries did not have that functionality. I have not had time to do it, but understand it is possible now. If you do it, drop me a line with sample code and i will add it here.
can you please mention the complete coding of this robotic car by using the joystick.As i am working on beaglebone black board to run car wirelessly with robotic arm.i am confused for programming.can you help me out of this.?
Unfortunately, I’m not familiar with Beaglebone, but the supplied Arduino example should be easy to adapt to that platform.
When I move the joystick, the values that are updated are only 9 as shown below.
{“mode”:null,”xval”:”9″,”yval”:”9″,”udlr”:”U”,”cmdVal”:”9″}
Could you please help me to solve this problem.
Is the server files that you included in the download section ok?
If you read the details about the app, it notes this. The idea is that the free version will allow you to build a robot to test and “see” the values of 9 in your Arduino. The Pro version unlocks these values and will return correct numbers.
Thanks. Could you please tell me how can I make the polling time and time of information sent be the same? Because the time for which the values are updating on the microcontroller side is not corresponding to the signal I am sending from the application.
If I understood your request correctly, you would have to test playing with delays in the sketch. However, you will want to be careful as there are factors outside of both the app and the sketch. For example, WiFi traffic on the network for which you are running your robot. i.e. if someone is watching Netflix or playing online games – this may affect how fast the robot responds to control.
Dear sir,
i am using ARM cortex LPC1343 board and i connected wifi module to my board and i also download WIFI BOT app but i dont know how to control my robot by using this app.So please provide required information to me.
Hi,
Thanks for trying out WiFi Bot Control. It’s hard to provide assistance with the limited information you have provided. Here are some thoughts:
1) Have you read all the set-up and FAQ’s here: http://www.plastibots.com/index.php/2013/11/26/wifi-bot-control-android-app-wifibot/
2) Have you downloaded the Arduino sketch to your micro controller?
3) Have you configured all the settings?
yes sir,I configured all the settings and is working with bluetooth module HC-05 and controlled by using aluetooth controlled app,but when i replaced with wifi bot app and i am using ESP8266 wifi module the commands was not receiving by robot.
Which app are you using? WiFi Bot Control or BT Bot Control? You said you had it working with a bluetooth module, so you must be using BT Bot Control. If you want to switch over to a WiFi module, you need WiFi Bot Control. Contact me offline at picoware at gmail dot com if hou have further questions.
Actually i am not working with arduino.
I use wifi shield and i include “server.begin()” and aREST library in my skatch. Now i dont understand server and interface part with app. have i need any local host?
if i make local host make in my pc is it work?
if i know no need local host in my pc how to send and receive data and how to hendle json file?
Please help me
Hi. Please ensure you follow through the instructions here as well as read the FAQ. Most of these questions are addressed already. If you are still stuck please use the contact page.
im doing my project with arduino uno and wifi shield ..where can i get the code for arduino for this app.
Did you read the details and FAQ in this post? The info you are looking for should be there…
Is it possible to control motor speed with BT Bot? Thank you!
Yes. Per our email discussion, it’s built into the sample sketch provided. However, the intent if that sketch is for users to customize to their needs. The sample demonstrates a ‘staged’ sort of speed control. Depending on the power of your setup, this can be made more robust, or more simple (i.e. left, right, fwd, back, stop). The sample sketch provided was built for a Digispark and the motor controller add-on for it.
Hi, any change you are working on a newer version. I love to see some new options like having 2 Joystick on both sides a better way of showing the push data. With some sort of widgets etc.
Unfortunately no, this app has not seen any new development in some time. Currently no plans to expand on features. Thanks for your interest though.
Is possible to use the ESP 8266 module?
It should work.. WiFi Bot Control was build before the ESP was even thought of. This app required a separate webserver to process requests and pass them along to the Arduino controller. Given the ESP can act as both a webserver and arduino-compatible controller, it may kill two birds with one stone. I haven’t tried it, but would like to know if this works. If you go down that avenue, please report back. I am interested in knowing if it works as it would cut out the “middleman”.
Did it work with ESP8266?
Please let me know, i’m doing my final year project on that.
This was built well before the ESP was out. However, the principles are the same and the ESP makes it even better as it can act at a web server to receive the commands. Haven’t tested this myself, but dont see why it couldn’t be made to work. Remember, it’s not WiFi Bot Control that needs to work, it performs the same duty regardless of the micro-controller. It’s what you build on the microcontroller and where the web server is located. I suppose BT Bot Control will also work with an ESP32 as it has Bluetooth capabilities… Waiting for someone to test that…
Yes i agree, but ESP826 has many library issues compared to CC3000.
Furthermore, to make the webserver using ESP8266, what are the parameters needed?
The parameter depends on the url of the app..
Can someone please try an example using the ESP8266
And post the codes (Arduino+Webserver) and schematics please.
That would really help me out.
The ESP is far better than the CC3000 IMHO. I gave up on that device even before the ESP was out. You have to think of WiFi Bot Control being independent. It send parameters via HTTP to a URL – that’s it. Forget about the input to the app for now, and just focus on the joystick output and parsing it on the ESP. Why not try it yourself? Just download the free version and get an ESP. The only different is that it sends 0’s for x & y. You can still build and test it. There are plenty of examples of ESP web servers out there and I am sure you can find samples that parse HTTP input into variables. After that, you can hack in the sample code provided with WiFi Bot Control.
I work on something using the nodemcu board together with a motor shield for it.
Also i have done some interfacing with node-red
Hello!
I know this is old post but…
What about one that I can control the camera position too? I mean a app with 2 joysticks, one for the car and another to camera and obviously mechanism to move camera.
Can you help me?
There are no future plans to modify this app. Have you tried Blynk? It’s very good and they just added a video streaming feature to the Andriod version (with iOS likely to follow).
can you please send code for this app using arduino software
Ummm… Did you read the post? It’s noted in there. 😉
how we can use this app using nodemcuesp8266and arduino IDE software for controlling bot.
I don’t see why not – it’s all Arduino based. Sample code just needs to be updated. It would be interesting to see if you could also use the Node as a webserver to hold the json file as well. If you get it working, let me know.
bro can u pls update the pin dig for Esp8699 it will be useful for beginners like me 😀
I think you meant ESP8266. I’ve already provided a sample using NodeMCU (based on an ESP8266). Google is your friend if you need to find more… A little elbow grease is necessary here. 🙂